I'm ready for the challenge of "longest post", so brace yourselves!....
Firstly - I'm still working on a universal cart / disk emulator board, and it's something I've been wanting to build for many years. Yesterday, I FINALLY sent off for the first 3 prototype PCBs to be manufactured.
For those of you who hadn't heard about Marshall's project, my PCB is basically my "spinoff" from Marshall's, and a lot of credit goes to him for testing the N64 / CF stuff on real hardware and getting the code up-and-running. AFAIK, he's still busy working on the bootloader code for the N64, so hopefully it won't be long until he gets the new board running...
http://forums.benheck.com/viewtopic.php ... 93#p419493" onclick="window.open(this.href);return false;
http://forums.benheck.com/viewtopic.php?f=5&t=33012" onclick="window.open(this.href);return false;
My PCB will be similar to Marshall's, but I thought about the possibility of making a "universal" emu board...
If I haven't made any huge mistakes with my own PCB design (AND if I can successfully solder the FPGA properly), it should be possible to emulate ROMs for multiple different systems (ie. on REAL consoles). The N64 is the first target, and that should be fairly straightforward assuming the PCB will work as expected.
btw, the first version will have 64MBytes (512Mbits) of SDRAM onboard, so it should handle some fairly big ROMs.
It should be possible to add different "harness" cables for other consoles like the SNES / Genesis etc. Eventually the idea is to directly emulate certain custom optical drives too (like the GC), but it might be a long while before it works properly.
Anyway, that stuff is for another thread, and when (if) the first board works, I'll start another thread.
OK, the point of this post (like the title suggests) is to discuss a possible method of slimming down the GC DD drive. I know this would be handy for a lot of you with portables, so I thought I'd mess around with an idea while I'm waiting for the cart emu PCBs. I don't know if this idea has been mentioned before or not?...
Before I explain - I have NOT got this working yet! Please keep this in mind at all times when reading through this huge post. Also, I've frankly lost patience with this experiment for the time being as it's not much fun to do the soldering and work everything out (I don't plan on building a portable any time soon anyway).
Basically, I wondered if the GC DD control board could be hooked up directly to a slim laptop DVD drive mechanism... I first had to find the pinout of the sockets on the GC DD controller. Luckily, some of the signals on the GC controller board are labeled, but I had to use my trusty ancient o'scope to try and figure out the rest of the pins.
It might be easier if a better type of laptop DVD drive can be found, so I simply present this info here for anyone else who is crazy enough to try it on some other drives (don't say it! lol)...
Some of the pins for the laser pickup are hard to determine, and there are many factors affecting whether or not this experiment will even work. The donor laptop DVD drive needs to have very similar properties to the original GC DD mech...
. The laser pickup focus / tracking coils need similar resistances.
. The optical design needs to use a similar method to the GC (3-beam / similar signals and voltages.)
. The photodiode layout / amplifier chip needs to be similar.
. The laser sled motor speed / gearing need to be similar.
. The spindle motor needs to be of a similar type (brushless, 3-phase, three hall-effect sensors).
. You get the idea.
As most of you will know, GC disks are basically just mini-DVD's (apart from the copy protection stuff), so you'll only need to use the RED laser diode of the donor laptop drive. I think the laser wavelength is around 650-660nm, but that shouldn't matter too much. (Any laptop DVD-ROM or DVD-RW drive is a possible candidate. At first, it will just be pure luck to find the best drive for this "mod").
The laptop DVD drive I started playing with is a Quanta Storage SDR-083 DVD-ROM drive. The laser pickup and spindle motor use Panasonic control chips, and the main chipset of the drive is the Mediatek MT1326F. I could NOT find any full datasheets for the Mediatek chip, but I did find the one for the spindle motor chip.
(These datasheets are just an example for MY Quanta drive of course, NOT for the GC - I couldn't find much on the GC DD control chips)...
http://www.datasheetcatalog.org/datashe ... 005BEB.pdf" onclick="window.open(this.href);return false;
And a similar datasheet for the laser pickup chip (it's actually a HUL7208, but the HUL7207 appears similar)...
http://www.datasheetcatalog.org/datashe ... UL7207.pdf" onclick="window.open(this.href);return false;
Finding the correct pinouts for each chip is hard enough, but ideally you'll want to connect the GC DD controller to the ribbon cables of the laptop drive mech. This takes a ton of messing about with a multimeter to find the connections. You then have the problem of how to solder some wires to the tiny ribbon cable or to the closely-spaced connector pins.
I messed up the laser pickup ribbon connector on my laptop drive, so I had to start soldering some Kynar wires directly to the end of the ribbon instead. This is NOT fun, so I chose to give it a rest for a while.
OK, so back to the GC pinouts...
Here is my "best GUESS" of the pinouts for the 20-pin LASER PICKUP ribbon connector on the GC DD controller....
1. Focus Coil - (minus)
2. Focus Coil + (plus)
3. Tracking Coil - (minus)
4. Tracking Coil + (plus)
5. VREF1 (around 2.20V).
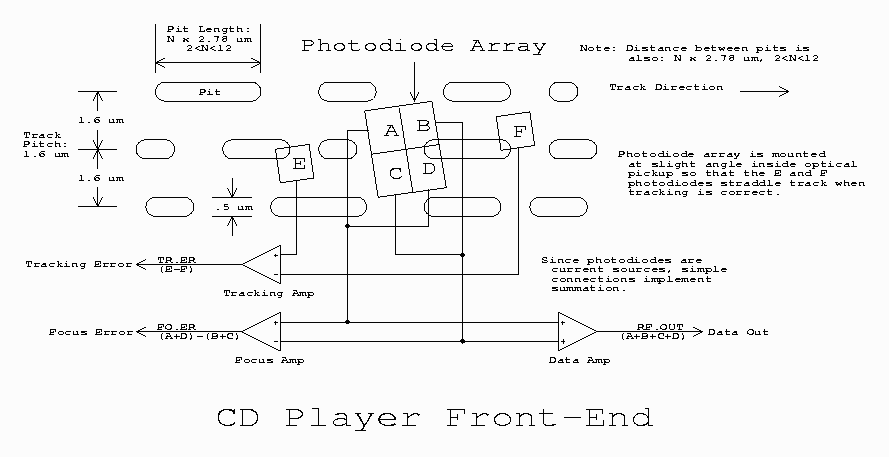
6. Not sure (tracking photodiode?) - goes via R406, DC biased at around 2.04V, 190mV pk-pk.
7. Not sure (tracking photodiode?) - goes via R405, DC biased at around 2.04V, 190mV pk-pk.
8. Photodiode? (possibly NC).
9. Photodiode?
10. Photodiode ?
11. Photodiode ?
12. +5V !!
13. RFP (RF data positive).
14. RFN (RF data negative).
15. +5V !!
16. "PIN" (laser power monitor photodiode I think.)
17. ?
18. GROUND / LD - (minus)
19. ?
20. LD + (plus)
Pin 8 was DC biased to 2.14V, and was around 130mV pk-pk. "A" photodiode ?
Pin 9 was DC biased to 2.14V, and was around 90mV pk-pk. "B" photodiode ?
Pin 10 was DC biased to 2.14V, and was around 90mV pk-pk. "C" photodiode ?
Pin 11 was DC biased to 2.14V, and was around 130mV pk-pk. "D" photodiode ?
RFP (13) was DC biased to 1.75V, and was around 190mV pk-pk.
RFN (14) was DC biased to 2.68V, and was around 190mV pk-pk.
As you can see, a lot of the photodiode pinouts are incomplete, but it just might be possible to hook up most of the "known" stuff, then swap the photodiode connections until it can read a disk.
OK, then there's the spindle motor... It's actually fairly straightforward (compared to the laser pickup)...
The Gamecube, and many laptop DVD drives use a brushless 3-phase type motor. It's just three coils spaced 120 degrees around the motor (or interleaved coils, I'm not too sure?) and the coils are in the "WYE" configuration. There are also three hall-effect sensors which detect the magnetic fields and give feedback to the controller to maintain the correct motor speed etc.
The hall sensors on the GC spindle motor are small 4-pin types, the sensors in my Quanta DVD drive look similar, but I don't imagine I'd ever find the datasheet for them. Luckily, the motor seemed to work fine when I hooked it up to the GC DD board...
Here's the pinout for the 12-pin SPINDLE MOTOR ribbon connector on the GC controller (tested with laptop motor, appears to be working)...
1. VH- (Hall sensor negative bias).
2. H3- (Hall sensor 3 minus).
3. H3+ (Hall sensor 3 plus).
4. H2- (Hall sensor 2 minus).
5. H2+ (Hall sensor 2 plus).
6. H1- (Hall sensor 1 minus).
7. H1+ (Hall sensor 1 plus).
8. VH+ (Hall sensor positive bias).
9. M1 (Motor coil, phase 1).
10. M2 (Motor coil, phase 2).
11. M3 (Motor coil, phase 3).
12. GROUND (shield / screw).
The laser "sled" motor on the Quanta was FAR simpler. It just uses a small DC motor and the gearing is a similar ratio to the GC DD. So the two wires from the GC DD board (usually brown and red) connect directly to the sled motor. You might need to test the polarity though; when the Gamecube first powers up, it moves the laser sled towards the center of the disk - if it moves outwards, then the wires will need swapping.
There is no "limit switch" on the original GC DD, so it simply forces the laser sled against the end-stop for a while to "zero" the laser position.
OK, as I said, I never finished testing this theory but I might come back to it once I can afford to buy some more laptop drives (missed a whole joblot on eB*y earlier - damn it!). If the connectors weren't so small, I would have a much better chance.
I did hook up the motors and the laser diode, but I've yet to try soldering the rest of the wires for the laser pickup (VREF, RF, photodiodes etc).
I think this post is long enough now, so here are a few photos of the "experiment" (yes, you're correct, my camera is CRAP
http://img231.imageshack.us/g/quantaslimmech.jpg/" onclick="window.open(this.href);return false;
OzOnE.

