My FC Twin (SNES only) plus Polycase SL-64 project

Includes but not limited to: SNES, Genesis, Sega CD, PlayStation 1, Nintendo 64, Dreamcast, Game Gear and I guess the Virtual Boy.

Moderator: Moderators

grahf
Posts: 370
Joined: Fri Jun 23, 2006 7:08 pm
Location: Tokyo Japan

My FC Twin (SNES only) plus Polycase SL-64 project

Post by grahf »

Hey guys. Its been a while since I posted anything. I moved to Japan and have spent the last year studying, so my time (and cash) is short. Nevertheless, I have been working on a new project here and there. My progress on this is going to be pretty slow, but I decided to upload some pics and at least get a thread started.

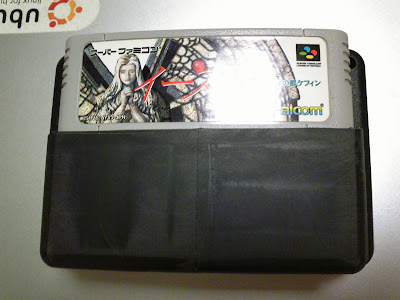
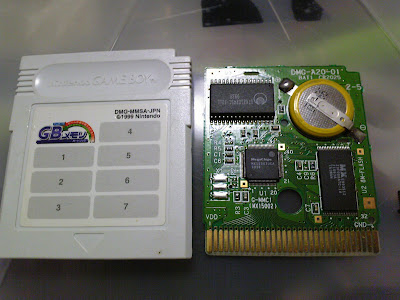
Since i'm in Japan, I decided that it would use SuperFamicom carts. These happen to be a little smaller than SNES carts (they are the same as the PAL SNES carts), so I could use the smaller SL-64 case. My main goals are to make this thing as small as possible, and to be able to charge via a USB port. If I can keep the power drain under 500mAh, it will be able to play while its charging. Screen size will be 3-3.5".

Components so far:
FC Twin, SNES board only
Polycase SL-64 case (6x4x1.1")


Here you can see the FC Twin system + video board draws 290mAh w/ cart. If I can find a screen that draws under 200mAh, charging-while-playing via USB will be no problem. You can also see my li-poly battery pack. It charges via USB, and outputs 5v. Thats the basis for the battery setup on this system.

Image


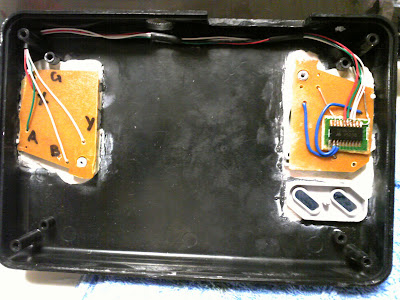
The main board is very tiny, and fits entirely into the smaller part of the casing. I removed/flattened all the components, except for those two diodes at the front. I also re-worked the 2nd player port so that it fits flat on the board, and also is tucked back in.

Image

Image


Here is some more of the 2nd player port. I carefully notched the port and the case, so that it is locked tightly in place when closed. It will keep any strain off of the PCB when inserting a second controller.

Image


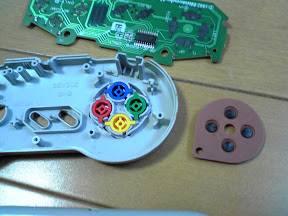
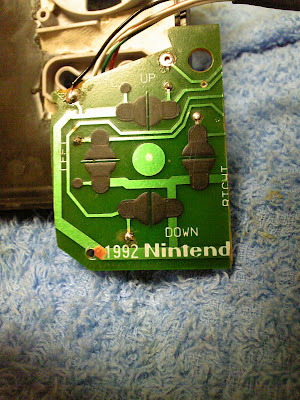
I HATE tact switches except for start/select/R/L, so I decided to use another d-pad pcb and contact pad to shrink down the button assembly. Space on either side of the screen is going to be tight, but This will allow me to have OEM feeling buttons. These are just some rough initial trimmings.

Image

Image


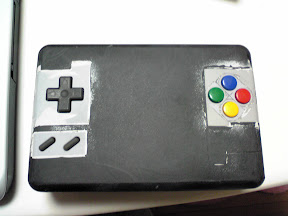
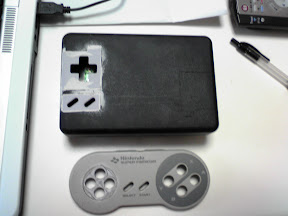
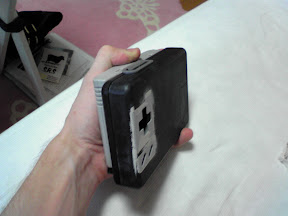
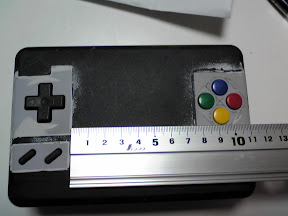
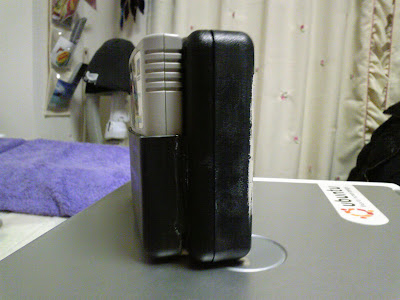
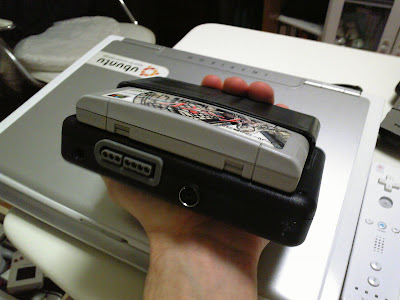
A pic of the overall size of this case. It will be only a little thicker than 2 SFC carts. The bottom half of the cart will be enclosed in a sleeve, once I find a nice sheet of plastic I can heat into the right curved shape.

Image
Last edited by grahf on Mon Jul 28, 2008 12:22 am, edited 1 time in total.
Life of Brian
Moderator
Posts: 2867
Joined: Wed Aug 03, 2005 5:55 pm
Location: Oklahoma
Contact:

Post by Life of Brian »

All I'm getting are broken links for the pictures.

Going from what you've written, it sounds like a kickass project. Your work is always top notch.
dragonhead wrote:sweet. ive spent a third of my life on benheck!
Image
grahf
Posts: 370
Joined: Fri Jun 23, 2006 7:08 pm
Location: Tokyo Japan

Post by grahf »

Thanks man. I switched the pics to another host. And don't mind the pink carpet, its my girlfriends house :)
grossaffe
Posts: 1450
Joined: Thu May 29, 2008 11:54 pm
Location: USA

Post by grossaffe »

Looks nice, I hope it turns out well.
Sharp Sapphire
Portablizer
Posts: 415
Joined: Fri Feb 22, 2008 9:40 pm

Post by Sharp Sapphire »

Looks very small.... where are you gonna fit the speaker/screen/batteries?
Things I need to purchase for my NES Laptop:
1X PSone screen
6X 1.2v 3500mAh sub-C's
1X 1/8'' to RCA stereo Adapater
1X Radioshack repair kit

..yeaaaaah...
grahf
Posts: 370
Joined: Fri Jun 23, 2006 7:08 pm
Location: Tokyo Japan

Post by grahf »

If I go with a 3" screen (I have one already, but the resolution is a little low), then I can fit it ok. A 3.5" screen should be doable, but it depends on how tight I want to make it and the size of the LCD border. The

The battery pack in the first pic actually contains two separate cells. There will be enough room to fit them between the system PCB and the buttons.

The start/select will go underneith the d-pad, and the speaker will go under the ABXY buttons. I decided on mono sound for size reasons, and also because stereo isn't that effective since its only 6" wide. There will be a headphone jack for real stereo though.
Valium
Posts: 1412
Joined: Wed Jun 06, 2007 12:08 pm
Location: Nova Scotia, I'm over from kurt

Post by Valium »

Beautiful so far, and from the looks of it, it'll stay that way.

When finished, will it be the smallest SnesP made here?
Image
Life of Brian
Moderator
Posts: 2867
Joined: Wed Aug 03, 2005 5:55 pm
Location: Oklahoma
Contact:

Post by Life of Brian »

It's definitely one of the smallest. The Super Portendo by Turbo Tax is the closest I can think of. The SuperNESToGo by beanflip is another small one, but I don't recall if either has internal batteries.

The case you're using is simple and elegant, and I'm really digging how you're using the 2nd player port.

I was just thinking - if you didn't have enough space for your super amazing battery (which you've had for months, as I recall), one could use something like this voltage booster or some cheaper equivalent from TI or whatever to use just one 3.7v li-poly cell to get the needed 5v, assuming your screen can run off of such a low voltage. I know AEI Comp screens can. Rekarp's work on his Flashback-in-a-cart got me thinking about this, and with low draw systems like these SNES and NES clones it might be a good way to shed some size and weight from a system. Dimension Engineering's stats on their LVBoost says it's typically 85.6% efficient, up to 92% max while providing up to 800 mA current at 5v.

So what I guess I'm trying to say is if I were to copy you someday grahf, would that be a good idea?
dragonhead wrote:sweet. ive spent a third of my life on benheck!
Image
project_failure
Posts: 812
Joined: Sun Dec 25, 2005 4:04 pm
Contact:

Post by project_failure »

I agree with you grahf stereo is not exactly noticeable when the speakers would be so close. Looks like this is going to turn out great.
Sword_Gun wrote:Klef your asking a whole bunch of videogame players.. for girl advice.. Nice.
It is not junk! It is assorted goods with no current use.
-Project Failure
grahf
Posts: 370
Joined: Fri Jun 23, 2006 7:08 pm
Location: Tokyo Japan

Post by grahf »

Life of Brian wrote:Portendo by Turbo Tax is the closest I can think of. The SuperNESToGo by beanflip is another small one, but I don't recall if either has internal batteries.
I actually own a SuperNEStoGo. He was nice enough to have another case made for me, and I put one together. It was NOT worth the money, on hindsight. It's nice, but not for the cost. I prefer polycases these days :). (Actually, my SuperNEStoGo DOES have internal batteries. Two tiny li-ion cells that last about 2 hours. I never posted it here since it's not really my work).

The battery pack I got <i>should</i> fit ok. In either case, I can use the PCB from it even if I don't use the cells. It has charging/voltage boost/protection circuitry all in one, so it's pretty good for a start. The "pocket power" batteries are getting pretty common, and they seem like great things to use for parts.

I did some work over the last few days. Finished rewiring the cart slot, and finally tested it. I also finished installing the d-pad, start/select and buttons in the case. R and L will be done later (still haven't decided on buttons). You can view my entire photo album here: http://picasaweb.google.com/rioninja/Projects" onclick="window.open(this.href);return false;

-----------------------------------------------------------------------

Space is at a premium, so I used a second controller d-pad PCB/contact pad for the ABXY buttons. I picked up a few controllers for $1 each.

Image

Image

The case is getting there. It's still going to need a more sanding, but Im happy with it so far. Everything is super solid, and both PCBs and contact posts on the inside mount using their original posts. Took me a long time trimming everything, but I think it was worth it.

Image


Some views showing the overall size:

Image

Image

Image

Crappy hipgear LCD test. (I've got a hipgear/GBO/Powerjoy project on the back burner).

Image
Life of Brian
Moderator
Posts: 2867
Joined: Wed Aug 03, 2005 5:55 pm
Location: Oklahoma
Contact:

Post by Life of Brian »

It's so thin! I really hope all of the dimensions work out well.
dragonhead wrote:sweet. ive spent a third of my life on benheck!
Image
grahf
Posts: 370
Joined: Fri Jun 23, 2006 7:08 pm
Location: Tokyo Japan

Post by grahf »

Everything should be ok (I hope!), I just need to figure out the screen. I was hoping to fit a 3.5" screen, but i'll have to settle for 3". I have a 3" RGB modded Casio EV680 screen on hand, that would fit fine, except its too thick. It's sandwiched, and measures about 1". I only have maybe 18~20mm to spare for a screen :cry:. If I used the Casio screen I would have to have it protrude from the case, and I don't really want to do that. Or at least, I don't want it to protrude above the buttons.

In any case, i'm sure I can find something to fit. There are a lot of thin screens out there. Just gotta find one :). In the meantime, after I wire up the batteries/controller, I think i'm going to pop an s-video jack on there and play it on the TV. Sega MegaJet style 8). It's been a while since i've played any SNES, and I picked up a few games since i've been in Japan.
lovablechevy
Portablizer Extraordinaire
Posts: 1104
Joined: Wed Nov 01, 2006 3:09 pm
Location: busy with a project
Contact:

Post by lovablechevy »

it's looking amazingly awesome! can't wait to see more!

what are your thoughts on that specific case...? i've debated using it for a future project.
they call me the Queen of Bondo, though maybe i should be called the Queen of Epoxy Putty

Image

current project - code name: blue mushroom!
grahf
Posts: 370
Joined: Fri Jun 23, 2006 7:08 pm
Location: Tokyo Japan

Post by grahf »

Thanks :)

It's a great case. Since it's not that wide though, space for screen/buttons is kinda tight.
grahf
Posts: 370
Joined: Fri Jun 23, 2006 7:08 pm
Location: Tokyo Japan

Post by grahf »

I did a little more work over the last few weeks. Not much, just found myself a nice curved piece of plastic to make the cart slot cover with. I gave it a bit of trimming and bonded it together. It came out pretty good. Needs a bit more sanding and some epoxy for filler around the bottom/sides.

Image

Image

Image

I also finished the d-pad and ABXY controls. Still have to do the LR and Start/Select. I did the PCBs in the same way as my last few portables: drilling through the board with a tiny bit and soldering. I do it this way so the wires don't interfere with the rubber contact pad. Works pretty good :wink:.

Image

Image


Also, here is a random pic of an official Nintendo GB Memory Cartridge". As far as I know it can't be programmed with most "other" backup systems, but it has Kirby on it so it was worth the ~$10 :).

Image
Post Reply