marbs N64p progress log (yes, there are pictures!)

Includes but not limited to: SNES, Genesis, Sega CD, PlayStation 1, Nintendo 64, Dreamcast, Game Gear and I guess the Virtual Boy.

Moderator: Moderators

marbs
Posts: 43
Joined: Sat Apr 19, 2008 2:44 pm

marbs N64p progress log (yes, there are pictures!)

Post by marbs »

I'm quite new here, so hi! :D

Anyway, I thought I'd make a progress log (plog?) for my N64p. It's my first portable, though I have had some prior experience with electronics doing simple projects at school, which fortunately invloved soldering (yay!).

I've been taking many photos as I go along since I got a snazzy camera for my birthday the other week, and when I'm done making the N64p I'll write a guide as to how I did it so that hopefully other people can learn from me how (or how not) to make an N64p :lol:

You've probably had enough of me blabbing on, so here's some lovely pictures of where I'm up to. Beware 56kers - they're quite big!

Never have I been so happy to see the "Controller is not connected" screen
A general overview of what's there

And I also thought I'd upload this diagram I made incase anyone would find it useful:
Diagram of how to connect PSone to N64
I plan on eventually extending this to a full N64 wiring diagram.


I'll try and keep this updated as I go along, and I may even have a question or two to ask if I get stuck. So far the casualties list is nil, aside from I broke my copy of lylat wars by inserting it in the cart slot backwards, and I burned my finger! :D
Last edited by marbs on Sun Jun 15, 2008 5:20 pm, edited 3 times in total.
DK
Posts: 1107
Joined: Fri Jun 30, 2006 4:00 am
Location: None of your business pedo nerds

Post by DK »

Seems to be going to plan. Congrats :D

And great to see another Brit on the site. Think you and Bacteria might get along well.

Oh and the ZN-40 might be a bit of a squeeze to fit a N64 in but it's possible. Seems a popular case around here. Couple of SNEses in them, a Playstation and now this.

Good luck :wink:
Image
bacteria
Portablizer Extraordinaire
Posts: 3984
Joined: Fri Apr 20, 2007 12:14 am
Location: Hampshire, UK
Contact:

Post by bacteria »

If you need advice marbs, ask here, or PM me.
Image
NixonTech2071
Posts: 79
Joined: Thu May 01, 2008 7:09 pm

Post by NixonTech2071 »

Has a very clean arrangement, nice job!
I cant hack yet... But I can help with "LazyMods"!!!
GoldenfrankO
Posts: 1490
Joined: Sat Apr 19, 2008 7:40 pm
PSN Username: FullFreak
360 GamerTag: GoldenfrankO

Post by GoldenfrankO »

That's great so far. Keep up the good work.
Image
Dbstew
Posts: 65
Joined: Wed Apr 02, 2008 4:35 am
Location: The Netherlands

Post by Dbstew »

Looks like you know what you're doing. Very nice schematic btw!
WhatULive4
Posts: 329
Joined: Fri Mar 28, 2008 6:19 pm
Location: Saskatchewan, Canada

Post by WhatULive4 »

Your name and avatar are familiar... are you on the NESDev forums?
marbs
Posts: 43
Joined: Sat Apr 19, 2008 2:44 pm

Post by marbs »

@DK
Yeah, I've looked at the dimensions and it would be a tight squeeze, but I reckon I could squash it all in :D

@bacteria
Thanks, I probably will at some point.

@NixonTech2071
Hehe, I like to keep it neat and tidy!

@Goldenfrank0
Thanks, will do.

@Dbstew
I'm just figuring it out as I go along based on research at this forum :lol:
And thanks, I like to have a nice diagram so that I know exactly what I'm doing.

@QhatUlive4
Nah, I'm not on the NESDev forums, the main other site I visit is 64digits, though I used to be active at the GMC. I am registered at the digitpress forums but haven't really said much there.


Thanks again for all the replies, I've got an exam in a few days so progress will probably slow down since I need to revise :(

[edit]
Just ordered the ZN-40 case from polycase. I'm gonna have to buy a dremel so I can lop the top off my PSone mobo because with it's current size it wouldn't fit :P
Sharp Sapphire
Portablizer
Posts: 415
Joined: Fri Feb 22, 2008 9:40 pm

Post by Sharp Sapphire »

64Digits is so lame nowadays. :( Nice portable none-the-less, and for your diagram use different colors for the +3.3 and +7.2, makes it less confusing
Things I need to purchase for my NES Laptop:
1X PSone screen
6X 1.2v 3500mAh sub-C's
1X 1/8'' to RCA stereo Adapater
1X Radioshack repair kit

..yeaaaaah...
schmellyfart
Portablizer Extraordinaire
Posts: 1151
Joined: Sun Mar 05, 2006 8:29 pm
Steam ID: schmellyfart
Location: Gilbert, AZ

Post by schmellyfart »

The LED mod looks great! But you might want to make the leads on the leds shorter to prevent shorts.
marbs
Posts: 43
Joined: Sat Apr 19, 2008 2:44 pm

Post by marbs »

@ChIkEn :P
Yeah, it's gone downhill quite a bit in recent times, I wish it had stayed like how it was when I first registered :(

Thanks, and yes I'll update my diagram with different colours just as soon as I finish it off (which means figuring out the getting two voltages thing).

@schmellyfart
Thanks, yeah I probably do need to do that. I noticed my screen had a really bad flicker and was quite worried, until I noticed it was simply that two of my wires were shorting, so fortunately that was an easy fix.


And as for updates, I didn't get much done today due to other circumstances (took my lovely pet dog to the vets to be put down :( ), though I did get around to making this diagram on relocating the N64 cartidge slot:
Link to diagram, quite large
This diagram is mainly for my own use, since I was trying to figure out which wire needs to be connected where, and found it hard to visualise, so decided it would be best to photograph it all and draw it out. I decided to go for the SCSI cable to save having millions of wires all over the place, but decided against using header pins because:
A) I couldn't find any 50pin header things so I'd have to get two smaller onces and whack them together or a bigger one and cut it up.
B) It would mean spending more money!
C) I'd have to wait for it to turn up in the post.
D) I'd miss out on the joy of soldering 50 pins (well, 48 technically).
Pretty lame reasons I know (apart from the last one :P), however if I do screw up with the soldering I'll probably go down the header pins route.

And now I'm gonna go to bed.
bacteria
Portablizer Extraordinaire
Posts: 3984
Joined: Fri Apr 20, 2007 12:14 am
Location: Hampshire, UK
Contact:

Post by bacteria »

Solder wires from the joints on the N64 mobo cart slot to the N64 cart slot directly, rather than using an IDE cable.
Image
marbs
Posts: 43
Joined: Sat Apr 19, 2008 2:44 pm

Post by marbs »

I've come up with a basic design for what my N64p will look like:
Link to picture
The diagram is all to scale, so that I can see how things will fit. I think I might swap the D-pad and analogue stick thing around. It uses the ZN-40 case.

Today I've been working on the cartidge slot relocation. Using the SCSI cable was too fiddly, so I went for just using wire like bacteria suggested. This is what my N64 currently looks like (big image):
Wee floating cartidge slot :D
Out of the 96 solder joints, 86 are done. My soldering iron is quite worn out and doing the last 10 is increasingly tricky, so I might buy a new soldering iron tip tomorrow and finish it off then. I've spent around 2 or so hours doing the soldering so far and so I think I'm done for today.
Ben Cebhrem
Posts: 302
Joined: Thu Jul 05, 2007 12:00 am

Post by Ben Cebhrem »

Instead of buying a new tip, get some tip tinner and cleaner, or use 300 grit sandpaper to clean it off a bit (or finer sandpaper, really).
marbs
Posts: 43
Joined: Sat Apr 19, 2008 2:44 pm

Post by marbs »

Wow, it's been a long time since I've posted an update, but I have been doing work on my N64p. Progress has been slow due to exams and such, but now that is over, but I'm also back to school :(

Anyway, I'll dump here a load of info about the stuff I've been doing in no particular order other than when it comes to mind :P

I bought a new soldering iron and a glue gun :D

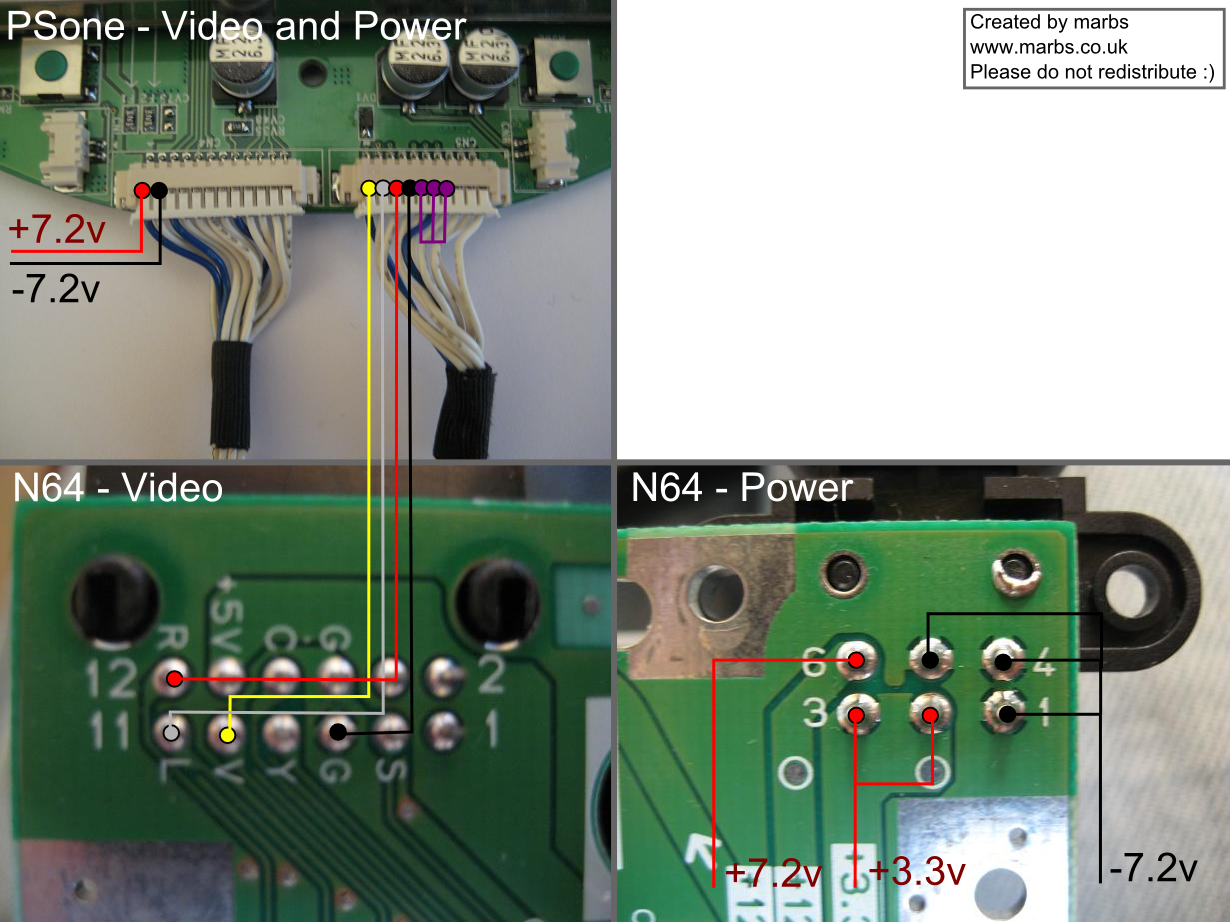
I got my 7.2v to 3.2v transformer working. First of all I wired it up like so:
Image
I tried to keep it as small as possible.

Then to test it worked I taped 5 1.5v batteries in series to get ~7.5v
Image
And according to my multimeter it outputs exactly 3.2v, yay :D

My attempts at cartridge slot relocation have gone badly.

Attempt #1:
Tried soldering each connection wire by wire:
Image
Unfortunately at the time I had a sucky soldering iron with a fat tip which made it really tricky to solder well.

Attempt #2:
Next I tried a similar technique, using a SCSI cable connector on one end to attach to the cart slot, and wires on the other end to attach to the mobo, however this didn't get very far either because I found the soldering too tricky :(
Image

Attempt #3:
This time I got some header pins and a SCSI cable. This was very easy to do, however I think I fried the N64. I can't find any problem with with connection between the mobo and cart slot, I tested each connection with my multimetere. The N64 power light comes on, but I don't get any signal coming to the TV. Might this be because I soldered without any heatsink on the chips?
Image
Fortunately I have another N64 :D

Due to this I have decided for this portable I won't relocate the cart slot, and instead I will adapt my initial design from this:
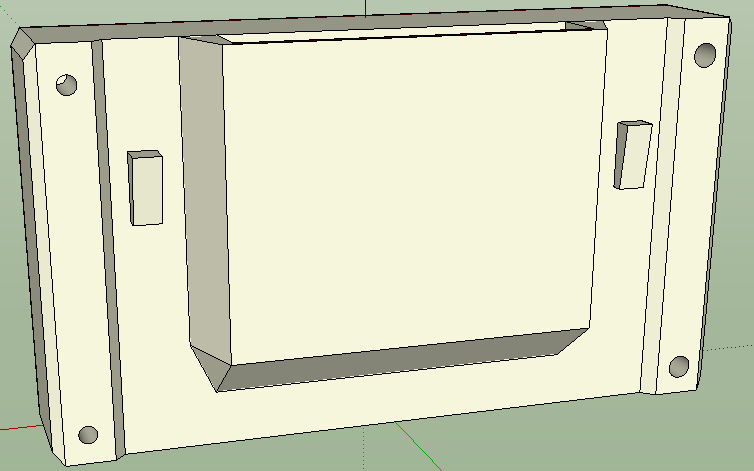
Image
To this:
Image
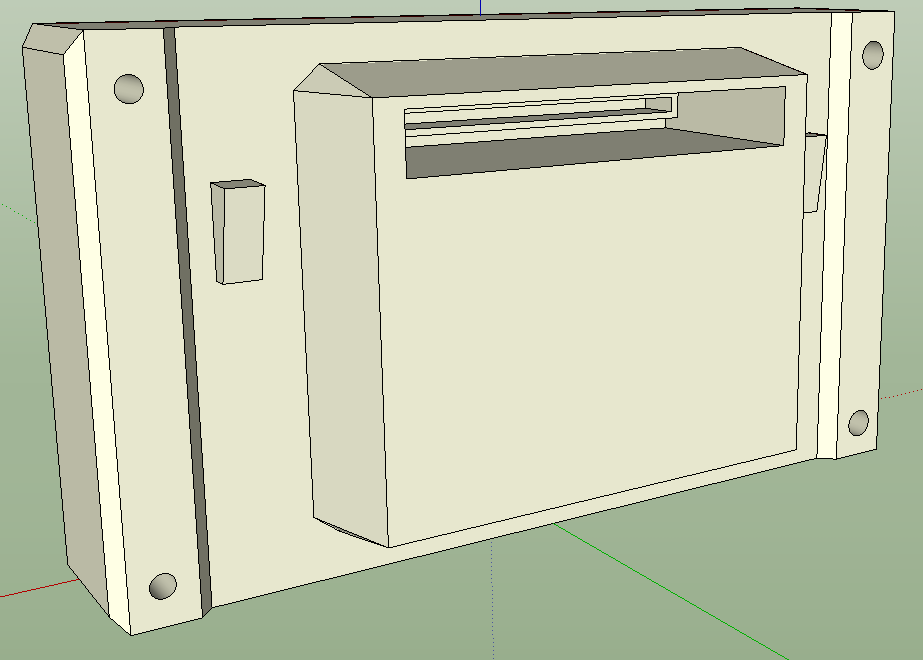
The disadvantage of this is that the cart is now perpendicular, which I don't really like :P however it gives me more room for batteries!

In good news, the case is coming on well. I got around to making the hole for the screen. By use of a soldering iron and a knife (and a cut finger :P) I hacked out a hole, and placed the PSone screen case (cut down) in it. It is now glued in place (tape is only temporary). When my milliput I ordered arrives (hopefully tomorrow) I will fill in the small gaps between the psone screen and the case. I will also soon get around to making holes for the buttons (not quite sure how I will do that yet, probably a similar technique to how I did the screen. Anyway here is a photo of the case:
Image
And for those of you wanting a size comparison of the ZN-40 case with an N64, here you go:
Image


I'm also not going to bother moving the N64 expansion port, I will just cut a hole for it in the case so it can poke through a bit into the battery compartment.


What I need to do next:
-Find a battery (Preferably at least 3 hours of play time, so that's like 5000mah? If anyone has any suggestions for batteries I should use (preferably from www.batteryspace.com or any other site that accepts paypal) then please let me know! :D)
-Wire up battery to transformer to screen and mobo (shouldn't take long)
-Wire up screen to mobo (won't take more than a couple mins)
-Hook up a controller (need to decide on whether to use an official one, or get a third party one and change the analogue stick to a PSone stick)

Any information or advice would be appreciated, and with that, goodnight! :D
Post Reply