Laptop style N64

Includes but not limited to: SNES, Genesis, Sega CD, PlayStation 1, Nintendo 64, Dreamcast, Game Gear and I guess the Virtual Boy.

Moderator: Moderators

evilteddy
Portablizer
Posts: 423
Joined: Tue Mar 25, 2008 2:11 am
360 GamerTag: Kirren of Smeg
Steam ID: kizzinator
Location: Newcastle, Australia

Post by evilteddy »

:D :D :D :D :D :D :D :D :D :D :D :D :D :D

OK so I don't use emoticons often but I am now because the psone screen is working again. I found the fuse everyone speaks of and to my lack of surprise it did not conduct when I tested it with the continuity tester on my multimeter. I spent a frustrating 10 minutes trying to bridge with solder but ended up ripping a pad off. I found a better place to the right for one of the connections, wired it up and I now have a working ps1 screen.

So I'm back to my record of nothing broken (Unless you count a surface mount fuse) but it would be nice to keep it that way so can I connect a fuse back in line using wire? Can I use any fuse or is it something specific?
Please give your ideas.
Neildo_64
Portablizer
Posts: 852
Joined: Sun Jan 29, 2006 9:09 pm
Location: Iowa

Post by Neildo_64 »

It can't be just any fuse, but I have no idea what it would need to be.
Image
Current projects:
Ultimate N64 Guide
N64 Portable (x2)
NES Portable
evilteddy
Portablizer
Posts: 423
Joined: Tue Mar 25, 2008 2:11 am
360 GamerTag: Kirren of Smeg
Steam ID: kizzinator
Location: Newcastle, Australia

Post by evilteddy »

Well I rewired the N64 so it is now more efficient and the load is less on the 7.2V line. So now I'm going for a battery test, keeping the multimeter out and checking voltage every so often so I don't cause cell death. The final project will have a jaycar kit to light up when I need to change battery or turn off.

The battery test is going well. I have two batteries and I'm so far up to 30 minutes with the lipo batteries at 11.9V so I have 3V to go. Because I don't have a fan I decided to get out a fan heater and use it for cooling the heatsinks. Don't get the wrong idea it is on the fan only setting. I'm not heating the N64 up it is cool as now. Heres a pic-
Image
evilteddy
Portablizer
Posts: 423
Joined: Tue Mar 25, 2008 2:11 am
360 GamerTag: Kirren of Smeg
Steam ID: kizzinator
Location: Newcastle, Australia

Post by evilteddy »

I just got the results back. One battery clocks in at one hour 50 minutes. I have two batteries so that is 3 hours and 40 minutes of play time. Not bad for 50 AUD worth of batteries.

EDIT: Well it turns out that the battery I haven't tested is damaged. Two of the cells are fine but the last one is under a Volt and my charger won't charge it. Because I hadn't used it at all the seller should replace it but it is ebay.
evilteddy
Portablizer
Posts: 423
Joined: Tue Mar 25, 2008 2:11 am
360 GamerTag: Kirren of Smeg
Steam ID: kizzinator
Location: Newcastle, Australia

Post by evilteddy »

Well a replacement battery has been returned and my Dad gave me more hot glue gun sticks which I've been running out of. All in all throughout this project I have used 6 sticks of hot glue in insulating, sticking things in place inside the case and redoing the above operations to satisfaction.

What I need to know is what is the best way to mount the fan. Sucking air into the case, blowing air out. I seem to remember marshall saying that you should mount the fan so it blows air out drawing more air in the other side over the heatsink. Is that true? It seems a bit counterintuitive.
bacteria
Portablizer Extraordinaire
Posts: 3984
Joined: Fri Apr 20, 2007 12:14 am
Location: Hampshire, UK
Contact:

Post by bacteria »

There had been debate on this a while back, although I am of the view that sucking air out is better as it will take longer for any dust to accumulate in the case and is more likely to give better airflow as air sucked out creates a tiny vacuum. It probably doesn't matter much though.
Image
evilteddy
Portablizer
Posts: 423
Joined: Tue Mar 25, 2008 2:11 am
360 GamerTag: Kirren of Smeg
Steam ID: kizzinator
Location: Newcastle, Australia

Post by evilteddy »

Well I mounted it sucking air out in the end on your advice Bacteria. I have put the two triggers in and they press very nicely. I used the original mushy pads for the triggers. The controls are coming along nicely. Earlier today my brother and I put in a team effort and got through the first level on james bond. He was on Z and R and I took command of the rest of the buttons. Now things are getting put in the right place I have tried playing the first level by myself and I finished it... just. I have also been hotgluing stuff like the motherboard, fan and stray wires into place. I hope to have this completed by next friday as we are going down to Sydney to see The phantom Of the Opera.

Oh and by the way Bacteria I quickly replaced the ps1 screen speakers (8 Ohm 1W) with some other cone speakers I had (8Ohms 1/3W). They are much bigger, louder and clearer. Thanks for telling me to change them.
evilteddy
Portablizer
Posts: 423
Joined: Tue Mar 25, 2008 2:11 am
360 GamerTag: Kirren of Smeg
Steam ID: kizzinator
Location: Newcastle, Australia

Post by evilteddy »

A quick update. I finished a battery monitor that will switch a relay when the level of the li poly batteries get too low. This is important because they don't have protection built in to make them lighter, smaller and cheaper. When the voltage of the battery drops below 9.3V it switches off power to the portable and only the protection circuit is powered which is in the realm of mA. In the future I will integrate a timer so red LED goes on and then a minute later power will be cut. I also have plans that will mean that the protection circuit will switch itself off meaning that discharged batteries could be kept in the portable without the small load from the battery protection circuit.
bacteria
Portablizer Extraordinaire
Posts: 3984
Joined: Fri Apr 20, 2007 12:14 am
Location: Hampshire, UK
Contact:

Post by bacteria »

Pleased you went for bigger speakers, the result is worth it.

Please detail how to make a circuit to introduce an LED on when a voltage gets under a level; (in my case, under 7v), I would find that useful, as it would give a few minutes warning before I start to lose power to the screen!
Image
evilteddy
Portablizer
Posts: 423
Joined: Tue Mar 25, 2008 2:11 am
360 GamerTag: Kirren of Smeg
Steam ID: kizzinator
Location: Newcastle, Australia

Post by evilteddy »

What I did was very similar to this-
Image
Description
R1, R3 2 1K 1/4W Resistor
R2 1 5K Pot
U1 1 LM339 Voltage comparator IC
D1 1 1N5233B Zener Diode
D2 1 LED
BZ1 1 Piezo Buzzer
MISC 1 Board, wire, socket for IC

Notes
1. The circuit will operate from 9V to 12V.
2. Adjust R2 until the alarm goes off at the correct voltage.
This one is from here

Once you have that you just hook up a relay to that so that it will switch off the load. Of course this one is 9-12V so it will not work for you but with a change to one of the resistors it should go fine.

EDIT: After looking at it again I think it might work fine measuring 7 Volts anyway. The one I made is similar to that and it can do 7 Volts. If that doesn't work then perhaps adding a small resistor between pin 12 of U1 and ground would help by allowing you to lower the value of the potentiometer further to keep the current flowing to the IC right. I think it will work without modification.

Of course you could probably also buy a kit from a local electronics shop that will do the exact same thing. For example-
kit from jaycar
evilteddy
Portablizer
Posts: 423
Joined: Tue Mar 25, 2008 2:11 am
360 GamerTag: Kirren of Smeg
Steam ID: kizzinator
Location: Newcastle, Australia

Post by evilteddy »

Well I have just finished the bottom half of the laptop. Everything has a hole in the side for it and is hot glued nicely in place. I am on to my second packet of hot glue gun sticks but unlike shockslayer I pull as much as I can off afterwards. The hinge is pretty ugly but it doesn't get in the way of playing and allows me to get to the guts easily. Here are some pics, sorry about the orange tint-
Image
Case with the lid down.
Image
Close up of the hinge.
Image
Close view of the guts with the lid up. I will easily be able to change batteries this way.
evilteddy
Portablizer
Posts: 423
Joined: Tue Mar 25, 2008 2:11 am
360 GamerTag: Kirren of Smeg
Steam ID: kizzinator
Location: Newcastle, Australia

Post by evilteddy »

Well the portable is finally finished. I've been sick and bed ridden for the last few days but I finally found the energy to get up and do 20 minutes work to finish the portable. It is fun and works well, though the C up button isn't working but because of my hinge I can get to it easily when I can be bothered (though who can? Its C up and I'm playing Zelda). Does this mean I get a fancy Portabliser title under my name?
Image
Image
Image
Thanks go to Bacteria who has been a great help. Thanks for pressuring me to choice Lithium batteries over NIMH.

For my next project a mame arcade cabinet. My parents gave me $300 to go towards a project (along with some other presents) and my dad said he'd throw in a nice lcd monitor if I make it a cocktail cabinet and put Galaga on it. For the purists I know CRT is authentic but LCDs are smaller.

Oh and I didn't end up frying anything :D :D :D
ShockSlayer
Niblet 64
Posts: 5059
Joined: Thu Jun 29, 2006 12:47 pm
Location: In my inbox.

Post by ShockSlayer »

Aww. So cute! It reminds me of my wii laptop!

Actually, I think its a great portable!

SS
http://twitter.com/ShockSlayer" onclick="window.open(this.href);return false;
evilteddy
Portablizer
Posts: 423
Joined: Tue Mar 25, 2008 2:11 am
360 GamerTag: Kirren of Smeg
Steam ID: kizzinator
Location: Newcastle, Australia

Post by evilteddy »

ShockSlayer wrote:Aww. So cute! It reminds me of my wii laptop!
Yeah they do look similar. thanks for the positive feedback.
bacteria
Portablizer Extraordinaire
Posts: 3984
Joined: Fri Apr 20, 2007 12:14 am
Location: Hampshire, UK
Contact:

Post by bacteria »

Very nice. A few observations:

* Well done, nice project, pleased you completed it.
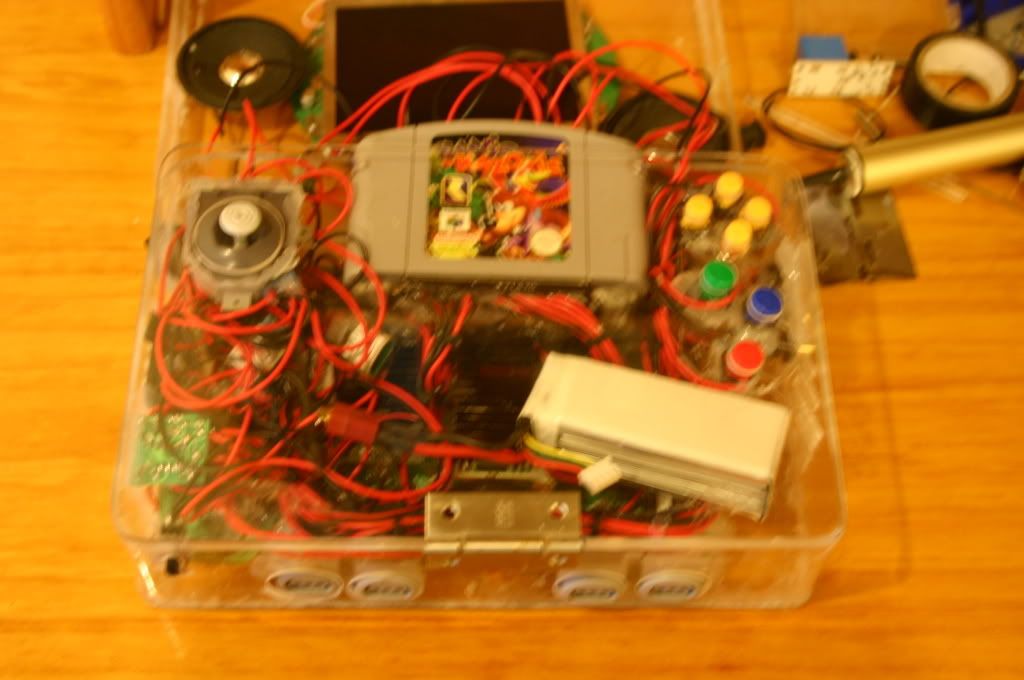
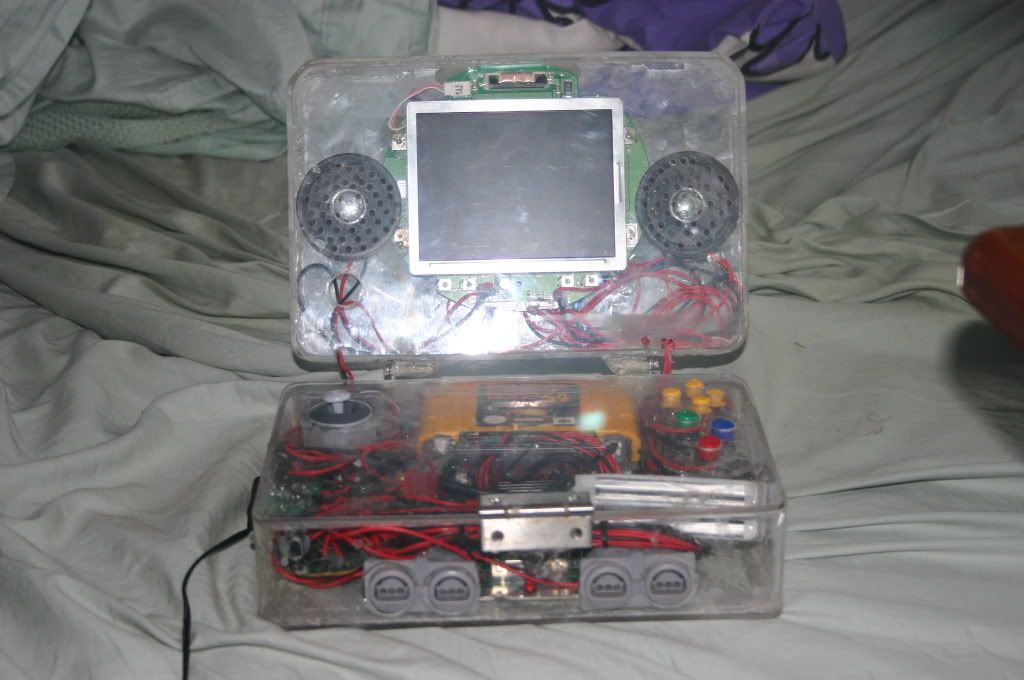
* Nice you got the cart slot at the rear, good.
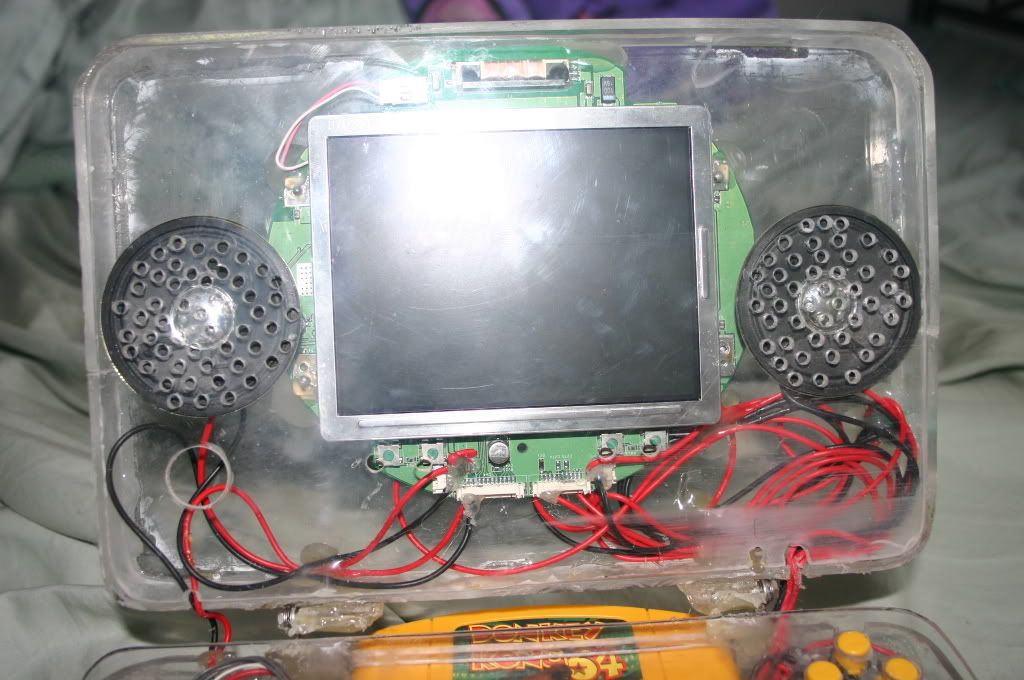
* No bowing on the plastic, good.
* A bit thick, ho hum; fine though as I imagine the screen will wobble if you use the system with the built in controls?
* Did you put a switch on the data (white) cable for the controller 1 port (leftmost) so you can plug an external controller in and use that instead of the built-in system?
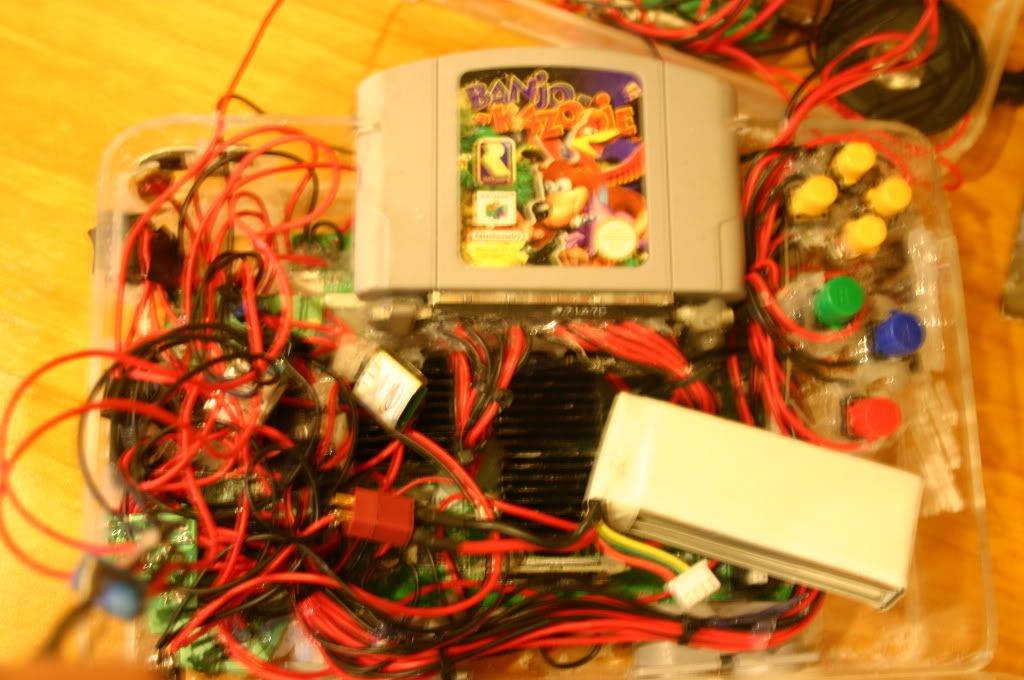
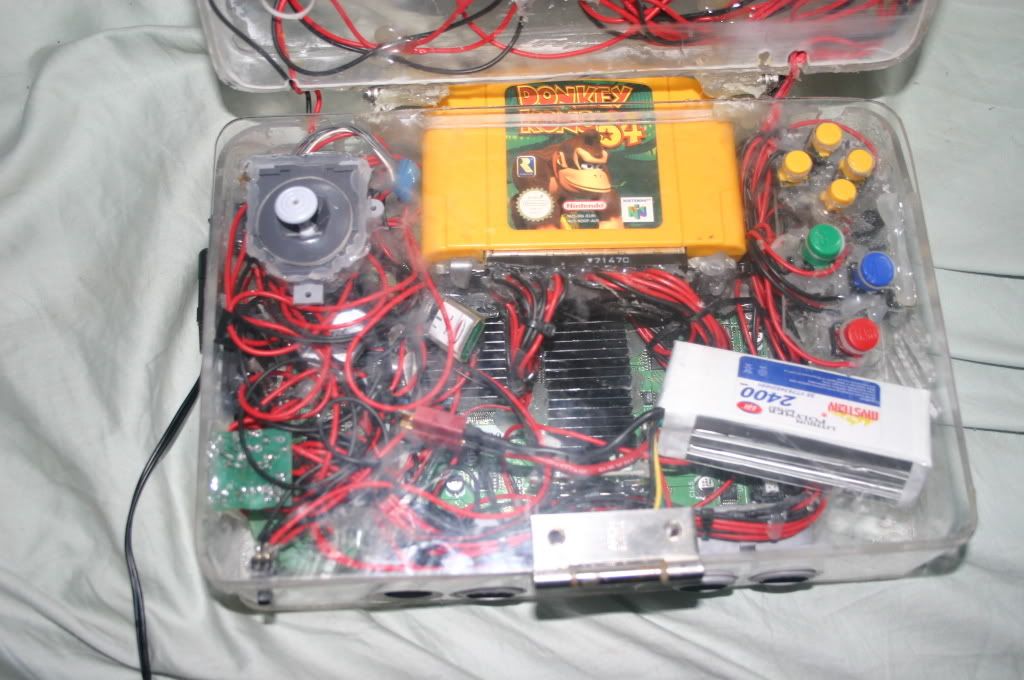
* Expansion pack or Jumper pack??
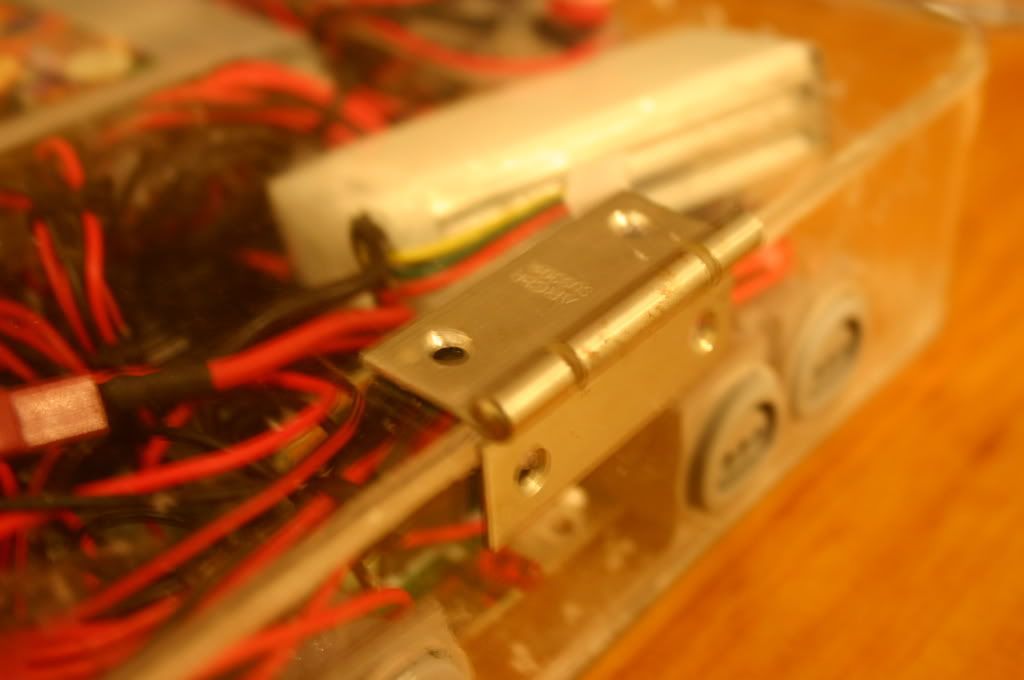
* Only 2400mAh battery? Rechargeable inside case? Is it secured in the case with hot glue?
* "C" buttons not equidistant from each other.
* Heatsinks but no fan and airholes? Not a good idea, takes away point of heatsinks and your system might get hot as the heat can't escape. I presume there is a fan in there (I hope).
* Right "C" button recessed a bit much??
* How about using the hinges from the PSone screen instead of regular hinges? (spring loaded)...
* Start button a bit wonky (easy to fix).
* Up button on "C", as you mention.
* No love for D-pad??
* I presume you have left shoulder, right shoulder and "Z" buttons?
* How about screwposts instead of the hinge? Being able to get to the guts is the important thing as things will go wrong, however be optimistic!
* Use some filler to fill in the holes made for the PSone screen controls (in slightly wrong places I notice, and the surplus one by the right hinge.
* Lightly sand the edges to make it look better.
* Like my projects, with the perspex clear, everything looks a mess; consider painting the system and/or cover with thick paper. If you are going to paint, use some PVA glue or similar to stick thin paper to the area before painting, so the paint can have something to stick to; and varnish the paint when done.
* I discovered that perspex scratches very easily indeed, so be careful handling your screen area - not such an issue as the screen closes when the system isn't being used so will be protected anyway.
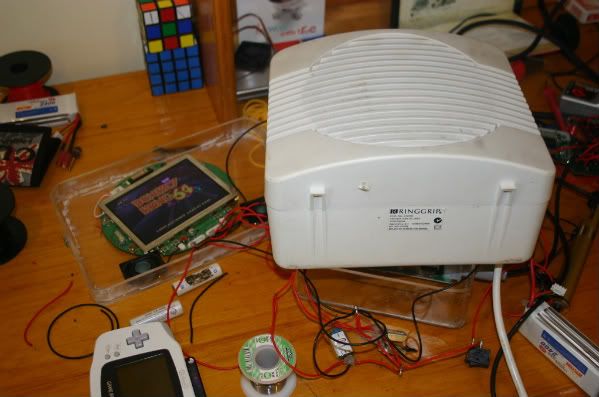
* Nice big speakers, you will now appreciate why I use them!

These are all positive and constructive points.

I like your system and the work you have put into it. Welcome to the "club" fellow modder!! :wink: This is one of the better N64p's out there - if you paint the system it will look miles better!! :wink:

BTW - thanks for the "thanks", appreciated. If I can help in any other way, please let me know.
Image
Post Reply