Troy's Arcade

Hacking a [insert console name here] but don't see a "[insert console name here] Hacking" forum? Come on in and post your [insert console name here] questions and build logs!

Moderator:Moderators

Post Reply
User avatar
ARTbyTROY
Posts:35
Joined:Thu Sep 09, 2010 3:33 pm
Troy's Arcade

Post by ARTbyTROY » Thu Sep 09, 2010 9:17 pm

Having been practically raised on arcade and console video games I've wanted to build a MAME system for a really long time. When I was a kid I would collect bottles and cans along the roadside for deposits and then ride my bike ten miles round trip to hit the local video arcade. I would have preferred building a full sized stand up arcade machine, but I'm severely space limited and there's no room for one in my home, so I decided to build myself a bar-top machine. I found a deal on two joysticks and a bag of 20 buttons for $42USD shipped, it smelled like a bargain.

Image

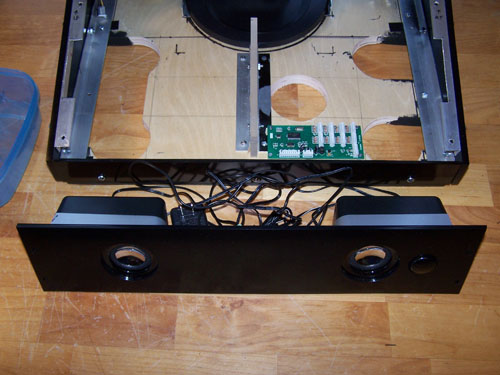
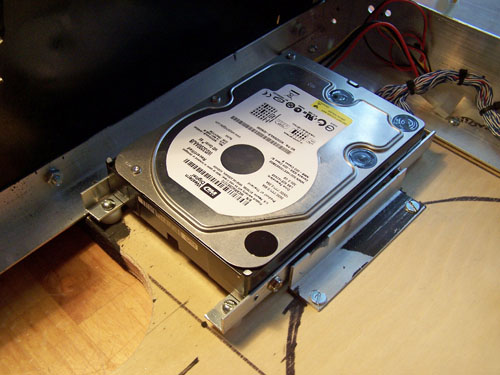
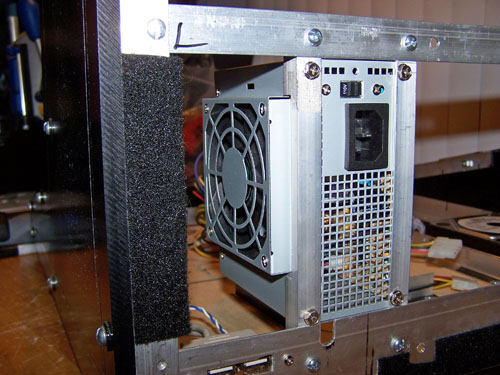
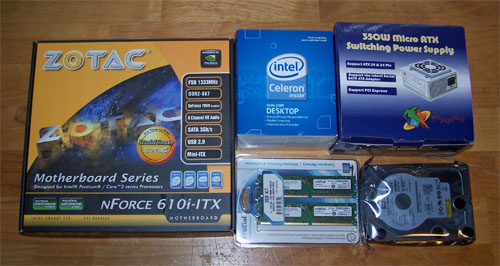
Below shows a Zotac mini-ITX motherboard with GeForce 7050, a Celeron 2.0 GHz dual core processor, 2GB of Crucial DDR2 667 memory, a 350W micro-ATX power supply and lastly a 320GB Western Digital hard drive.

Image

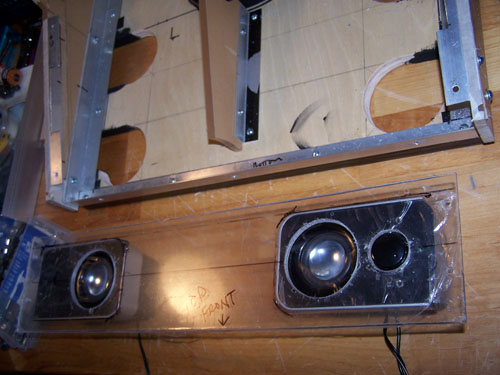
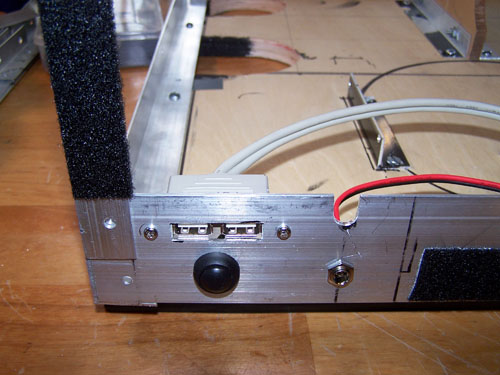
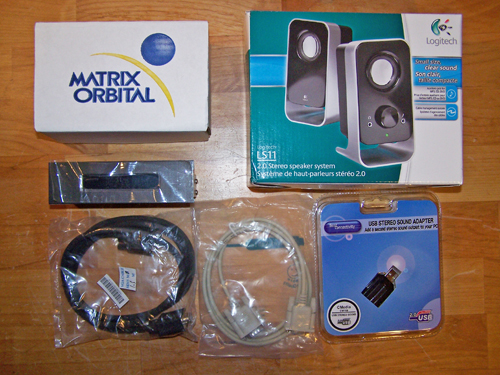
Next is a Matrix Orbital display, VGA cable, a pair of small speakers and a USB sound port adapter and serial cable that were not used.

Image

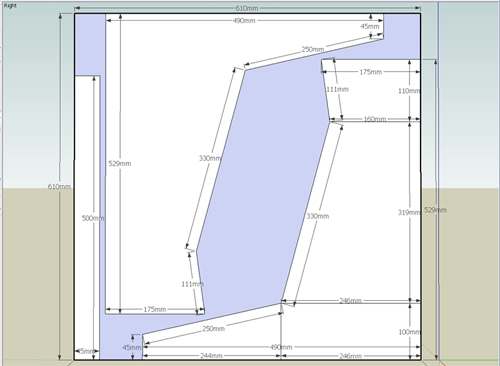
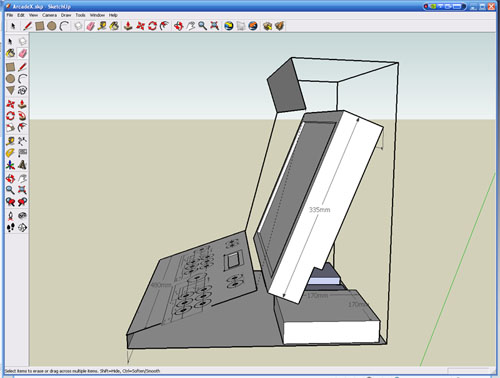
I skipped the usual pencil sketches and jumped right into Google SketchUp. Here's a side measurements view...

Image

3/4 side view showing parts placement...

Image

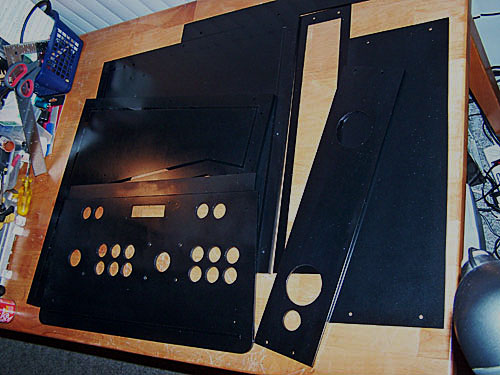
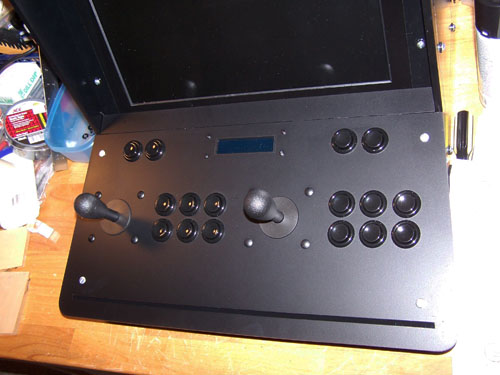
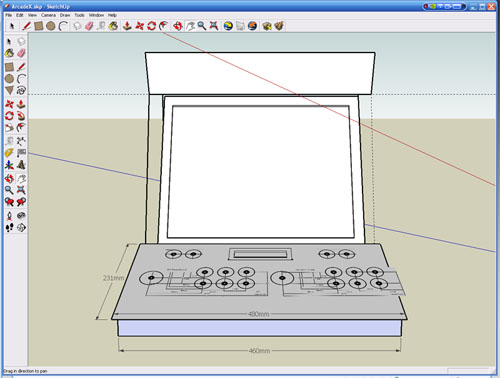
Front view showing joystick and button placement...

Image

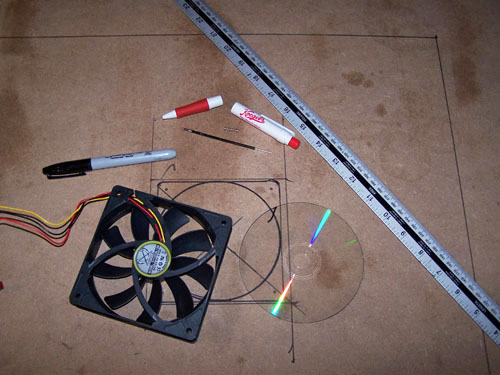
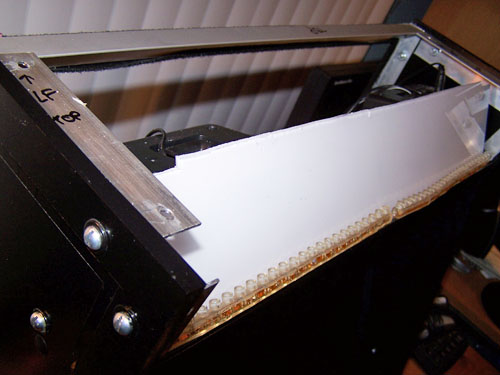
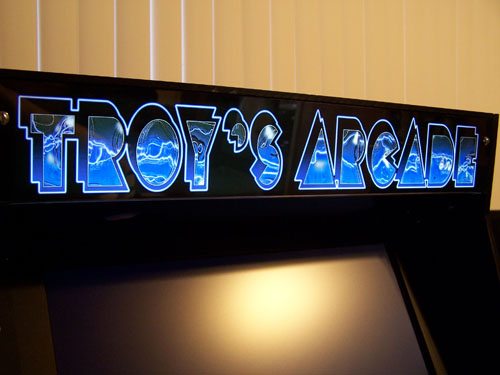
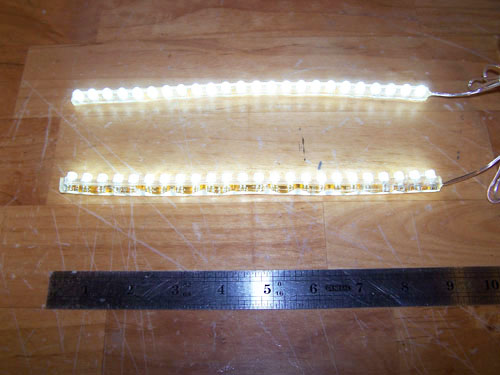
I bought a pair of 24 LED strips for $5.99 shipped off ebay, they measure 9 inches long each. I wired them up then fired them up, they are plenty bright and will be used to back light the front marquee.

Image

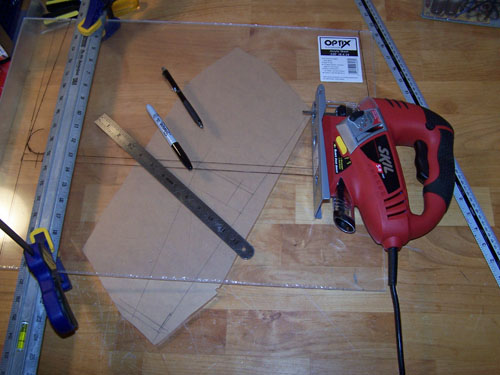
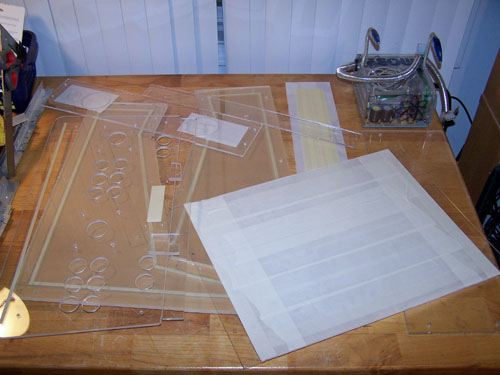
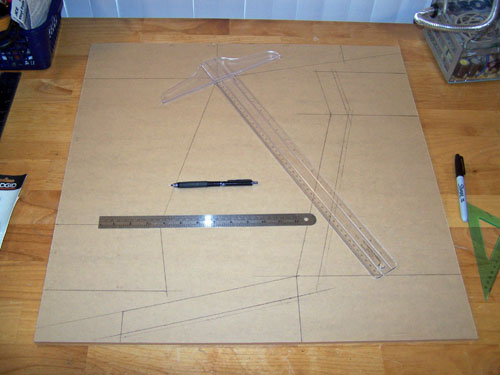
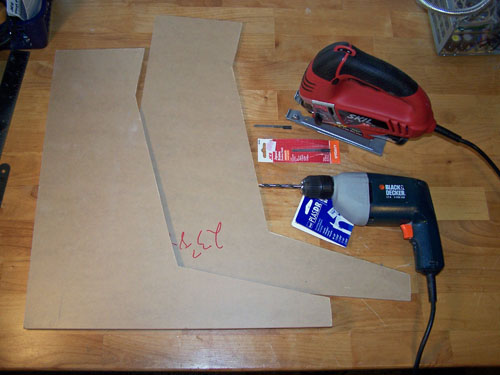
I transferred my side panel measurements onto a sheet of 3/8" thick clear acrylic in preparation for cutting.

Image

I used a jigsaw with a plastic cutting blade and a drill with a specialized plastic cutting bit from TAP plastics and carefully cut out both side panels.

Image

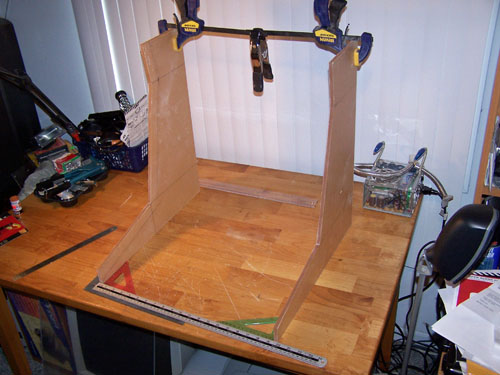
I set both side panels up, measured it out and then sloppily clamped them together just to get an idea of size and also to help me better visualize things.

Image

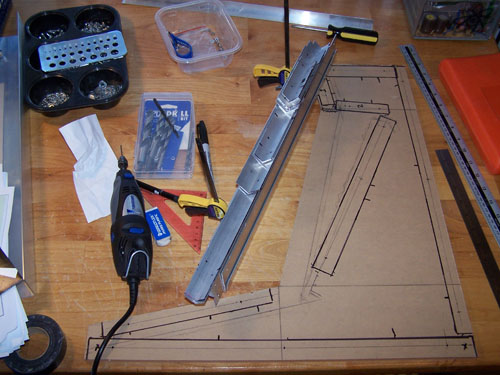
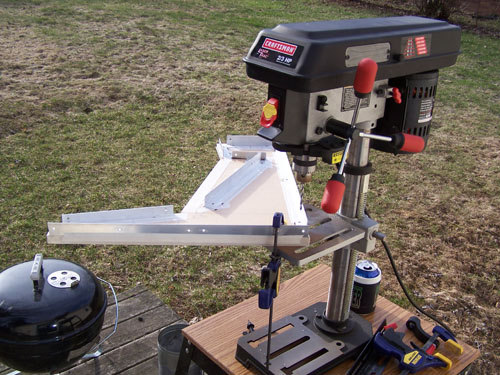
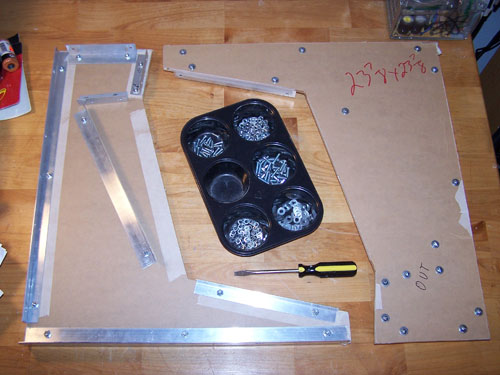
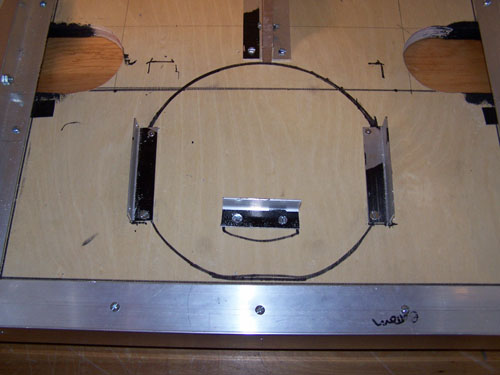
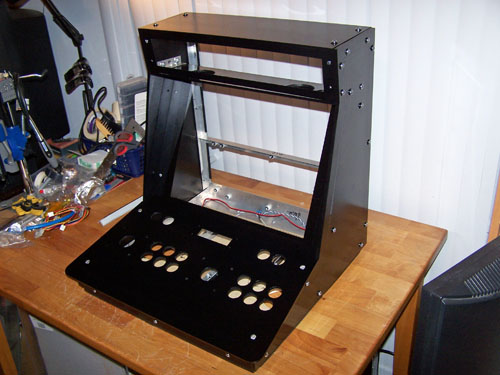
I cut a few lengths of Aluminum Angle to size and roughly arranged them on the side panels, when attached they will be the framework upon which everything else will be built.

Image

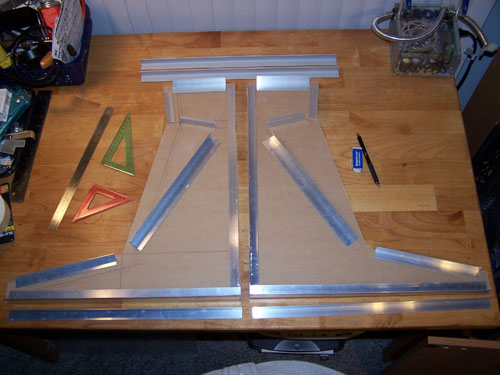
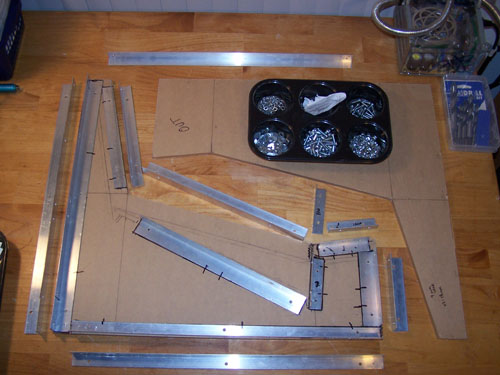
I started with the bottom and worked my way up, the following picture shows the Alum-Angle lower framework all laid out, measured up and ready for drilling.

Image

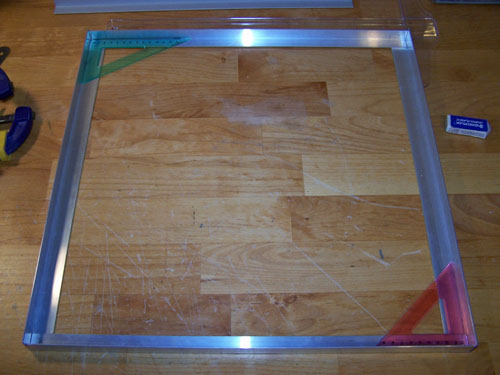
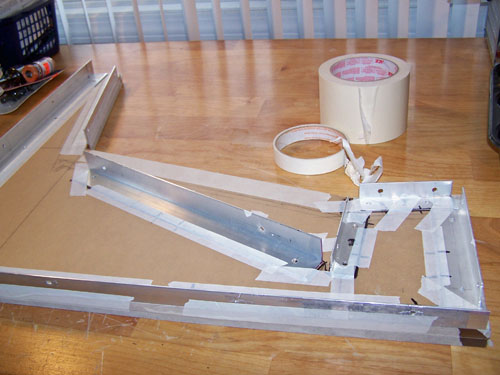
I used my Dremel Workstation and an 1/8" drill bit, the pieces of Aluminum Angle are (for now) held together with screws, they will be riveted together later on.

Image

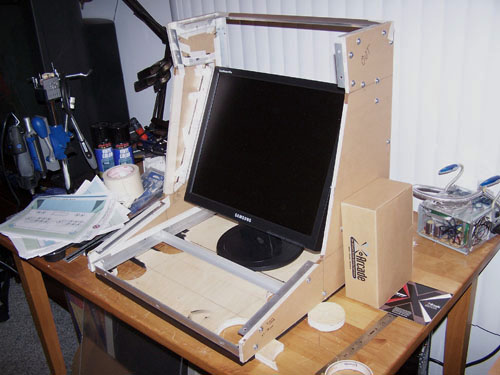
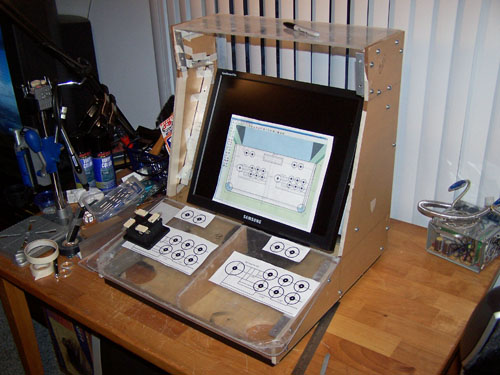
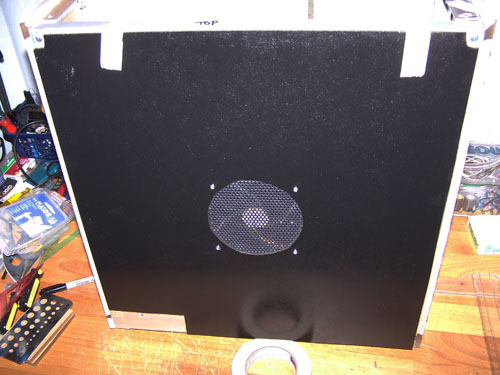
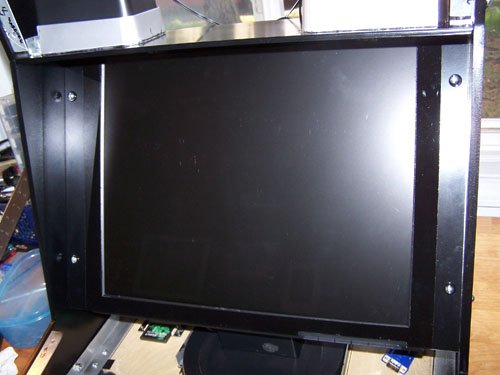
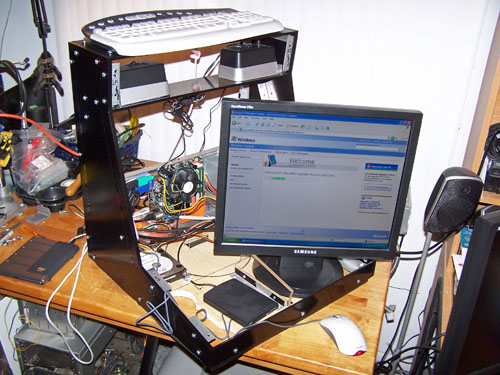
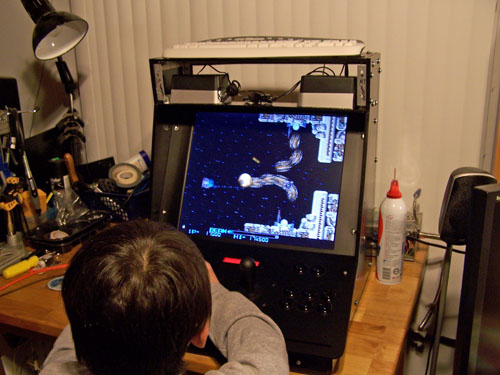
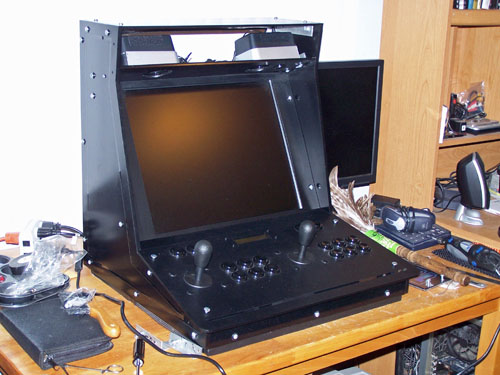
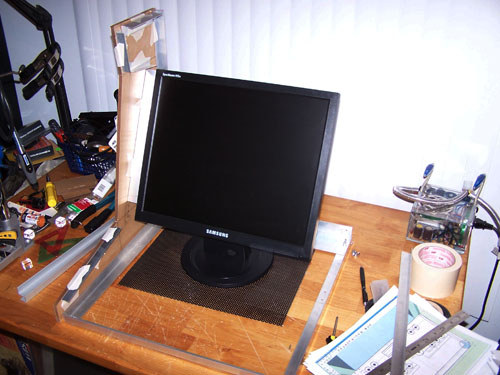
I was going to use an 18" touch screen monitor in this project, but that would have been a total waste - so I instead sacrificed one of my 19" Samsung 915N monitors.

Image

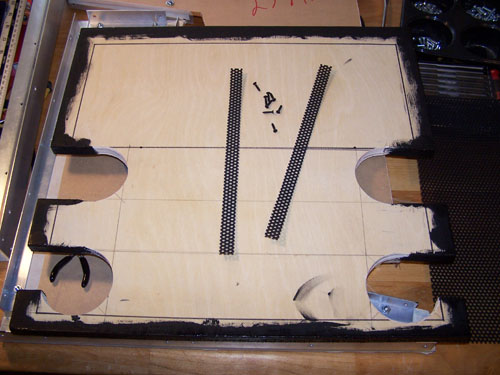
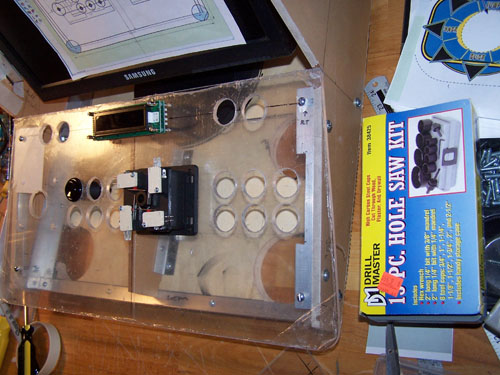
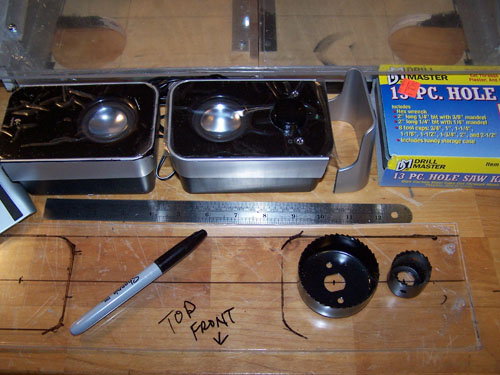
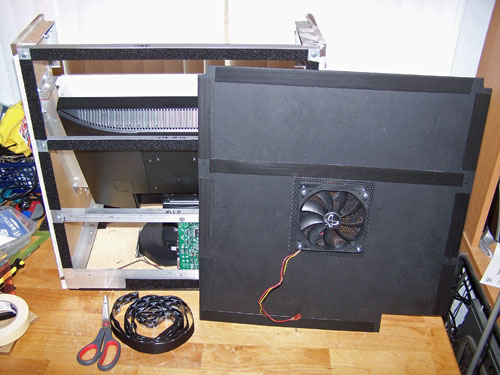
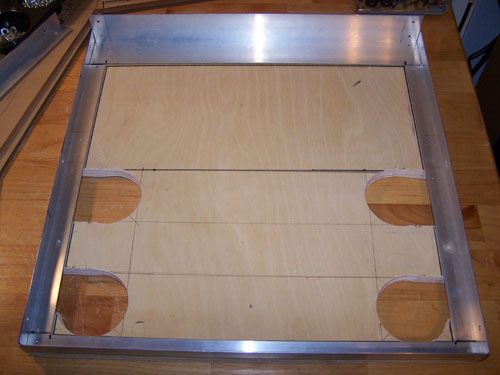
The Alum-Angle bottom framework is just that, framework... it's not a proper base for my arcade machine. Below is a piece of plywood I had in the shed, it fit almost perfectly as was. I marked it in preparation for cutting it using an 80mm hole saw and jigsaw.

Image

The finished product is shown below, I placed the Alum-Angle framing on top to test for fitment.

Image

I painted all the outer edges of the base with black acrylic paint and then cut two strips of plastic mesh to cover the side edge vents.

Image
Visit my site: CaseModGod.com

User avatar
ARTbyTROY
Posts:35
Joined:Thu Sep 09, 2010 3:33 pm

Re: Troy's Arcade

Post by ARTbyTROY » Thu Sep 09, 2010 9:17 pm

Back to the side panels... I traced all of the pieces of Alum-Angle onto the inside of one panel and then marked each aluminum piece for drilling.

Image

The next picture shows all of the aluminum pieces drilled and lined up on the side panel, it also shows what twenty-six dollars worth of nuts, bolts, washers and screws looks like... crazy.

Image

I lined up and taped both side panels together and then lined up all of the pieces of Alum-Angle and taped them down in preparation for drilling the acrylic.

Image

Since the holes needed to be perfectly straight I bust out the drill press with a 13/16" TAP Plasdrill bit, the aluminum angle acted as a guide template and the bit cut through both acrylic panels like butter.

Image

Below shows both sides of my side panels with their aluminum parts bolted on.

Image

I set my side panels onto the plywood base and then set the monitor inside to make sure it would all line up.

Image

I marked a sheet of .220" 18x24 Optix acrylic for cutting, it will become the top most panel and control panel. I also marked the side panel scrap piece that will be jigsaw cut to become a center brace for the control panel.

Image

The following picture shows the top piece and control panel test fit... it let me know that I needed to make some minor adjustments to a few pieces of Alum-Angle to make things fit together correctly.

Image

I installed the center brace beneath the control panel and positioned paper templates for the buttons and joysticks layout, I also marked out the Matrix Orbital display location.

Image

The hole saw kit is a $6.99 Harbor Freight special, it had the two sizes I needed and they cut holes in acrylic pretty good, well worth seven bucks anyway. Below shows the nearly finished control panel, it still needs a bit more filing before paint and final assembly.

Image

I cut all the pieces of acrylic needed to finish the outer casing and put it all together for a test fit...

Image

I cut the legs off the speakers and marked their position onto the acrylic.

Image

Speaker holes are cut and filed, below is a test fit. After I vinyl dye the acrylic sheet I plan to use some Weld-On 16 to permanently attach both speakers onto it.

Image

I had to figure out a way to keep the monitor from shifting around inside the cabinet, I considered cheesing out and just running wood screws through the base, but I really didn't want to have to modify the monitor... below is what I came up with.

Image

The monitor is held firmly in place by the three pieces of alum-angle and the front of the monitor base presses tightly against the control panel support brace I made. Doing it this way makes it easy to remove or replace the monitor if needed.

Image

I decided to make the back panel out of pressboard because it's cheaper than acrylic and nobody will see it anyway. Below shows where I installed a 120mm fan that will be temperature controlled by the Matrix Orbital.

Image

I cut my holes, assembled it all and then gave the back a couple coats of black spray paint, below shows the test fit.

Image

I cut lengths of adhesive Velcro and placed them on the back framework and back panel, I figured Velcro was simpler and more forgiving than screws and it works great.

Image

I drilled holes for both the power connector and the power button and also cut a couple USB ports into the bottom Alum-Angle, below shows everything installed.

Image

I masked and prepped all of my acrylic pieces before coating them with black vinyl color.

Image

The next picture shows all of my acrylic vinyl colored black and ready for assembly.

Image

I put it all together for a post paint test fit and to get an idea of how cool it's going to look when I'm finished.

Image
Visit my site: CaseModGod.com

User avatar
ARTbyTROY
Posts:35
Joined:Thu Sep 09, 2010 3:33 pm

Re: Troy's Arcade

Post by ARTbyTROY » Thu Sep 09, 2010 9:18 pm

I used Weld-On 16 to mount both speakers onto the acrylic panel and then clamped them down... Weld-On 16 dries clear and is some seriously wonderful industrial stuff.

Image

The speaker panel and the monitor overlay acrylic panel are installed. I cut some of the bottom right monitor acrylic panel out so that the monitor controls can be accessed when the arcade controls panel is removed.

Image

Below is my nearly completed arcade controls panel, for now it is just loose fit onto the cabinet, but both joysticks, all sixteen buttons and the Matrix Orbital display are installed.

Image

And a look at the back side - twenty four micro switches still need to be wired up to the BYO controller board, but not far now.

Image

I decided to change up the monitor overlay acrylic panel a bit, the clear center section had to go. My reasoning - first it eliminates the reflection/glare it caused, second it fixes and prevents any existing or future scratches, and third if the screen itself ever needs to be cleaned the whole thing won't have to be torn apart now to do it.

Image

I had to figure out a way to mount the Ipac2 controller to the bottom of the arcade controls panel, below shows what I came up with. I made a board tray out of some scrap aluminum, drilled four holes and implemented the same spacers and board mounting technique that I've used on my last four projects, the whole thing will be attached with Velcro.

Image

The micro switches on the joysticks and bottom of each button have three contact points - a normally closed position, normally open position and a ground. I used the normally open contact and wired each micro switch to its corresponding location on the Ipac2 board.

Image

Next, I piggy backed the ground wire to all of the switches for each player side and wired them to the ground point on the Ipac2 controller board. While I was at it I tidied it all up and then ran the USB cables to the Ipac2 and Matrix Orbital display.

Image

I had to come up with a mounting method for the hard drive. Good old aluminum angle and plastic spacers to the rescue, below shows what I came up with, it's a perfect fit.

Image

I also had to come up with a way to mount the power supply, again I used aluminum angle that was cut, filed and drilled to fit... alum-angle is awesome.

Image

Mounting the mother board... I drilled four holes into the rear alum angle and made standoffs just like the ones I made for the I-pac. With all the hardware installed it's time to fire it up and install WindowsXP, MAME32 and MaLa as the front end

Image

After the operating system and programs were installed it was time to throw it together for a test run. Below shows my 10 year old buddy Brent tearing up some R-type, after playing around twenty or so other games I asked him what he thought and he told me "Every kid should have one of these."... true that.

Image

Hands on testing of my own revealed a design flaw that needed to be addressed, the plexi sheet that the speakers rest on sat flat horizontally so it is hard for an adult to view the upper most parts of the screen while standing and playing. Changing the angle (see below) fixed the problem and also the speaker output is directed a bit more forward now instead of straight down.

Image

The arcade needed a marquee and it only took a couple attempts before I came up with something I liked. Once my design was double checked and finalized I uploaded it to GameOnGrafix.com.

Image

The marquee cost $19.35 shipped, it arrived in three days and looks absolutely fantastic straight out of the tube.

Image

Below shows the marquee LED strip lighting and the white acrylic reflector panel which is held in place by small pieces of Velcro attached to the speakers.

Image

I cut two pieces of acrylic to size and sandwiched the printed marquee graphic between them and temporarily bolted it on. An on/off switch was attached to the power for the LED marquee lighting..

Image

Time for a little two player hands on testing, which called for multiple games of Super Puzzle Fighter 2 Turbo followed by a few rounds of Capcom Vs. Marvel. The result - two out of two kids agreed that my arcade machine rocks.

Image

The silver bolts sticking out all over the sides looked out of place, so I masked off the entire thing and spray painted them all flat black.

Image

I had originally planned on putting side panel artwork onto my arcade, but I like the clean look of it without side art better... for now anyway.

Image

My MAME project is officially finished, everyone that has played it agrees that it is one of my coolest mods to date.
Visit my site: CaseModGod.com

User avatar
bassmasta
Posts:684
Joined:Sun Sep 06, 2009 8:56 pm
Steam ID:randomguy737
Contact:

Re: Troy's Arcade

Post by bassmasta » Thu Sep 09, 2010 9:57 pm

Awesome!
zeturi wrote:If you're getting 404'd when trying to use the links in stickies, try this tutorial to find that juicy info.

Snow_Cat
Posts:463
Joined:Fri Aug 13, 2010 12:40 pm
Steam ID:Snow_Cat
Location:Here
Contact:

Re: Troy's Arcade

Post by Snow_Cat » Thu Sep 09, 2010 10:20 pm

I really like the cleanness of the wiring under the panel. :)

nevermind1534
Senior Member
Posts:1977
Joined:Fri Feb 06, 2009 1:36 pm
Steam ID:nevermind1534
Location:Detroit, MI
Contact:

Re: Troy's Arcade

Post by nevermind1534 » Fri Sep 10, 2010 1:29 pm

It's somebody else from TBCS!

I remember this log; nice work on the cabinet. I'm almost done with a full size mame cabinet, and I'm doing a table top one next. It's nice to see other people also building them.


I'm also using the same joysticks that you used in your build in my full size cabinet. What is your impression of them? I find games like pac man a little more difficult to play with it compared to the real machine.
Kyo wrote:"does anyone here know how to fly a plane?"

"STAND BACK EVERYBODY, I HAVE A FAKE ID"

User avatar
ARTbyTROY
Posts:35
Joined:Thu Sep 09, 2010 3:33 pm

Re: Troy's Arcade

Post by ARTbyTROY » Fri Sep 10, 2010 3:22 pm

bassmasta wrote:Awesome!
Thanks!
Snow_Cat wrote:I really like the cleanness of the wiring under the panel.
I am pretty happy with the way that came out too, surprisingly enough it didn't take very long to do.
nevermind1534 wrote:It's somebody else from TBCS!

I remember this log; nice work on the cabinet. I'm almost done with a full size mame cabinet, and I'm doing a table top one next. It's nice to see other people also building them.

I'm also using the same joysticks that you used in your build in my full size cabinet. What is your impression of them? I find games like pac man a little more difficult to play with it compared to the real machine.
I really like the sticks, they feel arcade authentic and the micro switches make a satisfying click when you move them. I would also agree with you that games like Pac-Man and Dig-Dug work far better with a four way stick. I am also fairly sure that the X-arcade sticks can be configured to be either 8-way or 4-way... I can't recall exactly how to switch them over from 8 to 4-way, but I did have the foresight to leave openings in the bottom of my machine to access the undersides of both sticks so that if I wanted to I could readily access them.
Visit my site: CaseModGod.com

User avatar
Tibia
Posts:1319
Joined:Thu Feb 28, 2008 2:02 pm
PSN Username:Tibia1013
Steam ID:Mulder101361
Location:Istanbul, not Constantinople
Contact:

Re: Troy's Arcade

Post by Tibia » Fri Sep 10, 2010 9:15 pm

This is some seriously awesome work! I just love how clean and sleek it is. Fantastic!
This post brought to you by David Duchovny's glorious nipples.

Haunted360
Posts:1000
Joined:Sat Jan 30, 2010 12:22 am
PSN Username:Haunted360
360 GamerTag:Haunted 360
Location:Australia
Contact:

Re: Troy's Arcade

Post by Haunted360 » Wed Sep 29, 2010 3:52 am

Very nice.

It is like mine, except your Cabinet is much 'cleaner'. As mine was made from scraps of Particle Board, and so has chipped. Oh, I also dropped it when moving it from the garage as my dog got in the way :roll:

It was excellent to see another one built though!

I recommend getting the game 'NBA Maximum Hangtime' (or Hangtime. But I preferred the ROM upgrade of Maximum), all the 'Mortal Kombat's' (Except 4) and of course, 'The Simpson's'. Great games...

myersn024
Posts:212
Joined:Mon Dec 11, 2006 2:34 pm

Re: Troy's Arcade

Post by myersn024 » Wed Jan 12, 2011 9:03 am

This is a very nice build. I recently bought a full-size Ms. Pacman cabinet, and when I'm not playing that I'm dreaming of building a MAME cabinet. I hope that when I finally get around to working on it that it comes out as nice as yours. MAD PROPS!

Post Reply