I know this is a mod that's been tried a lot of times in the past, but I think I'm the first to ever do one based on a Pico-ITX motherboard.
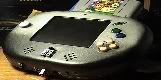
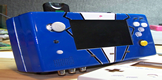
Here are two pictures of the finished product:
I started with an Artigo Pico ITX car kit and gutted it.

This gave me most of my components including the motherboard, RAM, CPU, the IDE hard drive adapter, mounting hardware for the motherboard/hard drive, the blue LED, the sound/USB board, the HDMI adapter cable, the mouse and keyboard (PS/2) connector cables/ports, and the Serial port connector cable (which I used for something else, described later), as well as the power board and wall power adapter.
Additional components which I had to obtain from other places included a Logitech wireless keyboard/mouse, an ethernet cable (to make the ethernet port), a VGA splitter (half of which I used to make the external VGA port), a 4-port USB hub (internal), a Green LED, a DVD/CD burner, a high-power wifi dongle (see the antenna sticking out of the back), and front USB ports (which I obtained from frontx.com).
The wiring in this thing is actually relatively straight-forward. The motherboard is extremely low-profile in that most of its connectors are not on the back like most motherboards, but are connected via pins - this made it so I could put the ports wherever I wanted to on the NES unit itself.
USB Header ---> connects to USB/sound board from the Artigo kit which has 4 USB ports on it. Of those 4 USB ports,
Port 1 ---> USB Wifi adapter
Port 2 ---> one of the 4 front USB ports
Port 3 ---> internal USB 4-port Hub
Port 4 ---> unused
The internal USB hub connects to the other 3 front USB ports.
The USB/sound board also has 1/8" audio in and audio out - I ran out of those a 1/8" extender cable and connected the other end to the back of the case as input/output ports.
Now back to the motherboard. Out of the PS/2 pins, I ran the keyboard/mouse ports from the Artigo car kit - those I put on the NES case where the old Audio/Video outputs were.
The trickiest part for me was wiring the original power/reset switches. First off, a small tab had to be removed from the power switch because of the way a computer's power switch works - you can't have the switch left in the "on" position or it will just shut back off after 5 seconds - so the power switch now functions just like the reset switch does. I also could not for the life of me figure out the wiring to the original red LED (at least by using the 5 wires coming out of the original NES power switch board) so I removed the blue LED light from the artigo kit and wired it to the pins from the motherboard. The green LED which is just above the blue one on the front panel functions as the hard drive LED. So the 4 wires from the LEDs along with the 4 wires from the power and reset switches are what went to the motherboard.
But connecting those 8 wires to the motherboard wasn't easy - that's where the old serial connector came in. It had (if I recall correctly) a 10-pin connector designed to connect to the motherboard. Luckily the power/reset/leds are all right next to each other in their pin-outs on the motherboard so what I did was remove 2 wires from this connector and use the other 8 wires to solder to the 8 wires from the power/reset/leds and then shrinkwrap over those soldered spots. The whole rig was just long enough to comfortably run it all the way to the motherboard.
The only other pin-out connector to the motherboard I had to use was to the HDMI port and that was easy to connect the port with came out of the original Artigo kit.
Now on the back side of the motherboard (left side as it is oriented in the case) has the VGA and Ethernet ports. For the ethernet I used a blue extender cable (I looked around for a while to find one with and end that looked like it would mount to the case easily). For the VGA port I used a VGA splitter and cut off 1 of the 2 split ports and just used the other one. I went this route because I couldn't find any non-splitters (just extenders) that were this short and I didn't want a bunch of extra VGA cable to deal with. And one last thing is the power board - I routed it to the back of the case exactly where the original NES power supply plugged in using an adapter from the Artigo car kit.
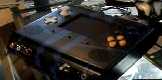
As far as mounting everything into place, I used a combination of old pegs from inside the NES case, screws, and crazy glue. In some instances (like for the power board) I had to cut out an unused peg and move it so that I could put a screw into it exactly where I wanted it positioned. The mouse/keyboard ports are screwed in, the sound ports are attached with a nut that screws them firmly into place, the ethernet port is crazy-glued into place, the VGA port is attached via 2 nuts that are screwed over the push-screws that were originally on the port, and the front USB ports are attached via screws to the black plastic moldings which are crazy-glued to the case.
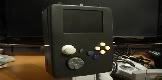
I think that covers about everything I can think of. Oh, the ram and hard drive - the ram plugs right into the motherboard underneath and the hard drive connects to the IDE connector (you can see the connector - its the diagonal-shaped green board which is just over the sound board).
And those red things you see were from a plastic coffee can, I used those to screw to a few of the original NES pegs inside the case to help keep all the wiring secured in place. With the whole thing put together, you can shake it all you want and nothing inside budges - everything is very secure.
Oh and I almost forgot about the DVD drive - I had to cut out a tiny bit of plastic to get it to fit - those white mounting "brackets" you see were original plastic tabs inside the NES case that I heated up to shape them - the drive is very securely in place.
The specs are as follows:
-1.0 ghz processor
-1 gb of ram
-533 mhz bus
-8 GB IDE solid state drive
-DVD burner
With limited space on my 8 GB hard drive as well as relatively limtied specs to work with - I settled on Windows 2000 as my operating system. Everything actually runs really good. As this was built primarily as a retro-gaming PC for playing roms, all the emulators for the major 8-bit and 16-bit systems (NES, SNES, Sega Genesis, and Game Boy Advance) all run flawlessly.
One last thing I can think of - its kind of hard to tell from the picture because of the angle and the depth of the top of the case - but there is only one fan in this system and its the motherboard fan - and that thing lines up PERFECTLY with the original vent on the top of the NES case.
Here is a youtube video:
http://www.youtube.com/watch?v=wHi9mGQwElU" onclick="window.open(this.href);return false;