i may or may not be working on a project soon, and was contemplating vacuuforming a case for it. my only gripe would be that it would have to be COMPLETELY SYMMETRICAL because im OCD like that.
i came up with a few ideas, mostly fiberglassing and car body work tricks. what have you people come up with?
Tips for making SYMMETRICAL Vacuuform mould?
Moderator: Moderators
-
dragonhead
- Posts: 952
- Joined: Sun Apr 04, 2004 4:28 pm
- Location: NH, USA


-
palmertech
- Senior Member
- Posts: 3225
- Joined: Sat Feb 02, 2008 1:40 am
- Location: California, land of the homeless and hippies
-
jjhammerstein
- Senior Member
- Posts: 1562
- Joined: Tue Nov 18, 2008 7:15 pm
- Location: Southern CT
- Contact:
Wood is less forgiving than clay, but it's easier to be millimeter perfect.
GET FREE WOW GOLD SEX VISIT MODRETRO
-
dragonhead
- Posts: 952
- Joined: Sun Apr 04, 2004 4:28 pm
- Location: NH, USA
you cant make a mirror image of a 3d object by conventional means, so palmer, your idea is out sorry.
mario, yes, that will get me a basic shape but i mean i want it perfectly identical on each side, curved surfaces and all.
and jj, i hate wood. nuff said.
see now, my ideas are, take a block of clay, make one half the way i want it and either use a contour gauge to carve out and match the other side.
OR
do it fiber-glass-buck style and make one half, draw a large-ish square grid on it, and cut along the grid lines, then trace the cut faces of each piece on cardstock, flip all the pieces over to mirror them, then assemble them into a grid again, and fill in the spaces in between, using them as a guide.
-
palmertech
- Senior Member
- Posts: 3225
- Joined: Sat Feb 02, 2008 1:40 am
- Location: California, land of the homeless and hippies
Re: Tips for making SYMMETRICAL Vacuuform mould?
Sorry, I thought you meant "Completely Symmetrical".dragonhead wrote:COMPLETELY SYMMETRICAL
If your case was indeed identical on both sides, my method would work.

Excellent
You could make a jig (I think thats what it would be called) that, when you move one side, moves the other the same distance in the opposite direction.
Simple, craptacular drawing. You've probably seen something like it before. The brown lines are pieces of wood that move (such as yard sticks), I left spaces between the separate pieces. There are 2 of one length, 4 of half the length of the first one. Put a bolt through the middle of the 2 longs, at each end of the longs to an end of a short, and the shorts that are at the tip.
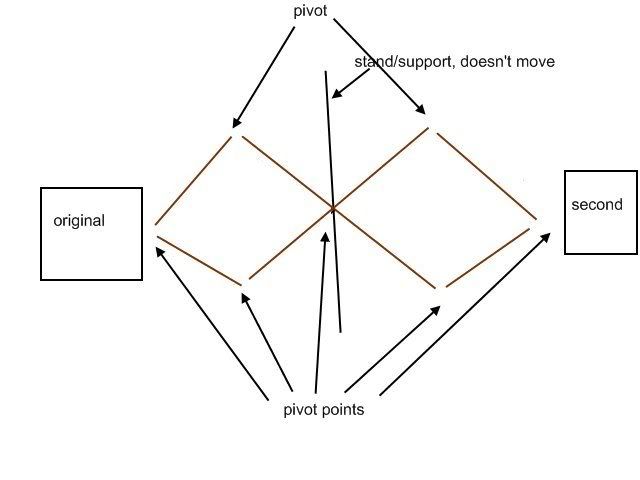
Simple, craptacular drawing. You've probably seen something like it before. The brown lines are pieces of wood that move (such as yard sticks), I left spaces between the separate pieces. There are 2 of one length, 4 of half the length of the first one. Put a bolt through the middle of the 2 longs, at each end of the longs to an end of a short, and the shorts that are at the tip.

That's kinda like a Pantograph.vskid wrote:You could make a jig (I think thats what it would be called) that, when you move one side, moves the other the same distance in the opposite direction.
Simple, craptacular drawing. You've probably seen something like it before. The brown lines are pieces of wood that move (such as yard sticks), I left spaces between the separate pieces. There are 2 of one length, 4 of half the length of the first one. Put a bolt through the middle of the 2 longs, at each end of the longs to an end of a short, and the shorts that are at the tip.
Please keep an eye on my HBN64 progress.
HBN-Style Anti-Noise Headphones.
Moderatio Est Figmentum.
Long live the Queen of Bondo!
HBN-Style Anti-Noise Headphones.
Moderatio Est Figmentum.
Long live the Queen of Bondo!
I am partial to 3d printing of course as I own a 3d printing company but the only way you are going to get this accurate to a fraction of a millimeter is to use a 3d printer. Prices depend on the geometry but I would imagine that you could make a reasonable size case for under $100 unless it is a very thick case.
-
dragonhead
- Posts: 952
- Joined: Sun Apr 04, 2004 4:28 pm
- Location: NH, USA
see the biggest problem with most of your idea is that they only work in 2 dimensions, not 3. the case am planning will have compound curves and such.
as for 3d printing, i am terrible with 3D modeling software first of all, and second, TOO EXPENSIVE! meh ive been up all night and i need sleep now....
as for 3d printing, i am terrible with 3D modeling software first of all, and second, TOO EXPENSIVE! meh ive been up all night and i need sleep now....
-
Dark-Aries
- Posts: 291
- Joined: Fri Nov 09, 2007 7:12 pm
calm down, as a 3d artist I can say that palmertech's idea would work fully, he just needs to reword it.dragonhead wrote:see the biggest problem with most of your idea is that they only work in 2 dimensions, not 3. the case am planning will have compound curves and such.
as for 3d printing, i am terrible with 3D modeling software first of all, and second, TOO EXPENSIVE! meh ive been up all night and i need sleep now....
You divide up your case into 4, the top and bottom, the left and right. Make the top left half mold, vacuum form, rotate, do the other quarter. Now this is only with the screen cut out as the button holes would be all screwy. This is also saying the screen hole is in the middle and not more towards the top or bottom. Then do the bottom left, rotate, bottom right. This is also just the basic shape. Then manually make the hole with a drill, sand out the roughness.
If this doesn't work then your portable might be symmetrical but I can't help unless you draw out a blueprint, I could then make a 3d model for you to view, and I can figure out a way of vacuum forming it.
-
dragonhead
- Posts: 952
- Joined: Sun Apr 04, 2004 4:28 pm
- Location: NH, USA
ok maybe symmetrical isnt the best term. i want to make a left side, and then make an EXACT mirror image of that for the right side. this isnt a boring square case or something basic. think along the lines of a dreamcast controller. not flat anywhere, curved surfaces everywhere. not easy to duplicate a 2nd half.
-
deviouskoopa
- Posts: 144
- Joined: Tue Dec 30, 2008 2:19 am
- Location: Virginia Tech
Haha isn't that the definition of symmetrical?dragonhead wrote:ok maybe symmetrical isnt the best term. i want to make a left side, and then make an EXACT mirror image of that for the right side. this isnt a boring square case or something basic. think along the lines of a dreamcast controller. not flat anywhere, curved surfaces everywhere. not easy to duplicate a 2nd half.
It seems that palmertech's method should work somehow... I just can't quite work out the steps in my head at the moment.