Edit: Oh look, page 29!
Bacteria's N64/GBA combined portable - Nintendo 64 Advance
Moderator: Moderators
-
bacteria
- Portablizer Extraordinaire
- Posts: 3984
- Joined: Fri Apr 20, 2007 12:14 am
- Location: Hampshire, UK
- Contact:
Edit: Oh look, page 29!
Last edited by bacteria on Tue Oct 09, 2007 1:22 am, edited 1 time in total.


-
bacteria
- Portablizer Extraordinaire
- Posts: 3984
- Joined: Fri Apr 20, 2007 12:14 am
- Location: Hampshire, UK
- Contact:
Thanks very much, you are most kind. I must confess, I have visualized the system and am making it to the design in my head, but I keep having to make minor changes as I go along, so even I don't know precisely how this will look like in the end.Skyone wrote:Much deserved. I think the whole forum is on there toes waiting for updates.bacteria wrote:Thanks very much for making this topic a sticky! Much appreciated!
Ok, here's some more updates:
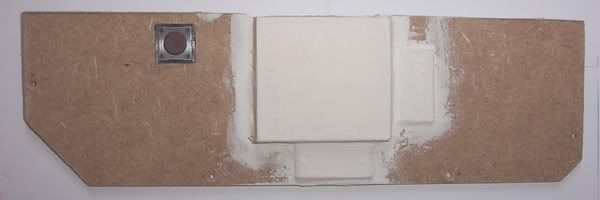
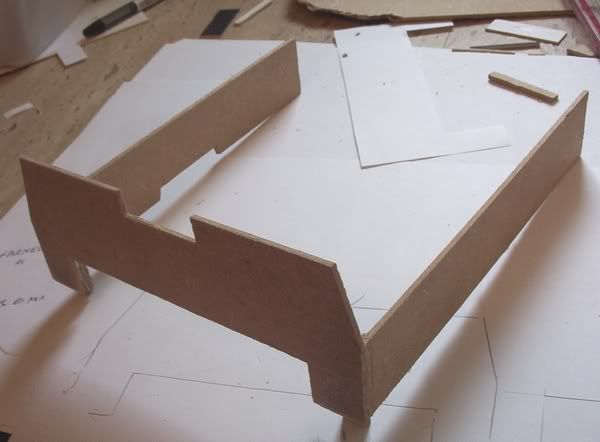
The top of the case
I made a template out of paper initially, then cut out some of the wood from the picture frame backing when I was happy the shape was fine. The legs are to give a backing for the screws to attach into
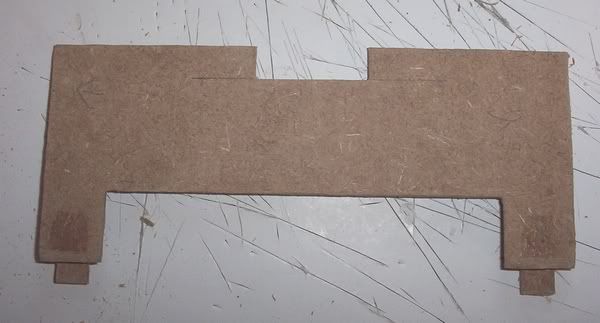
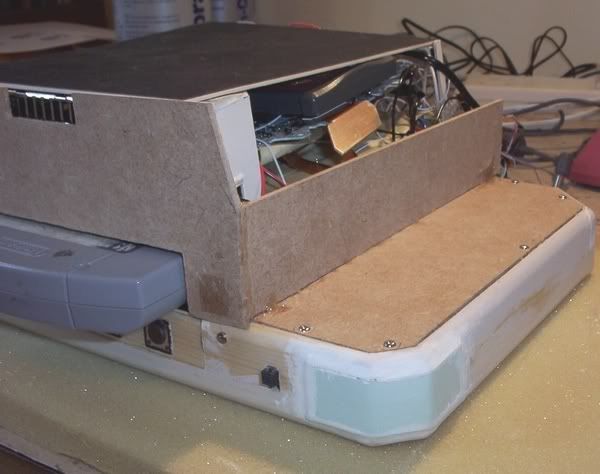
Attached item, secured by two screws. The hole at the top is for the exhaust fan. I can't get it all in and make it centred, but I am able to use 2/3 of the fan holes, which will be fine. The fan isn't in the right place at the moment, it will be later - in the pic the top bit is lopsided, this is only temporary, but I needed to put a back on the system a while back so I could rest it on the bench so I could test the system.
I can't hot glue it in place and smooth the contact points nice and flat as otherwise I can't remove the case base when I need to, I have to be able to do this otherwise I can't open the system up in the future for repairs if needed. A compromise.
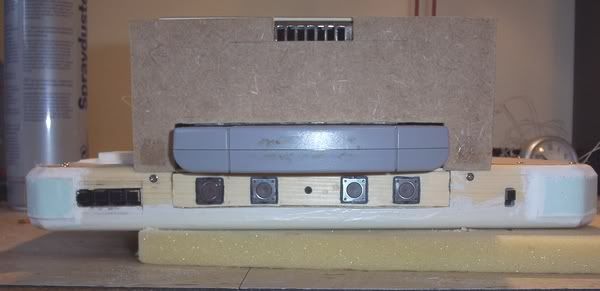
There is just under a 2mm gap between the N64 cart and the wood and about 2mm gap on the sides. This is fine for air intake as well as leeway to insert the N64 cart.
I had wanted to make the case non-boxlike, but it would make it hard to make strong as it would increase the amount of joints required. I wanted to make the system have an angled base, however this wouldn't be effective and would make the case bigger. I will make an add-on for this to put the case onto; thereby adding the same functionality but removable when not required. I can however introduce some subtle curves into the case to make it more interesting.
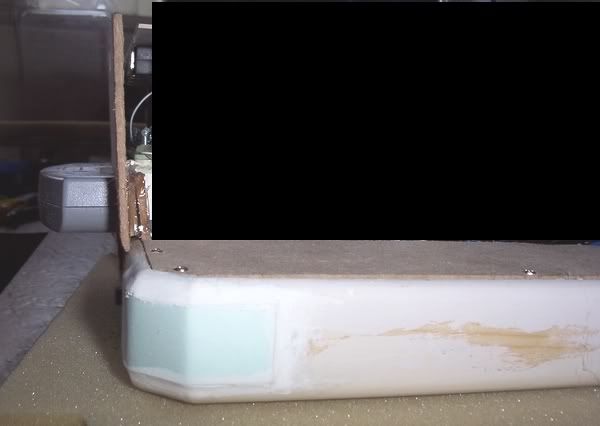
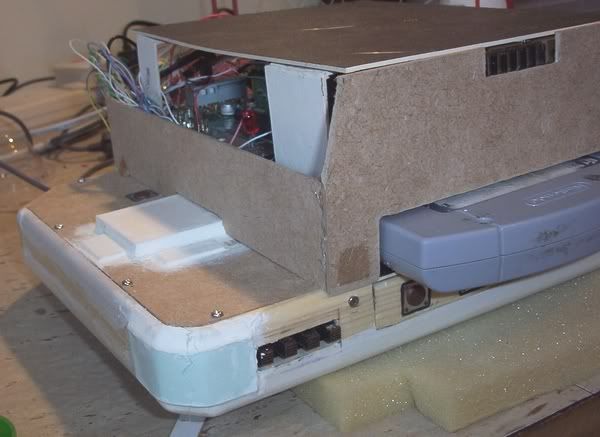
Oh yes, side view below. I edited out the rest of the pic as my photo made the top look lopsided, which it isn't.
-
bacteria
- Portablizer Extraordinaire
- Posts: 3984
- Joined: Fri Apr 20, 2007 12:14 am
- Location: Hampshire, UK
- Contact:
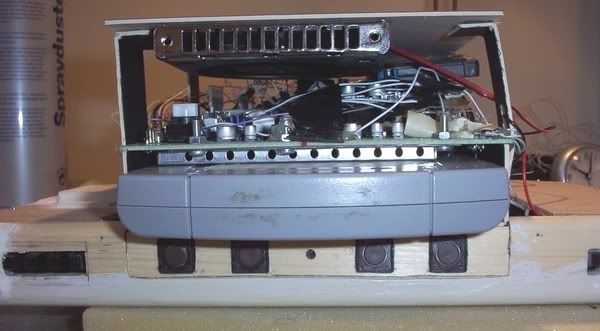
Time to put in the "Z" button.
For this, I will use a tact switch as it is only for the N64 and not a shared button. Due to the location, ie directly above the speaker enclosure and directly above the rear of the speaker cone itself, I need to make the button flat. The only way to do this (apart from a home-made flat design switch) is by taking advantage of the thickness of the wood (2mm thick) as this means the tact switch only protrudes by about 1mm. I cut out the hole, using a drill and a file, then made a recess for the two tact switch connections, then hot glued the rear of the tact switch in place to the wood. It is exactly the right height as it can still be secured to its screw holes on the casing ok - just.
Front and rear view:
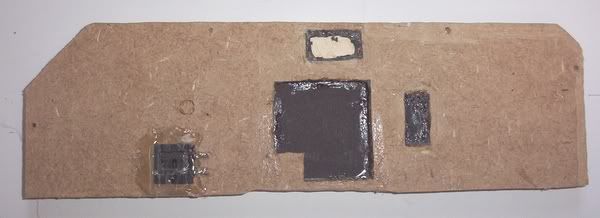
On the underside I had to shave areas down - where the screws and bolts are (for the switches), over some glued areas and the bit by the joystick raised area as it was catching on the N64 controller mobo very slightly.
I then soldered the "Z" contacts in place, and screwed the assembly back onto the case.
I need to keep the "Z" button low so it is easier to press. If it is too low at the moment (probably is), I will cut a circle of plastic, probably from perspex, and glue that on top, making a raised button.
Out of time again today, I will be back with more updates tomorrow - I have the morning aside for the project again.
For this, I will use a tact switch as it is only for the N64 and not a shared button. Due to the location, ie directly above the speaker enclosure and directly above the rear of the speaker cone itself, I need to make the button flat. The only way to do this (apart from a home-made flat design switch) is by taking advantage of the thickness of the wood (2mm thick) as this means the tact switch only protrudes by about 1mm. I cut out the hole, using a drill and a file, then made a recess for the two tact switch connections, then hot glued the rear of the tact switch in place to the wood. It is exactly the right height as it can still be secured to its screw holes on the casing ok - just.
Front and rear view:
On the underside I had to shave areas down - where the screws and bolts are (for the switches), over some glued areas and the bit by the joystick raised area as it was catching on the N64 controller mobo very slightly.
I then soldered the "Z" contacts in place, and screwed the assembly back onto the case.
I need to keep the "Z" button low so it is easier to press. If it is too low at the moment (probably is), I will cut a circle of plastic, probably from perspex, and glue that on top, making a raised button.
Out of time again today, I will be back with more updates tomorrow - I have the morning aside for the project again.
-
bacteria
- Portablizer Extraordinaire
- Posts: 3984
- Joined: Fri Apr 20, 2007 12:14 am
- Location: Hampshire, UK
- Contact:
Kyo - Yes, there is space for batteries, not on the sides (no space there, it is quite tight), some at the top, but at the bottom there is plenty of space.
My issue, as relayed before is I don't know how much I should trust the TI board to run at about 3.2v (as mine does) reliably and not peak or spike. I asked about this but have to date not had a reply as to reliability under load, and once you have a voltage (eg 3.2v) it stays as this or not. Someone posted a while back that they can cause a problem, I don't know if this is the case or not and can't afford to just try it in case it blows my system.
I thought after I get everything finished I might rig up my old part-modded N64 to a PSone screen and leave it running with Goldeneye or similar, with the TI board running, and see what happens. I have plenty of headroom for the Expansion Pack. Using the car adapter I can't use batteries as the car adapter takes too much juice. If the TI card proves ok, I could, if I want to later, pop in an Expansion Pack and also batteries, but as mentioned before, I only really need mains power for the system. Anyway, batteries add to the weight, and can be expensive to get a powerful suitable light battery.
-
bacteria
- Portablizer Extraordinaire
- Posts: 3984
- Joined: Fri Apr 20, 2007 12:14 am
- Location: Hampshire, UK
- Contact:
Update time: I haven't spent as much time this morning as planned, as I was browsing the forums for a bit too long!
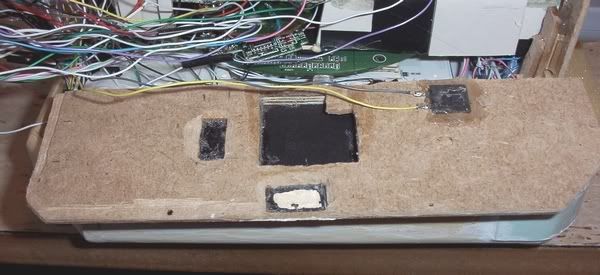
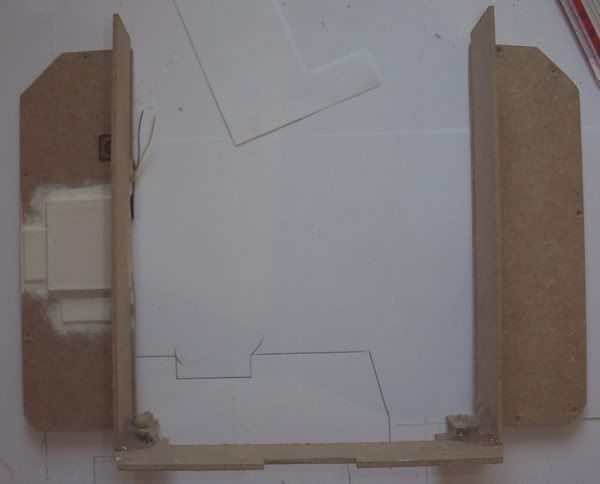
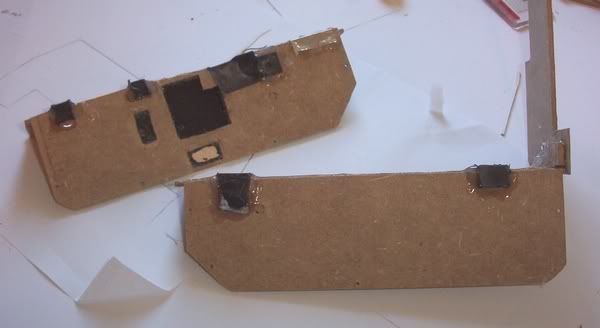
Decided to make the sides more interesting than "boxed" by sloping them.
I carefully measured the sides, stuck the side on with the top piece in place, removed then to add plenty of hot glue at the joint.
I then screwed it back in place on the case
I then added a couple of blobs of hot glue to the sides, so I know precisely where the pieces are so I can secure them properly together at the rear, so the bits I use to keep the joints together and solid are not visible.
Removed whole piece intact. Ready to secure the parts in place strongly (next stage). The surfaces need to be straight, as they will be covered by reverse spray painted acetate (as described before so will look like plastic, not wood.
-
bacteria
- Portablizer Extraordinaire
- Posts: 3984
- Joined: Fri Apr 20, 2007 12:14 am
- Location: Hampshire, UK
- Contact:
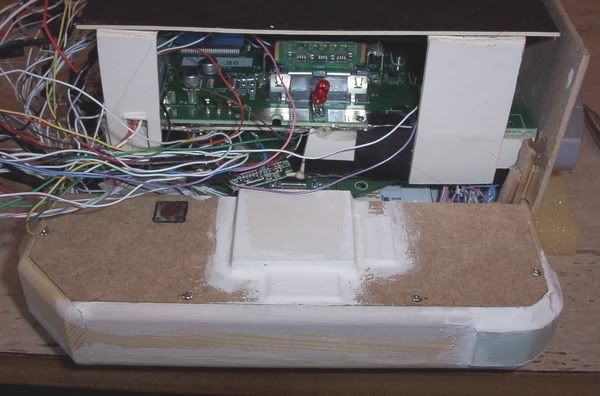
Ok, secured it nicely now. I dremelled out some of the right angled plastic from the original N64 case, these 90 degree shapes are ideal to hot glue to the case and secure the sides! The old N64 case is of no use anyway. I got the right angled bits from the rear of the N64 case, where the power pack goes in!
This ugliness of the joints doesn't matter as this goes inside the case so won't be seen unless the case rear is removed.
I then re-attached back on (it made it easier to remove for this work). Next stage will be the bottom of the case, where the power goes in. I then only have the rest of the base to make, then it is time to make it pretty!!
Run out of time again today, night shift again later, need to get some sleep!
Wow! I hadn't checked your updates in awhile due to almost exceeding my bandwith limit with my internet. This is looking pretty awesome but I'm kind of bummed at the extra space being added bt it's not like you could've done anything else. Keep up the great work!
Kurt_ wrote: I would use tact switches but I want the mushy feel. Mushy = God. (I typed that correctly).

-
bacteria
- Portablizer Extraordinaire
- Posts: 3984
- Joined: Fri Apr 20, 2007 12:14 am
- Location: Hampshire, UK
- Contact:
dudex77 - nice to hear again from you, its been a while!
Yes, the extra height is unavoidable as this is a dual function system. Without the GBA part, the total height would have come to the top of the existing vertical piece of wood in the pic (before the sloped area) as I wouldn't have needed to increase the height for the homemade buttons by the PSone screen and the GBA mobos on the opposite end. The extra height wouldn't have been so much if my attempt at making a GBA cart relocation had worked. The holding area would have been the same, as would the length and breadth of the front of the case; the only extra height is the part you don't hold (therefore isn't a problem using the system). Look at other N64p projects, some look like they are less high than mine but some are higher; and that is only as an N64p let alone a dual system. When the case is built I will upload pics of me holding the system, front and rear, etc - you will see what I mean then.
Tinkering about and testing the system earlier, I ran into two problems:
1) where the case front had been resting for many days on foam on my desk, the homemade buttons recessed a bit, so the touch to make them work became hair trigger! I should have thought about this before; anyway, I pushed them back fully in place, separated the contacts and left them for a couple of hours, so the foam pads I used could get back to shape, which they did - back to normal again. My system is now resting on a book so it is raised but there is now no pressure on the buttons as before.
2) no idea how to solve this problem: I don't know if it happened recently or ages ago (probably ages ago when everything was in bits), but I rigged up the D-pad to work for both systems; had each of the five wires from the D-pad (4 + common) in the centre of the 5 switch connections, with the 5 for the GBA to one side of the switches and the other 5 for the N64; flip a switch and select between the two, right?
For some reason, the D-pad on the GBA works perfectly, when using the N64 and switches are in GBA positions the D-pad doesn't work (as designed) and the joystick works perfectly; when in the N64 position, the joystick works perfectly but the D-pad is eratic, it keeps generating phantom button presses and when I isolate what the D-pad does in N64 mode, it insists on only moving one direction irrespective of what you press. This is a headscratcher - yet another compatibility issue with using two consoles together - others were solved, this one got away. I am struggling to find the fault now. If I can't solve it, rather than opening everything up to bare bones again, and doing extensive tests, I may well resort to just using the joystick for N64, and the D-pad for GBA games only. For sake of completeness it would have been nice to have the N64 with both inputs, even though I haven't played a game (to date) for which I have ever used a D-pad on the N64 (or Gamecube for that matter). In this scenario, it will probably fall into the same camp as when I tried to get the rumble pack installed ages ago, of "it should work but doesn't, oh well, never mind, it isn't important". Single system - easy; dual system - lots of issues need solving.
The actual joystick I am using is superior to the official one in feel and responsiveness, so unless an N64 game I like demands to use a D-pad instead of joystick I can forgo it easily. I haven't found one yet. Many N64p's on the forum don't have a D-pad in any case, which I guess proves my point.
If I just keep the D-pad for the GBA system, I may as well dremel down the slide switches from two of the four switches, keep them in GBA positions, smooth the area and cover it with the case (as if it was never there). If I solve the issue at a later date, I only need to replace the two leveled switches for two new ones, and resolder a few wires; nothing drastic or irreversible. Nobody looking at the system when complete would even be aware of this issue.
Spent a few hours sorting out these problems today. More time tomorrow for this project.
On a different note, got my TI card working at 3.23v, seems fine, doesn't seem I damaged it a while back. My existing system (with car adapter) seems fine, even tried it with Goldeneye for a couple of minutes, which is a demanding game for the hardware. I can swap them over at some point if I want the Expansion Pack or if my system resets itself when playing a game for a long time - I have only tested my system with an N64 game running for up to about 2-3 minutes at a time, not for hours (will do this when the case is complete and airtight, so the system achieves proper airflow and everything is kept really cool from the fan exhaust).
-
Life of Brian
- Moderator
- Posts: 2867
- Joined: Wed Aug 03, 2005 5:55 pm
- Location: Oklahoma
- Contact:

-
bacteria
- Portablizer Extraordinaire
- Posts: 3984
- Joined: Fri Apr 20, 2007 12:14 am
- Location: Hampshire, UK
- Contact:
The N64 controller caused me lots of grief a while back because when connecting controls from another system (eg GBA, or whatever) there were lots of conflicts and things stopped working. This is why I had no option but to make homemade buttons, which had two separate circuit connections via one press-switch. Although the D-pad worked before for both systems, it seems to have gone "screwy" on the N64 part. I will do more tests again in the morning with my multimeter, if it fails to solve the issue, I will just use the D-pad for the GBA part and have done with it. I don't want to disassemble the whole thing again to find one rogue wire playing up; lots of work for little benefit; I wasted several hours on this today as it was.
The joystick on the controller I am using is excellent, far more responsive and better made than the official one.
The joystick on the controller I am using is excellent, far more responsive and better made than the official one.