Bacteria's N64/GBA combined portable - Nintendo 64 Advance
Moderator: Moderators

-
bacteria
- Portablizer Extraordinaire
- Posts: 3984
- Joined: Fri Apr 20, 2007 12:14 am
- Location: Hampshire, UK
- Contact:
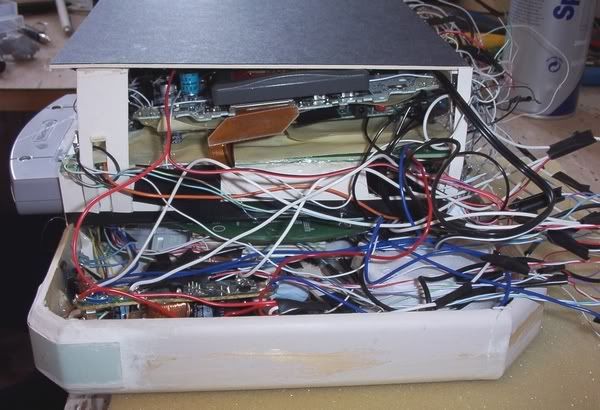
This might help (rear view):

In red is the triangle I need to make to raise the area as mentioned before, so the orange area (opposite side) is needed to keep it symmetrical. The faded area is how the top piece will be (it will be straightened of course!) - I might well make it with angled sides instead of straight, for more interesting curves and esthetics. I will use whatever width of the fan I can, in order that it is centred.
The cart only goes in straight, that is how I designed it ages ago when I secured the steel plate for the cart insertion to the N64 mobo and secured it firmly in place so it couldn't move, and built the cart slot around it. Even if I wanted to change this (which I don't) it would be major surgery to angle it now - anyway, I want it straight, not crooked!

-
ShockSlayer
- Niblet 64
- Posts: 5059
- Joined: Thu Jun 29, 2006 12:47 pm
- Location: In my inbox.
Last night I had a dream about this portable. It was awesome!
Looks good so far!
SS
Looks good so far!
SS
http://twitter.com/ShockSlayer" onclick="window.open(this.href);return false;
-
bacteria
- Portablizer Extraordinaire
- Posts: 3984
- Joined: Fri Apr 20, 2007 12:14 am
- Location: Hampshire, UK
- Contact:
ShockSlayer - What was in the dream??
I tried to update with a couple of new pics but Imageshack's servers seem down; normally it is a bit hit and miss, today it has been dead; so I looked about and signed up on Photobucket as an alternative. Let's see if that is better - looks nicer to use, seems a bit friendlier and also faster...
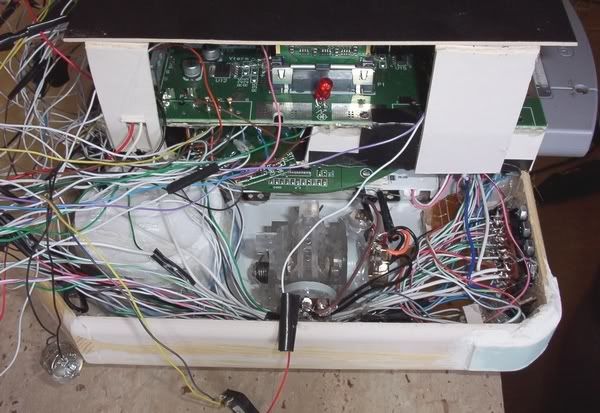
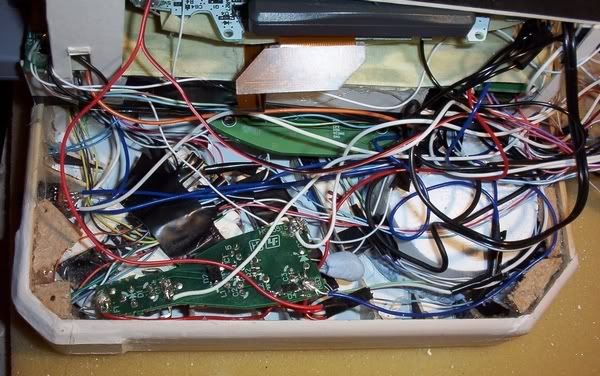
The car adapter is in (top pic), I put Blu-Tac over the LED so it doesn't show any light. I had to use more wiring for the case's positive and negative power wires, as mentioned before, earlier today I managed to reduce my older wiring by more than about 30cms, ideal. Tested system, reliable.
The sides are ready now for the case back as the wires are now out of the way. The trailing wires will be at the base of the case (ie left on the bottom pic), I designed my unit for this; there is about a 1-1.5cm gap for this purpose. I just need to incorporate two batteries in the design to replace the existing ones (one 3v for the GBA mobo, the other of 3v for the N64 memory card); and of course the "Z" button and mains power-in plug. All that is left then is just the case.
Interestingly, the four tiny bits of the sticky foam pads really stick the PSone screen to the perspex well. I am not relying on them (daft to), but it does mean I can continue to build a strong structure around them to support the weight and not be bothered about the screen moving about.
I tried to update with a couple of new pics but Imageshack's servers seem down; normally it is a bit hit and miss, today it has been dead; so I looked about and signed up on Photobucket as an alternative. Let's see if that is better - looks nicer to use, seems a bit friendlier and also faster...
The car adapter is in (top pic), I put Blu-Tac over the LED so it doesn't show any light. I had to use more wiring for the case's positive and negative power wires, as mentioned before, earlier today I managed to reduce my older wiring by more than about 30cms, ideal. Tested system, reliable.
The sides are ready now for the case back as the wires are now out of the way. The trailing wires will be at the base of the case (ie left on the bottom pic), I designed my unit for this; there is about a 1-1.5cm gap for this purpose. I just need to incorporate two batteries in the design to replace the existing ones (one 3v for the GBA mobo, the other of 3v for the N64 memory card); and of course the "Z" button and mains power-in plug. All that is left then is just the case.
Interestingly, the four tiny bits of the sticky foam pads really stick the PSone screen to the perspex well. I am not relying on them (daft to), but it does mean I can continue to build a strong structure around them to support the weight and not be bothered about the screen moving about.
-
bacteria
- Portablizer Extraordinaire
- Posts: 3984
- Joined: Fri Apr 20, 2007 12:14 am
- Location: Hampshire, UK
- Contact:
Can't he reach the door handle then?Kyo wrote:somewhere in the world there is a smallness-king. He's crying right now.
Length and breadth is not the issue, this is nice and in my view the right sort of size (I made it that size for a reason); it is the depth. If I had used flat buttons, only an N64 and not the GBA too, I could have made this design about 60mm deep. Measuring my system, now it is together and complete, including the extra raise for the PSone screen, it is 92mm deep; not as bad as I thought a while back. I should be able to get it 90mm deep. 30mm (3cms) extra is not a problem. The sides are 29mm deep; will raise to about a total of 40mm deep, however that is not important, the 29mm is the part to rest between my thumb and forefinger gap, the extra 10mm raise for the finger rests will not be noticeable, so not an issue in terms of grip and hold.
-
bacteria
- Portablizer Extraordinaire
- Posts: 3984
- Joined: Fri Apr 20, 2007 12:14 am
- Location: Hampshire, UK
- Contact:
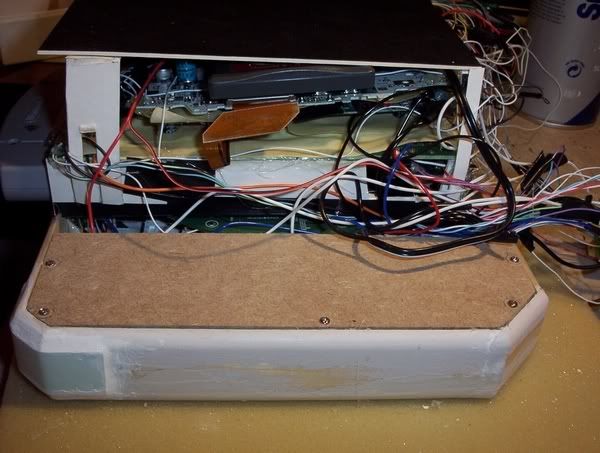
Spent quite a while working this out, and the options available. I decided not to have a slant (angle) as before, it would be too hard to get right and also be removable. After testing, I found I can make do with less finger space at the rear of the case, so decided to make a flat piece at the base. This was also done as the wiring and components are tight in the space, no headroom; so making more of a space around the middle section is far better for the wiring.
Firstly, I had to trim a bit off the mounting board I put over the "C" buttons, as the car adapter was a little too tall. This solved the problem.
I then proceeded to saw the wooden picture frame back (as mentioned weeks ago I might use) and shape it; then drilled holes in it, hot glued pieces of this wood on the case and made holes in the relevant places (the scraggy bits of wood in the pic). I had to be careful as I was drilling close to my electronics and wiring.
Next job was to screw it down. I can make it pretty later.
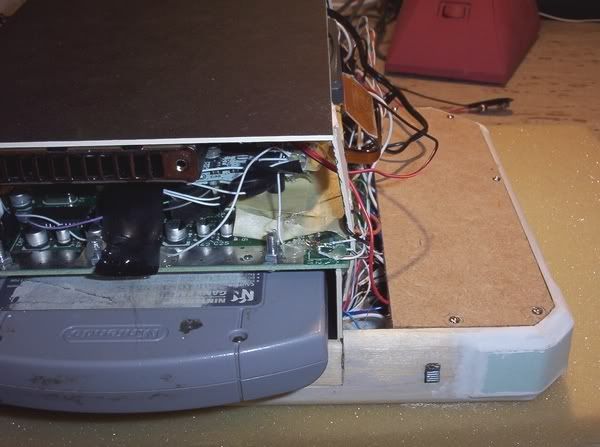
PS - Photobucket.com is far better than ImageShack for images; I am converted!
The other side will be easier to make, although as I have decided on this course of action (option 1 in previous posting), I am likely to need the milk bottle top after all, for above the joystick!!
Screwing down wood onto the surface looks fine, makes it easy to open again later if needed; although getting a perfect finish will be harder; although this is the reverse of the case so not as important.
Firstly, I had to trim a bit off the mounting board I put over the "C" buttons, as the car adapter was a little too tall. This solved the problem.
I then proceeded to saw the wooden picture frame back (as mentioned weeks ago I might use) and shape it; then drilled holes in it, hot glued pieces of this wood on the case and made holes in the relevant places (the scraggy bits of wood in the pic). I had to be careful as I was drilling close to my electronics and wiring.
Next job was to screw it down. I can make it pretty later.
PS - Photobucket.com is far better than ImageShack for images; I am converted!
The other side will be easier to make, although as I have decided on this course of action (option 1 in previous posting), I am likely to need the milk bottle top after all, for above the joystick!!
Screwing down wood onto the surface looks fine, makes it easy to open again later if needed; although getting a perfect finish will be harder; although this is the reverse of the case so not as important.
Yet another victim of the evildoings of imageshack, as I see! Now if the host of my imagehost wouldn't suck so damn much (I'm moving it soon), I would totally say goodbye to imageshack, it's slowness, it's page-not-load-ness, and it's popups myself!
On topic however, I love the look of this. Can't wait to see the done thing!
On topic however, I love the look of this. Can't wait to see the done thing!
-
bacteria
- Portablizer Extraordinaire
- Posts: 3984
- Joined: Fri Apr 20, 2007 12:14 am
- Location: Hampshire, UK
- Contact:
My intentions, if I can do it, is to make the rear of the case in effect one piece, sealed on both sides and base with screws only. The rest of the case is to be sealed to these three sides. The case needs securing in three places to keep all the guts of the system firmly in place and to keep it as airtight as possible (so the fan is efficient). The third securing place needs to be raised anyway as that is where the mains power-in plug will be housed.
I intend to make the rear of the case incorporating various angles, as I don't want it to look like a box. It would also be nice if part of the bottom underside has an angle between 30-40 degrees or so, so the system can be played on a desk as an option to just holding it. I need to experiment to see if this can be done without too much disruption. Irrespective of such an angle on the base, it also needs to rest flat on a desk when not in use (stable base). Making a case to this spec needs a lot of thought and planning, and might need compromises.
Picked up system a few times yesterday, especially in order to evaluate the sides, the weight is fine; it is lighter than my previous project (but then, I did use a fair bit of Polyfiller on the last project - this stuff is heavy!). In contrast now, I am barely using any filler and am using mounting board and 2mm picture framing wood, far lighter.
I like imageshack, it works great for me.... get firefoxKyo wrote:Yet another victim of the evildoings of imageshack, as I see! Now if the host of my imagehost wouldn't suck so damn much (I'm moving it soon), I would totally say goodbye to imageshack, it's slowness, it's page-not-load-ness, and it's popups myself!

"Linux is only free if your time is worthless"