Bacteria's N64/GBA combined portable - Nintendo 64 Advance
Moderator: Moderators
-
bacteria
- Portablizer Extraordinaire
- Posts: 3984
- Joined: Fri Apr 20, 2007 12:14 am
- Location: Hampshire, UK
- Contact:
Kyo - Sure, pic as below (just woke up after my kip before work).

This is the right shoulder button, laid flat. Looks a little messy, but you can see in the pic at the bottom the washers, I just used some UHU glue to stick them to the paper and each other (about 1.5mm total thickness). I used a little Polyfiller to fill the holes, prior to their painting.
Button contacts made as I am doing have sweetspots - the places where they work the most efficiently. Where these washers are on the pic are the sweetspots on the right side and corner positions where both sets of contacts with one button press work together.

-
CronoTriggerfan
- Moderator
- Posts: 4131
- Joined: Fri Jan 27, 2006 3:07 pm
- Location: University of Michigan - Ann Arbor
- Contact:

-
johnbjuice
- Posts: 520
- Joined: Thu Nov 30, 2006 11:52 pm
- Location: California
- Contact:
-
bacteria
- Portablizer Extraordinaire
- Posts: 3984
- Joined: Fri Apr 20, 2007 12:14 am
- Location: Hampshire, UK
- Contact:
johnbjuice - Thanks for the kind comments, always appreciated! 
I must admit, I am also wondering what page number this will finish on. I know I am in control of it entirely, however I catalogue everything, so in reality, I don't know either, as I don't have any intention to put in less pics in order to reduce it, nor pad the topic with pics there for the sake of it. I'm guessing page 30?? I doubt it will be under 28 pages at the end. Watch this space!!
Taking out the re-working and re-tracing steps, just keeping it purely step-by-step and concise would probably reduce it to about 10 pages I guess. I still intend to make a downloadable .pdf guide after finishing the project, although when I do that depends on other different projects in the pipeline.
Anyway, I have an hour or so before going to bed (just back after a night shift, another one again tonight, so I need some sleep) for more project work.
-
bacteria
- Portablizer Extraordinaire
- Posts: 3984
- Joined: Fri Apr 20, 2007 12:14 am
- Location: Hampshire, UK
- Contact:
Not been happy with the "button" style on the shoulder buttons. The whole reason I make the strip a strip covering part of the side, whole of the corner and part of the top on both shoulder buttons was that I could press ANYWHERE on it and it would register the press. Occurred to me that the thin acetate is making too much resistance and therefore also needing an actual press to work, and it was fussy as to where I pressed. Not good enough. I pulled off the plastic and attached some 160g thin card (in blue on pic) in its place.
It now works as it was designed to do; press anywhere (apart from edges) and the contact is made: also no unsightly raised areas. This is more like it! One other issue I had was one of the contact wires didn't hot glue to the others as it should have done, so I had to disassemble more of one of the sides to repair it, hot glue the wire back, and put top on.
Anyway, updated pics. I am happy with it now; light touch is all you need (as it should be) to make it work. I thought thin PVC was good to try - it wasn't. Problem solved.
The reason I need to have such an area as the shoulder buttons isn't just for appearance; when playing N64 games you primarily use the joystick (sometimes with D-pad but not often), when playing GBA games it is D-pad only; so depending which you are using varies where your shoulder buttons need to be, so basically I have covered all the bases with my design.
NOTES:
1) The circle in pic at the top of case is the reflection of the camera lens.
2) The lines, etc in the pics are the struts behind the perspex hot glued in place. They are only visible if the case has a light behind the case (so no issue). When I have the rear of the case on, no light will be able to come in the case at all.


I had just enough time to smooth the shoulder button areas with Polyfiller before going for my sleep. Next job will to lightly sand the areas, clean the window inside the case (remove dust), clean the PSone screen and then start the assembly; although I doubt I will have much time to do this on the weekend (with the wife), however I do have most of Monday and Tuesday to use as playtime for the project. I will have lots of pics on Monday and Tuesday to share!!
Update: pic below - did the Polyfiller. This is prior to a light sanding (paint and varnish). Nice and smooth on the edges.

It now works as it was designed to do; press anywhere (apart from edges) and the contact is made: also no unsightly raised areas. This is more like it! One other issue I had was one of the contact wires didn't hot glue to the others as it should have done, so I had to disassemble more of one of the sides to repair it, hot glue the wire back, and put top on.
Anyway, updated pics. I am happy with it now; light touch is all you need (as it should be) to make it work. I thought thin PVC was good to try - it wasn't. Problem solved.
The reason I need to have such an area as the shoulder buttons isn't just for appearance; when playing N64 games you primarily use the joystick (sometimes with D-pad but not often), when playing GBA games it is D-pad only; so depending which you are using varies where your shoulder buttons need to be, so basically I have covered all the bases with my design.
NOTES:
1) The circle in pic at the top of case is the reflection of the camera lens.
2) The lines, etc in the pics are the struts behind the perspex hot glued in place. They are only visible if the case has a light behind the case (so no issue). When I have the rear of the case on, no light will be able to come in the case at all.
I had just enough time to smooth the shoulder button areas with Polyfiller before going for my sleep. Next job will to lightly sand the areas, clean the window inside the case (remove dust), clean the PSone screen and then start the assembly; although I doubt I will have much time to do this on the weekend (with the wife), however I do have most of Monday and Tuesday to use as playtime for the project. I will have lots of pics on Monday and Tuesday to share!!
Update: pic below - did the Polyfiller. This is prior to a light sanding (paint and varnish). Nice and smooth on the edges.
-
bacteria
- Portablizer Extraordinaire
- Posts: 3984
- Joined: Fri Apr 20, 2007 12:14 am
- Location: Hampshire, UK
- Contact:
I thought mounting the case onto the PSone screen was going to be fast, however the case didn't initially lower enough to be on the screen. I thought the issue was with the polystyrene surround for the speakers, so I removed a few chunks, discovered it wasn't the issue.
The issue was that I hadn't allowed enough clearance for the button surrounds on my home made buttons; ok, I could solve that, but then I realised a far deeper issue; I would have no way to mount the other bottom buttons in the case and connect them; in fact, I also needed to raise the distance from the PSone screen mobo as there was no space for the buttons in the case I had made - if the buttons were completely flat (ie I only did an N64p I would get away with it), that would be fine, but as two of the buttons need to be multi function I need the height for them (about 8-10mm). Normally in a project others have done, this is not a problem as normally the buttons under the PSone screen are the contrast and volume buttons (not on my project), so the PSone plug connectors aren't in the way, nor do you need to attach contact wires normally.
I had no option therefore but to raise the height of the PSone screen from the PSone screen mobo. This meant there were no issues anymore, so I also hot glued the polystyrene around the speakers back on. The edge of my homemade "A" button needed a bit more clearance, so I dremelled off one of the metal tabs around the PSone screen.
Unfortunately, this adds more height to the system. I could have raised it by about 11mm but decided on 17mm so there is plenty of space to put in the two homemade buttons under the PSone screen and be able to solder wires to the tact switches, and also be able to do repairs or adjustments if I need to. I tested the screen; the maximum height the ribbon cable would allow is about 20mm.
I raised the screen with mounting board, each layer is hot glued to the next for strength; the screen is secured in place, as is the mounting board, by double-sided tape, which makes it easier to remove later if I need to. Raising the screen also had one other impact - the screen was further up the PSone mobo than before, due to the arc of the ribbon cable, so I had to adjust the position of the mobo on the mounting board backing - this was a positive benefit


This is a bit unfortunate as the case is already quite thick, this just makes it thicker.
This extra height also means I had a gap at the rear of the case above the cart slot. Fortunately I still had the wood piece I had cut out ages ago, I just reduced one of the long sides a bit to make it fit. It doesn't matter that there are grooves in the surface, acetate will cover it later.
This also means I can mount the PSone contrast and volume buttons at the top of the case, in front of the cart, which makes them easier to access. (next step to do).


The middle part was always going to be too thick to hold, so I guess making it a bit thicker still isn't a problem; the sides are the parts to hold, and they will be fine.

Proves, as said before, you have to make the case last, you can't make a case beforehand and hope everything will fit, because it won't; especially if you are using home-made parts, and being a bit inventive and creative.
This case is going to end up about 95mm high in the middle; higher than I wanted it to be; however I had to raise the PSone screen (reasoning above) by 17mm and the GBA mobos raised the system by about the same; so if I had just made an N64 portable it would have been about 65mm high instead of 95mm high. *sighs*.
The issue was that I hadn't allowed enough clearance for the button surrounds on my home made buttons; ok, I could solve that, but then I realised a far deeper issue; I would have no way to mount the other bottom buttons in the case and connect them; in fact, I also needed to raise the distance from the PSone screen mobo as there was no space for the buttons in the case I had made - if the buttons were completely flat (ie I only did an N64p I would get away with it), that would be fine, but as two of the buttons need to be multi function I need the height for them (about 8-10mm). Normally in a project others have done, this is not a problem as normally the buttons under the PSone screen are the contrast and volume buttons (not on my project), so the PSone plug connectors aren't in the way, nor do you need to attach contact wires normally.
I had no option therefore but to raise the height of the PSone screen from the PSone screen mobo. This meant there were no issues anymore, so I also hot glued the polystyrene around the speakers back on. The edge of my homemade "A" button needed a bit more clearance, so I dremelled off one of the metal tabs around the PSone screen.
Unfortunately, this adds more height to the system. I could have raised it by about 11mm but decided on 17mm so there is plenty of space to put in the two homemade buttons under the PSone screen and be able to solder wires to the tact switches, and also be able to do repairs or adjustments if I need to. I tested the screen; the maximum height the ribbon cable would allow is about 20mm.
I raised the screen with mounting board, each layer is hot glued to the next for strength; the screen is secured in place, as is the mounting board, by double-sided tape, which makes it easier to remove later if I need to. Raising the screen also had one other impact - the screen was further up the PSone mobo than before, due to the arc of the ribbon cable, so I had to adjust the position of the mobo on the mounting board backing - this was a positive benefit
This is a bit unfortunate as the case is already quite thick, this just makes it thicker.
This extra height also means I had a gap at the rear of the case above the cart slot. Fortunately I still had the wood piece I had cut out ages ago, I just reduced one of the long sides a bit to make it fit. It doesn't matter that there are grooves in the surface, acetate will cover it later.
This also means I can mount the PSone contrast and volume buttons at the top of the case, in front of the cart, which makes them easier to access. (next step to do).
The middle part was always going to be too thick to hold, so I guess making it a bit thicker still isn't a problem; the sides are the parts to hold, and they will be fine.
Proves, as said before, you have to make the case last, you can't make a case beforehand and hope everything will fit, because it won't; especially if you are using home-made parts, and being a bit inventive and creative.
This case is going to end up about 95mm high in the middle; higher than I wanted it to be; however I had to raise the PSone screen (reasoning above) by 17mm and the GBA mobos raised the system by about the same; so if I had just made an N64 portable it would have been about 65mm high instead of 95mm high. *sighs*.
-
twilightprincess
- Posts: 367
- Joined: Sat Feb 17, 2007 12:28 am
- Location: Western Australia Gender: Male

-
bacteria
- Portablizer Extraordinaire
- Posts: 3984
- Joined: Fri Apr 20, 2007 12:14 am
- Location: Hampshire, UK
- Contact:
twilightprincess - Thanks, yes, it will look nice, very pleased with it so far; I had hoped it would have been less bulky though, however it isn't a problem.
In process at the moment of cutting out the buttons in front of the cart slot (PSone contrast, volume; N64 memory pack switch). I haven't hot glued them in place yet, they are a very tight fit (as needed). The tact switch itself is the same thickness as the wood, so is seamless. I am making it so that the tact switch itself sticks out whilst the tact switch surround is the same height as the wood. This means I can have very low switches, discreet.

Two down, two more to go. For the N64 memory switch I will make it only accessible by pressing something into a hole, so it can't be pressed unintentionally.
In process at the moment of cutting out the buttons in front of the cart slot (PSone contrast, volume; N64 memory pack switch). I haven't hot glued them in place yet, they are a very tight fit (as needed). The tact switch itself is the same thickness as the wood, so is seamless. I am making it so that the tact switch itself sticks out whilst the tact switch surround is the same height as the wood. This means I can have very low switches, discreet.
Two down, two more to go. For the N64 memory switch I will make it only accessible by pressing something into a hole, so it can't be pressed unintentionally.
-
bacteria
- Portablizer Extraordinaire
- Posts: 3984
- Joined: Fri Apr 20, 2007 12:14 am
- Location: Hampshire, UK
- Contact:
Done.
Only hole left to do will be the mains power in. Toying with where to put it, but will put it somewhere under the cart at the rear of the case. This means I can rest the system on the desk without it rocking.
Doing this work really proved to me how strong the right-angled triangles with a little hot glue really is - only four of these held the re-attached piece of wood, yet withheld drilling, and vigourous filing. I am impressed with its strength.


Soldered wires to the contacts as when the case is on, this is the one part I will not be able to access!

Only hole left to do will be the mains power in. Toying with where to put it, but will put it somewhere under the cart at the rear of the case. This means I can rest the system on the desk without it rocking.
Doing this work really proved to me how strong the right-angled triangles with a little hot glue really is - only four of these held the re-attached piece of wood, yet withheld drilling, and vigourous filing. I am impressed with its strength.
Soldered wires to the contacts as when the case is on, this is the one part I will not be able to access!
Last edited by bacteria on Mon Sep 24, 2007 7:55 am, edited 1 time in total.
-
nightwheel
- Senior Member
- Posts: 2018
- Joined: Mon Mar 19, 2007 11:49 am
- PSN Username: nightwheel
- 360 GamerTag: nightwheel94
- Steam ID: nightwheel
- Location: Kentucky, We are KFC
- Contact:
Um can you get me a up close pictures of this area where the mobos and the cartridge slots are?
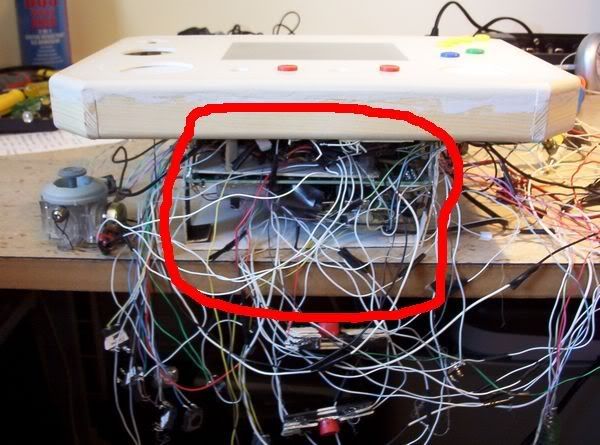
One picture with the cartridges in. And another picture with them out. I got a idea for you. But I need to see if my idea for you is possible and will work for you.
One picture with the cartridges in. And another picture with them out. I got a idea for you. But I need to see if my idea for you is possible and will work for you.

Who knows if the Namco Portable will ever become a reality?
-
bacteria
- Portablizer Extraordinaire
- Posts: 3984
- Joined: Fri Apr 20, 2007 12:14 am
- Location: Hampshire, UK
- Contact:
nightwheel - interested in your thoughts. Made pics of the four views and made them 800 pixels wide (instead of my normal 600), so you have a good view.


The GBA cart can't be made higher nor can it be located elsewhere - there is no where else to put it, so I can't reduce the height here. I can't reduce any height in the middle section, that was made as thin as possible; and there is an issue with getting to the front button section - I can make it a few millimeters less, but if I have to replace the buttons in the future it would be a problem getting to them, so I have made it slightly higher to accomodate this. A project like this has to be (fairly) easy to disassemble for repairs and maintenance as needed.
The GBA cart can't be made higher nor can it be located elsewhere - there is no where else to put it, so I can't reduce the height here. I can't reduce any height in the middle section, that was made as thin as possible; and there is an issue with getting to the front button section - I can make it a few millimeters less, but if I have to replace the buttons in the future it would be a problem getting to them, so I have made it slightly higher to accomodate this. A project like this has to be (fairly) easy to disassemble for repairs and maintenance as needed.
-
bacteria
- Portablizer Extraordinaire
- Posts: 3984
- Joined: Fri Apr 20, 2007 12:14 am
- Location: Hampshire, UK
- Contact:
Last update for day, probably:
Firstly, I tested the system (GBA) to make sure I didn't pull the PSone ribbon cable, or whatever - all ok.
I gave the window of the front of the case a good clean, then the PSone screen. I put small pieces of sticky foam pads (1mm thick) onto the corners of the PSone screen and pressed the case front in place.
When I turn the system over I will hot glue the screen in place and seal the sides with BluTak to stop any light coming in from the back (if there is any).
I put the joystick in place, had to position it with my hand otherwise the joystick stick would be down instead of in its correctly raised position.
Lots of work to do yet, but at least it is taking shape now - this is the fun part of the project as you can see things unfold quickly.


Once the screen is in position, I can solder the connections to the buttons and contacts, then start the sides and back of the case (and Z button).
Firstly, I tested the system (GBA) to make sure I didn't pull the PSone ribbon cable, or whatever - all ok.
I gave the window of the front of the case a good clean, then the PSone screen. I put small pieces of sticky foam pads (1mm thick) onto the corners of the PSone screen and pressed the case front in place.
When I turn the system over I will hot glue the screen in place and seal the sides with BluTak to stop any light coming in from the back (if there is any).
I put the joystick in place, had to position it with my hand otherwise the joystick stick would be down instead of in its correctly raised position.
Lots of work to do yet, but at least it is taking shape now - this is the fun part of the project as you can see things unfold quickly.
Once the screen is in position, I can solder the connections to the buttons and contacts, then start the sides and back of the case (and Z button).


