Phew. I've been lurking in these forums for months, and have finally figured out why my previous two attempts at getting a screen name here have not worked. The answer? Hotmail. I don't know if any of you have experienced this, but when I signed up as my proper internet name of jordanaction and also Jordan Action, I did not recieve confirmation in my hotmail. I actually had to go and set up a Gmail account.
Anyway, enough of that. I've bought the book, and have been watching from the shadows. I've fried a couple ps1 motherboards and had to adlib a couple details, but I've collected my necessary components and am well on the road to completing my PS1. I've taken the Frankencase bondo route for this one, and so far am very satisfied with my results, having almost completed the faceplate.
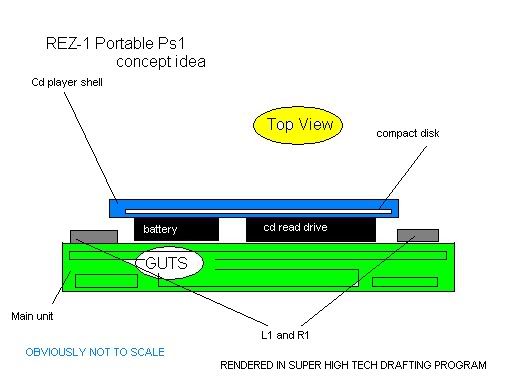
Playstation Rez-1 Features:
5" famous Ps1 screen
Ps1 mini motherboard
Sony Infolithium battery
Internal Memory one slot/external memory 2 slot
Player one and two external ports (as well as onboard player 1 controls)
PSP analog thumbsticks modded to be "clickable"
Landscape design 13cm X 20cm
and so on
My goal with this is a somewhat professional appearance, with all components housed inside, no external or mounted batteries. the only info i'm short on right now is if it would be possible to make my sony battery charge within the unit without removal.
Pictures of current progress coming soon.
Portable playstation project: Rez-1
Moderator:Moderators
-
RezCrimson

- Posts:64
- Joined:Tue Nov 20, 2007 1:27 pm
- Location:Battle Creek, Michigan
- Contact:
Last edited by RezCrimson on Wed Nov 21, 2007 5:49 pm, edited 2 times in total.

-
Helpplease

- Posts:43
- Joined:Sun Nov 18, 2007 11:56 am
- Location:In my room, building stuff. And in Sweden.
-
Life of Brian

- Moderator
- Posts:2867
- Joined:Wed Aug 03, 2005 5:55 pm
- Location:Oklahoma
- Contact:
Cool! Looking forward to seeing your work!
As for charging the batteries, I suppose you'd need to build some sort of charging protection circuit inside the case and provide power somehow... Afraid I don't know much more than that.
I used hotmail back when I first signed up... Perhaps it filtered the confirmation into the junk mail file?
As for charging the batteries, I suppose you'd need to build some sort of charging protection circuit inside the case and provide power somehow... Afraid I don't know much more than that.
I used hotmail back when I first signed up... Perhaps it filtered the confirmation into the junk mail file?
dragonhead wrote:sweet. ive spent a third of my life on benheck!

-
RezCrimson
- Posts:64
- Joined:Tue Nov 20, 2007 1:27 pm
- Location:Battle Creek, Michigan
- Contact:
-
RezCrimson
- Posts:64
- Joined:Tue Nov 20, 2007 1:27 pm
- Location:Battle Creek, Michigan
- Contact:
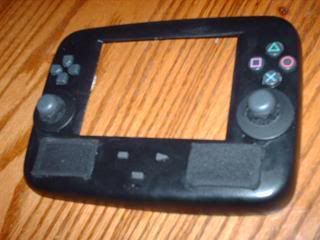
Rez-1 Faceplate Rough Cut
Since I love these forums so much, Thought I'd put up a peek of this baby
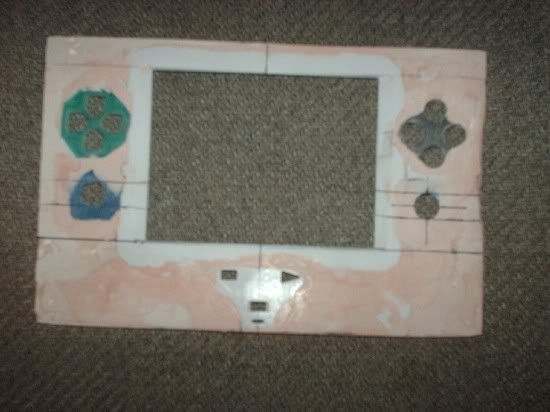
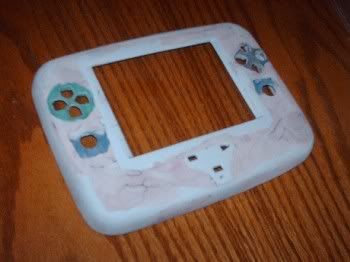
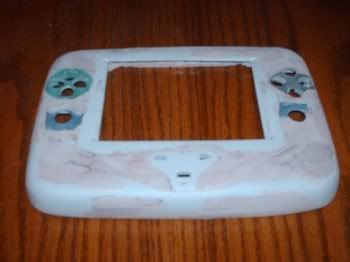
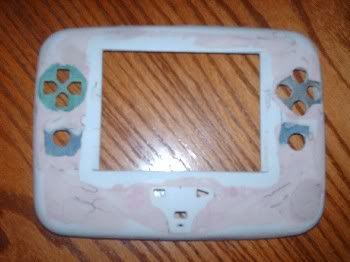
As you can see, this is a very rough cut of the faceplate. Next step is to fill in all the divots and trenches, round the corners, and square up the sides. Afterwards the guts will be arranged behind it so I can get a thickness measurement. When I get the thickness, I'll be able to install the walls.
Walls may be plastic or aluminum.
I'm thinking of a candy burgundy or crimson for the paintjob.
I decided instead of making the PSP thumbsticks "clickable." I will instead put r3 and r4 buttons on the back. I don't believe it will conflict with gameplay. On the contrary, I think the analog buttons are hard to use anyway. I seem to remember in Metal Gear Solid, clicking to crouch, only to watch in horror as Snake snuck around drunkenly and got caught.
Honest opinions and helpful suggesitions will be appreciated.
-
RezCrimson
- Posts:64
- Joined:Tue Nov 20, 2007 1:27 pm
- Location:Battle Creek, Michigan
- Contact:
a labor of love...

Until next time, intrepid portablizers
-
johnbjuice

- Posts:520
- Joined:Thu Nov 30, 2006 11:52 pm
- Location:California
- Contact:
-
Turbo Tax 1.0

- Portablizer Extraordinaire
- Posts:4773
- Joined:Wed Mar 30, 2005 6:19 pm
- Location:Delaware, no sales tax
- Contact:

-
RezCrimson
- Posts:64
- Joined:Tue Nov 20, 2007 1:27 pm
- Location:Battle Creek, Michigan
- Contact:
trudging
Little update here,
Started fooling around with the guts. To my horror, the ps1 is going to be too thick, so to keep the thickness down, i'm going to have to make the cd kind of external like all the other one's i've seen. But, I've got an idea to encase the cd in a cd player and put an enclosure around the read drive and the battery, so that way they will be protected and out of sight. (imagine a wide doorknob on the back of the unit. of course all of this will be bondo'd and painted and all that so it dosen't look hillbilly or anything.
just an idea, may or may not do it.
-
RezCrimson
- Posts:64
- Joined:Tue Nov 20, 2007 1:27 pm
- Location:Battle Creek, Michigan
- Contact:
-
RezCrimson
- Posts:64
- Joined:Tue Nov 20, 2007 1:27 pm
- Location:Battle Creek, Michigan
- Contact:
Unfortunately disaster has struck. One of my psp sticks broke and I have decided that they are cheap as S@*# and I don't want anything to do with them. So ps2 mini analog sticks it is. They aren't really smaller, but the ones I selected were mostly metal in construction and the sticks with some alterations worked out well. Here we go with the update,
Look at the plates I mounted the sticks on. They are the power and reset buttons from an origional version playstation. I made speaker covers with thin plastic and speaker cloth.
closeup of the stick. I used speaker cloth to cover up the construction.
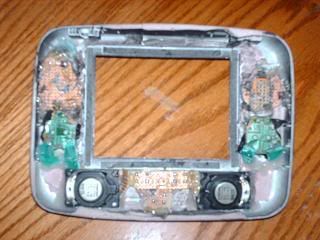
Look at the plates I mounted the sticks on. They are the power and reset buttons from an origional version playstation. I made speaker covers with thin plastic and speaker cloth.
closeup of the stick. I used speaker cloth to cover up the construction.
-
RezCrimson
- Posts:64
- Joined:Tue Nov 20, 2007 1:27 pm
- Location:Battle Creek, Michigan
- Contact:
oi. I have spent about 20 ridiculous accumalitive hours trying to solder the 16 little connections on my psone controller. (the one ben suggests in his book) I have another controller that is very suitable for soldering connections on various parts of the controller board. Now my only problem is that this controller only has 8 connections that go to the controller port. The one Ben describes in the book has 9. So I'll have to do some trial and error connections unless someone knows where they go.
(I'll go check the sticky just in case and do searching. I'm sure someone has had this issue)
(I'll go check the sticky just in case and do searching. I'm sure someone has had this issue)

Perhaps with this controller you don't have to wire points 2 and 8 to the same place.RezCrimson wrote:oi. I have spent about 20 ridiculous accumalitive hours trying to solder the 16 little connections on my psone controller. (the one ben suggests in his book) I have another controller that is very suitable for soldering connections on various parts of the controller board. Now my only problem is that this controller only has 8 connections that go to the controller port. The one Ben describes in the book has 9. So I'll have to do some trial and error connections unless someone knows where they go.
(I'll go check the sticky just in case and do searching. I'm sure someone has had this issue)
The case looks cool , reminds me of a cross between G-force's playmad and the original PSone shell.
-
Life of Brian
- Moderator
- Posts:2867
- Joined:Wed Aug 03, 2005 5:55 pm
- Location:Oklahoma
- Contact:
I've had a similar problem before. The only sure-fire way to not mix up your connections is to go at it with a multimeter to test your connections. I just plugged the controller into the jack and tested where each wire went.RezCrimson wrote:oi. I have spent about 20 ridiculous accumalitive hours trying to solder the 16 little connections on my psone controller. (the one ben suggests in his book) I have another controller that is very suitable for soldering connections on various parts of the controller board. Now my only problem is that this controller only has 8 connections that go to the controller port. The one Ben describes in the book has 9. So I'll have to do some trial and error connections unless someone knows where they go.
(I'll go check the sticky just in case and do searching. I'm sure someone has had this issue)
Edit: By the way, your case is coming out freakin' sweet!
dragonhead wrote:sweet. ive spent a third of my life on benheck!
-
RezCrimson
- Posts:64
- Joined:Tue Nov 20, 2007 1:27 pm
- Location:Battle Creek, Michigan
- Contact:
I figured it all out with the controller I think. My only concern is the case getting too thick, the playmad was about 2 or 3 inches wider than mine. I actually have the screen itself sitting about an inch above the screen's board so that I can fit the controls so close to the screen. The control pad board will also be in this space along with a computer speaker amplifier board that I "flattened" because my screen's audio went out.
If I use this ps1 enough, I'll be making a "lite" version that will be more like Ben's CNC case.
Tonight I'll get the controls plugged in and maybe I will see this sucker operational. Afterwards I'll get the backplate going.
If I use this ps1 enough, I'll be making a "lite" version that will be more like Ben's CNC case.
Tonight I'll get the controls plugged in and maybe I will see this sucker operational. Afterwards I'll get the backplate going.