this makes me wanna build a nintendo portable!
you know, something simpler than a n64
The Entertain Boy worklog FINISHED
Moderator:Moderators
-
metalcookie

- Posts:393
- Joined:Sat Mar 21, 2009 12:29 pm
- Location:Walter Sullivan's apartment
Citizen Kane
Re: NESp from the book worklog (56k warning)
I'm too lazy to take pictures at the moment. What I've done now is line the spacers with some styrene tubing (my other hobby is model airplanes and tanks). The screws fit snugly after I re-threaded everything. I was able to install the controller boards after that, so now the buttons are in place, and I've come to enjoy the clicky tact switches actually.
After I get some more work done, I'll post more pics. Just wanted to remind everyone that I haven't been snoozin'.
After I get some more work done, I'll post more pics. Just wanted to remind everyone that I haven't been snoozin'.
Last edited by Bino Gas on Sun Aug 23, 2009 3:26 pm, edited 1 time in total.

Re: NESp from the book worklog (56k warning)
These 2 photos explain everything. Basically, all the guts are installed except for the screen.

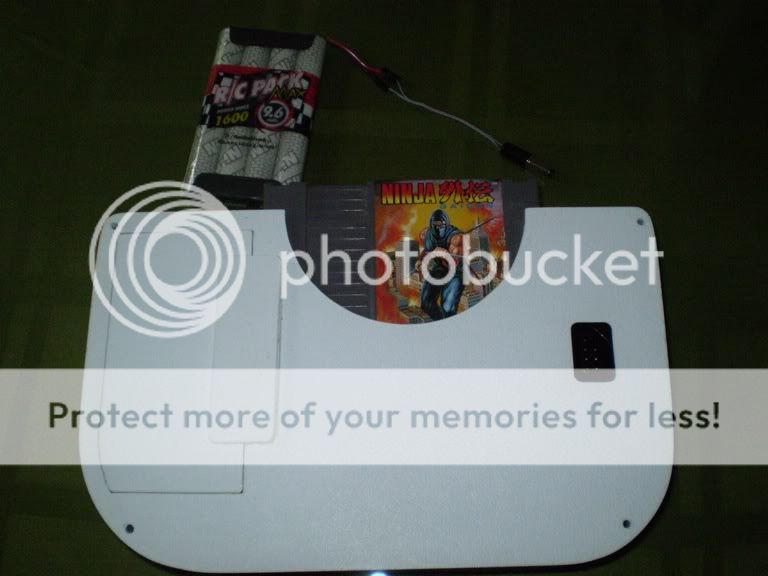
Ninja Gaiden!
I also made brightness and volume buttons using rubber stoppers, but they are too ugly to be in the picture. Instead, I'll probably use SNES buttons like this guy did.
Ninja Gaiden!
I also made brightness and volume buttons using rubber stoppers, but they are too ugly to be in the picture. Instead, I'll probably use SNES buttons like this guy did.
-
Shadowbast

- Posts:9
- Joined:Wed Aug 19, 2009 7:13 pm

Re: NESp from the book worklog (56k warning)
It's made out of PVC ...I think. I found a sheet of it lying around in my basement. 1/16" thick.Shadowbast wrote:What is this case made of?
Thanks, hopefully it will be finished soon.Shadowbast wrote:exelent job!
Re: NESp from the book worklog (56k warning)
It's been a while since I've updated this, and now is as good a time as any.
I finally got a PSone screen, and the coolest part is that it came with a PSone attached to the bottom.

I got it all hacked up and everything, but I wired it incorrectly and ended up frying the LEDs. As soon as my new LEDs ship, this portable will be finished.

Picture a screen where the hole is right now, and that's pretty much how this will look in a week.

I finally got a PSone screen, and the coolest part is that it came with a PSone attached to the bottom.
I got it all hacked up and everything, but I wired it incorrectly and ended up frying the LEDs. As soon as my new LEDs ship, this portable will be finished.
I thought these PlayStation buttons would look cooler, so I put them in with the same method I used for the A/B buttons.Bino Gas wrote:I also made brightness and volume buttons using rubber stoppers, but they are too ugly to be in the picture. Instead, I'll probably use SNES buttons like this guy did.
Picture a screen where the hole is right now, and that's pretty much how this will look in a week.

Re: NESp from the book worklog (56k warning)
Get that thing working! I want to see it in action!
(Whoops, I just realized this was from a long time ago. Good thing I wasn't the one who bumped it.)
(Whoops, I just realized this was from a long time ago. Good thing I wasn't the one who bumped it.)
Making stuff with my new beautiful CNC machine!
Would you like a professional looking custom case for your portable? I may be able to help you. Check out this link:
http://forums.benheck.com/viewtopic.php?f=13&t=32724
Would you like a professional looking custom case for your portable? I may be able to help you. Check out this link:
http://forums.benheck.com/viewtopic.php?f=13&t=32724
Re: The Entertain Boy worklog (resurrected)
I have decided to resume work on this project. It even has a new name:

Anyway, I did get this portable to work a few months ago, but I wasn't satisfied with the sloppy wiring. I gutted the case, and started fresh. Here is my cut-down PSone screen. It works, too.


I'll probably include stereo sound now, and I'm entertaining (pun intended) the idea of dropping in a Playchoice ppu for rgb video. More pics to come after I get another NES.
Anyway, I did get this portable to work a few months ago, but I wasn't satisfied with the sloppy wiring. I gutted the case, and started fresh. Here is my cut-down PSone screen. It works, too.
I'll probably include stereo sound now, and I'm entertaining (pun intended) the idea of dropping in a Playchoice ppu for rgb video. More pics to come after I get another NES.
-
Life of Brian

- Moderator
- Posts:2867
- Joined:Wed Aug 03, 2005 5:55 pm
- Location:Oklahoma
- Contact:
Re: The Entertain Boy worklog (resurrected)
Good name, great case - finish it!
dragonhead wrote:sweet. ive spent a third of my life on benheck!

Re: The Entertain Boy worklog (resurrected)
Update time! Installed the screen yesterday. I'm going to try to used screw posts as much as possible in this portable. Here the screw posts from the PSone screen are holding the screen in:
Front

Back

It took forever to make the holes for headphones, charge, and wall power because I used a hand drill and filed the holes to size.

Low-battery indicator circuit:

Audio amp:

My plan to incorporate stereo sound involves separating the 2 signals, feeding one through the system's audio amp, and feeding the other through the identical amp seen above. The chip used is a 74hcu04 hex inverter salvaged from a broken NES. Here is a schematic by Kevin Horton of the path of audio in the NES (I had to redraw it because his site no longer exists):

Front
Back
It took forever to make the holes for headphones, charge, and wall power because I used a hand drill and filed the holes to size.
Low-battery indicator circuit:
Audio amp:
My plan to incorporate stereo sound involves separating the 2 signals, feeding one through the system's audio amp, and feeding the other through the identical amp seen above. The chip used is a 74hcu04 hex inverter salvaged from a broken NES. Here is a schematic by Kevin Horton of the path of audio in the NES (I had to redraw it because his site no longer exists):
Re: The Entertain Boy worklog (resurrected)
I installed the low-battery indicator circuit. The led on the left is green and the one on the right is red.


Re: The Entertain Boy worklog (resurrected)
I installed the controls and wired them up. Next on my list is cart slot relocation. Stay tuned.

With flash:

Without flash:

With flash:
Without flash:

Re: The Entertain Boy worklog (resurrected)
This looks awesome, I like your attention to detail.