First, yes I know that Joe built one, and his was much better, well mine isn't, but I think it is pretty damn good for $5 .
Full size and whole album: http://picasaweb.google.com/lh/photo/qS ... BPKM9u-K4A
I found a Super Joy 3 76000-in-1 (yes, actually yes, and it tries to show you, but if you go to 76000 it is almost a random game, not what the title says ), I didn't have any $$ so I came back another day and bought it for $5. I tried to play it and the buttons were pure crap, they were very hard to press and then they would "snap" down. Useless. I ripped out the mainboard and wired up a battery pack and the 2nd player as first player, but the Genesis clone controller it came with was just as bad, if not worse.
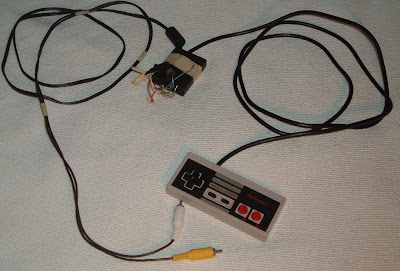
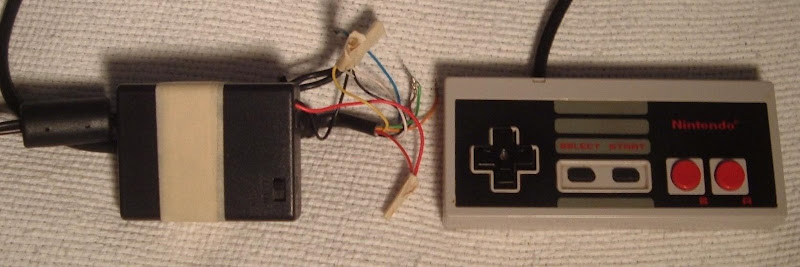
So, I dug out the NES controller I had, but I had stripped it for a failed PC Joystick project (back before the USB converters were available, and I didn't feel like designing a Joyport version). So I had to cut up the 2nd player controller for the glop-top to get it working.
It just uses a 4xAAA pack with a switch, I use 4x NiMH for 5-volts, no regulator (Who knows what could happen if somebody threw Alkalines in there? ).
Full size: http://picasaweb.google.com/lh/photo/gP ... rZRF3HoKPQ
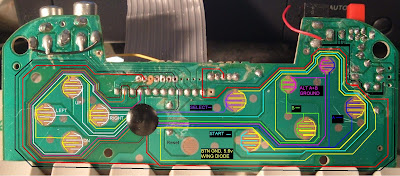
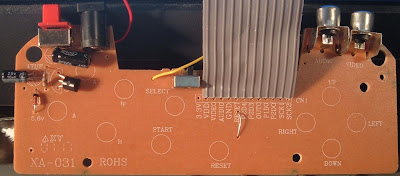
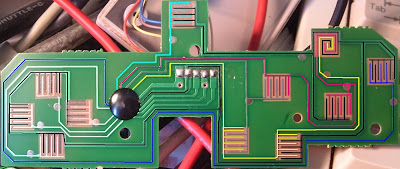
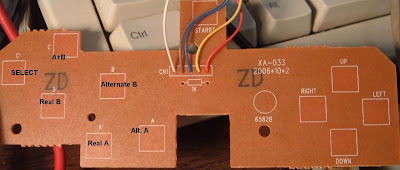
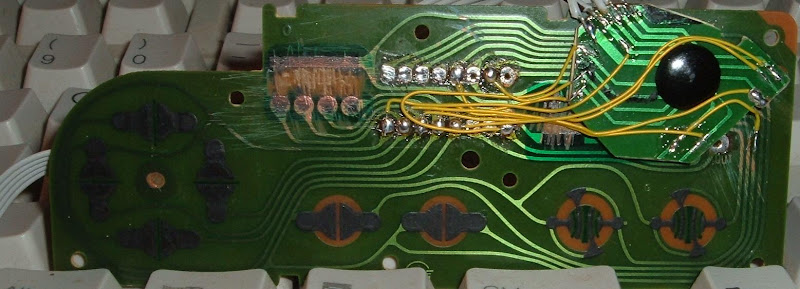
Does anyone know what the deal is with these super joy? They have a second 'ground' (is it a button matrix?) for the alternate A and B, and another button that seems to be A and B together, weird.
I was starting on the project and figured to jam the whole shebang into the controller (except the batteries). I was psyched until I saw the one that Joe built with the backlit Nintendo logo and the Cart connector. I don't feel too bad because I only spent $5 total and don't have any NES stuff, no controllers, no systems, no games, no memories (well, next to none). I have been loving me some Tetris II and still can't figure out the insanely hard Competition Lode Runner that this comes with (hints?)
NOAC inside NES Controller - Labeled macro PCB shots!
Moderator:Moderators
Last edited by nubie on Thu Sep 25, 2008 1:23 am, edited 1 time in total.
Super Joy 3 Main controller PCB
Just some info for newbs (or people who already cut up their boards ), I traced the boards in case I had to cut them up for the controller glop-top:
Main controller PCB with Audio/Video, Power switch and 5v regulator:
Full size downloads: http://picasaweb.google.com/lh/photo/cN ... kz-nhFg4uw
Back side, pretty well labeled already , the zener diode is connecting the controller buttons to ground, I think.
Full size for downloading: http://picasaweb.google.com/lh/photo/qN ... UQLNBJgahQ
Super Joy 3 Second controller PCB
Labeled shots of the second player super Joy 3 PCB:
Full Size: http://picasaweb.google.com/lh/photo/LX ... IaZN4blLHA
This is an even wackier PCB than the main one, in addition to a second A and B line (is it turbo perhaps?) there is also an A+B on a single button!
Full Size: http://picasaweb.google.com/lh/photo/Bn ... 4WTTNVAKzQ
Full Size: http://picasaweb.google.com/lh/photo/LX ... IaZN4blLHA
This is an even wackier PCB than the main one, in addition to a second A and B line (is it turbo perhaps?) there is also an A+B on a single button!
Full Size: http://picasaweb.google.com/lh/photo/Bn ... 4WTTNVAKzQ
NES PCB with glop-top
Here is the original NES controller (I tore into it trying to make a native PC controller, maybe 8 years ago or more, before USB was widespread, so I gave up.)
Full size: http://picasaweb.google.com/lh/photo/D0 ... ffuEGINJTA
Wrapping wire is your friend when re-wiring stuff , I did use regular (40-conductor size) ribbon cable for the connection to the NOAC board.
5 free wires for second player with light gun support:
Full Size: http://picasaweb.google.com/lh/photo/2x ... cpBYQohn-Q
The wires aren't connected inside the NES yet, I was sick of working on it all day and just wanted to play the darn thing (plus I don't know how much fun I can get out of Duck Hunt anyway, but I wasn't playing with 2 ducks, that could be my problem ).
I color coded the wires properly, Red for 5v, Black for Ground, White for Audio, and Yellow for video. (I don't know about the second player, probably just wire it up, unless there is a correct color scheme and I can use it with what I have, Blue/Gray/Brown/Green/Orange)