Please help with finishing steps snes
Moderator:Moderators
I have followed all the instructions for my snes portable and am so close to completion i can taste it. Only problem, when attempting to wire the audio and video to the psone screen, those itty bitty silver disks came off... now where do i wire these things? someone please help... thanks.
-
Life of Brian

- Moderator
- Posts:2867
- Joined:Wed Aug 03, 2005 5:55 pm
- Location:Oklahoma
- Contact:
Re: Please help with finishing steps snes
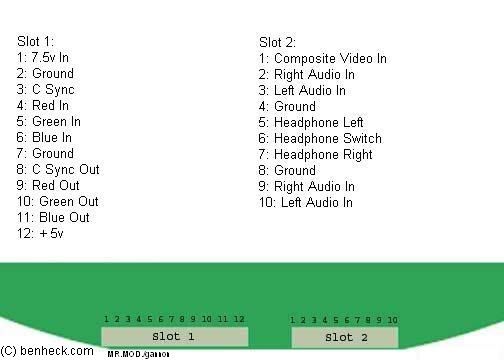
The next "easiest" option is to connect the wires to the front two jacks as shown in this picture. So, slot 2 pins 1, 2, and 3. Make sure you connect ground for your screen, system, and batteries together as well.
dragonhead wrote:sweet. ive spent a third of my life on benheck!

Re: Please help with finishing steps snes
Excellent thanks. Unfortunately i'm having other problems as well. This is my first attempt at a project like this and i wish i knew more about all this but i don't...
Anyhow on to the issues. I wanted to have an external av plug so i could plug into the tv as well, and a second controller jack for 2 player action, kinda making a snes version of the sega nomad. No matter what i did i wasn't getting video to the psone screen so i tried plugging the snes into my tv through the av jack to test it that way, the video came through the tv but with no sound, odd. I then unplugged and suddenly i had no power to the screen seemingly. The leds will no longer light and i seemed to have no power. I noticed then when i ran power directly from the power switch to the 7805 regulator the leds lit. But would no longer light without it attatched there. But now, they will not even light then. I'm extrememly confused, extremely tired, and extremely frustrated. I've poured money into this project and would love to just be able to get this damn thing to work. Any help would be greatly appreciated... Thanks
Anyhow on to the issues. I wanted to have an external av plug so i could plug into the tv as well, and a second controller jack for 2 player action, kinda making a snes version of the sega nomad. No matter what i did i wasn't getting video to the psone screen so i tried plugging the snes into my tv through the av jack to test it that way, the video came through the tv but with no sound, odd. I then unplugged and suddenly i had no power to the screen seemingly. The leds will no longer light and i seemed to have no power. I noticed then when i ran power directly from the power switch to the 7805 regulator the leds lit. But would no longer light without it attatched there. But now, they will not even light then. I'm extrememly confused, extremely tired, and extremely frustrated. I've poured money into this project and would love to just be able to get this damn thing to work. Any help would be greatly appreciated... Thanks
-
Life of Brian
- Moderator
- Posts:2867
- Joined:Wed Aug 03, 2005 5:55 pm
- Location:Oklahoma
- Contact:
Re: Please help with finishing steps snes
Alright, let's troubleshoot. Can you describe in a bit more detail how you have this currently wired up? As best as I can tell, you have stated that you have an LED modded PSOne screen and an SNES mini, correct? I'm also assuming that you are putting around 7.4v to the PSOne screen, and taking 5v from one of its 7805's to power the SNES. Is this correct?
A couple of quick things to check - make sure ground is connected between your screen, system, and batteries. Also, I know this sounds simplistic but make sure all your wires are securely attached. You might have a cold solder joint.
A couple of quick things to check - make sure ground is connected between your screen, system, and batteries. Also, I know this sounds simplistic but make sure all your wires are securely attached. You might have a cold solder joint.
dragonhead wrote:sweet. ive spent a third of my life on benheck!
Re: Please help with finishing steps snes
Life of Brian wrote:Alright, let's troubleshoot. Can you describe in a bit more detail how you have this currently wired up? As best as I can tell, you have stated that you have an LED modded PSOne screen and an SNES mini, correct? I'm also assuming that you are putting around 7.4v to the PSOne screen, and taking 5v from one of its 7805's to power the SNES. Is this correct?
A couple of quick things to check - make sure ground is connected between your screen, system, and batteries. Also, I know this sounds simplistic but make sure all your wires are securely attached. You might have a cold solder joint.
I do have an led modded psone screen and a snes mini, i am using 6 AA batteries to power everything and i was taking 5v from one of the 7805s to power the snes.
Grounds are all connected together, all the wires are securely attatched.
I have power (tested with my multimeter) coming from the power switch and into the screen. But no power coming from the 7805 regulators. Have i blown a fuse or something? is the screen fried?
UPDATE: i removed the fuse (ps1) as instructed in the book (in case of emergencies), and now the 7805s are putting out power, yet the leds will not light (blown?). also if i power the snes directly and hook up through av adapter it displays a blank brown screen and no sound, i must have hooked up the adapter incorrectly or loosely or something right?
2ND UPDATE: i noticed that number 1 and 2 on the 12 av spots for the av adapter had come loose, in fact i think i lost the rings to solder them to, any suggestions?? so i discovered the led's were in fact blown (bought new ones and they work), so while unscrewing the lcd screen to swap the leds i (like a nimrod) knocked of 3 of the little surface mount capacitor things... not good....
two are labeled 102 one i cant read and they came from slots rt58, rt57, and rt56 they are located above where the screen plugs into the board, i don't know where they need to go... here are pics...


i feel like a retard...
am i just sol here?
-
Life of Brian
- Moderator
- Posts:2867
- Joined:Wed Aug 03, 2005 5:55 pm
- Location:Oklahoma
- Contact:
Re: Please help with finishing steps snes
Those look like surface mount resistors, since they're designated as "R-something" on the board. If I read them correctly, they have "102" written on them. A quick Google search for "surface mount resistor codes" tells me that they are 1.0k Ohm resistors. You should be able to replace those with regular resistors if you have any on hand, otherwise take a trip to RadioShack or somewhere similar and pick up some 1k Ohm resistors. Pick up a variety pack of resistors while you're at it - they come in handy.
If you accidentally ripped up some traces, there are alternative spots to solder to. This sticky in the Portable Screen Hacking section of the forums has an insane amount of information about alternative pins. Look at the second picture provided in that post.
If you accidentally ripped up some traces, there are alternative spots to solder to. This sticky in the Portable Screen Hacking section of the forums has an insane amount of information about alternative pins. Look at the second picture provided in that post.
dragonhead wrote:sweet. ive spent a third of my life on benheck!
Re: Please help with finishing steps snes
[/quote]
can i not just put the original ones back on? what about my issue with the snes connection? (("2ND UPDATE: i noticed that number 1 and 2 on the 12 av spots for the av adapter had come loose, in fact i think i lost the rings to solder them to, any suggestions??"))
Life of Brian wrote:Those look like surface mount resistors, since they're designated as "R-something" on the board. If I read them correctly, they have "102" written on them. A quick Google search for "surface mount resistor codes" tells me that they are 1.0k Ohm resistors. You should be able to replace those with regular resistors if you have any on hand, otherwise take a trip to RadioShack or somewhere similar and pick up some 1k Ohm resistors. Pick up a variety pack of resistors while you're at it - they come in handy.
If you accidentally ripped up some traces, there are alternative spots to solder to. This sticky in the Portable Screen Hacking section of the forums has an insane amount of information about alternative pins. Look at the second picture provided in that post.
can i not just put the original ones back on? what about my issue with the snes connection? (("2ND UPDATE: i noticed that number 1 and 2 on the 12 av spots for the av adapter had come loose, in fact i think i lost the rings to solder them to, any suggestions??"))
-
Life of Brian
- Moderator
- Posts:2867
- Joined:Wed Aug 03, 2005 5:55 pm
- Location:Oklahoma
- Contact:
Re: Please help with finishing steps snes
Oh, sorry - I thought you were referring to the screen, not the SNES. I'll take a look and see if I can find some alternate places to wire to.
Yes, you can try reattaching the SMT resistors to the screen. I thought you weren't able to and that was why you were asking about it.
Yes, you can try reattaching the SMT resistors to the screen. I thought you weren't able to and that was why you were asking about it.
dragonhead wrote:sweet. ive spent a third of my life on benheck!
Re: Please help with finishing steps snes
ahhh, no i was just wondering if all three were the same, i could see that two of them were but the other had the numbers scratched off, as i'm sure you can see, and i didn't have another board for reference to see if all three were the same, and if not, where the different one went.Life of Brian wrote:Oh, sorry - I thought you were referring to the screen, not the SNES. I'll take a look and see if I can find some alternate places to wire to.
Yes, you can try reattaching the SMT resistors to the screen. I thought you weren't able to and that was why you were asking about it.
also now when i hook up the snes to my tv it still displays brown (i'm sure cause of the 1 and 2 connecters that arent connected) but also there is still no sound and the games dont seem to be loading, it's just a blank brown screen instead of a brown tinted screen.... odd....
UPDATE: i think the screen may not be working correctly as well, i replaced the resistors and when i press the brightness buttons or volume buttons i can see faintly the on screen display but it's very very faint and seems to be on a lag ... ugh i feel stuck this is so f****** frustrating