Sam's Back with a PSone Portable in the works

Includes but not limited to: SNES, Genesis, Sega CD, PlayStation 1, Nintendo 64, Dreamcast, Game Gear and I guess the Virtual Boy.

Moderator:Moderators

User avatar
sam_thornley
Posts:137
Joined:Sat Mar 10, 2007 7:32 pm
Location:Derbyshire, UK
Contact:
Sam's Back with a PSone Portable in the works

Post by sam_thornley » Sat Oct 24, 2009 8:21 am

Hey everyone! Its been well over year since my last portable was completed way back in June 2008. So i thought maybe its about time i should start a new project. I was going to start a portable in early January of this year, but had to abandon that for the time being. Mainly because i was quite busy with other stuff/interests/college at the time. I've had all the parts needed to start for a while, but just never got round to doing anything. But now i'm ready to start.

So here's my mspaint mock-up initial design:

Image

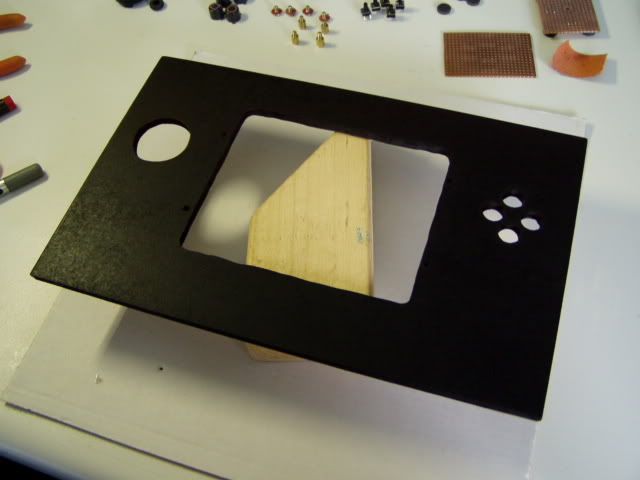
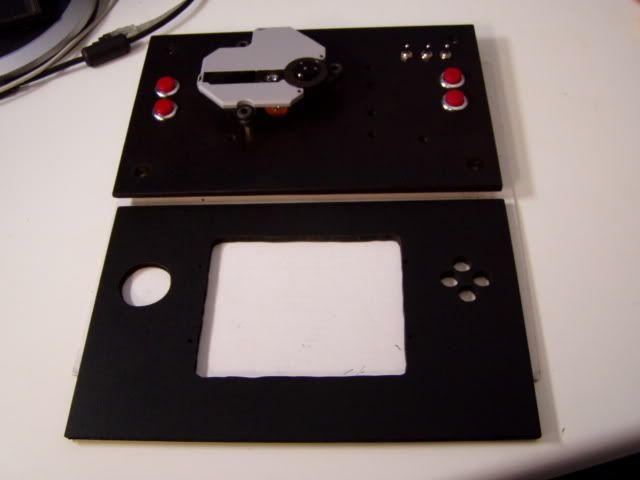
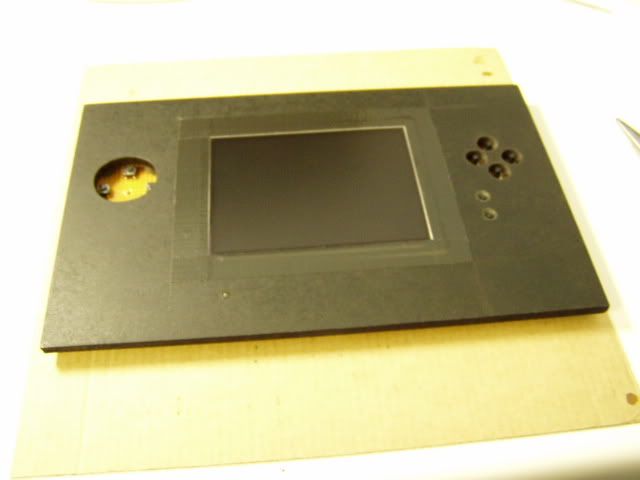
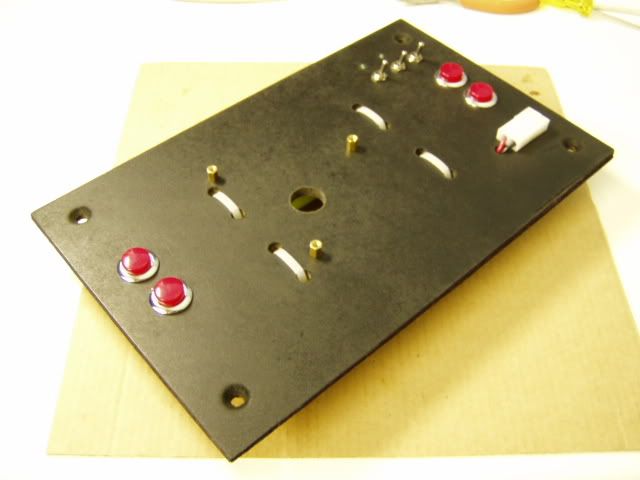
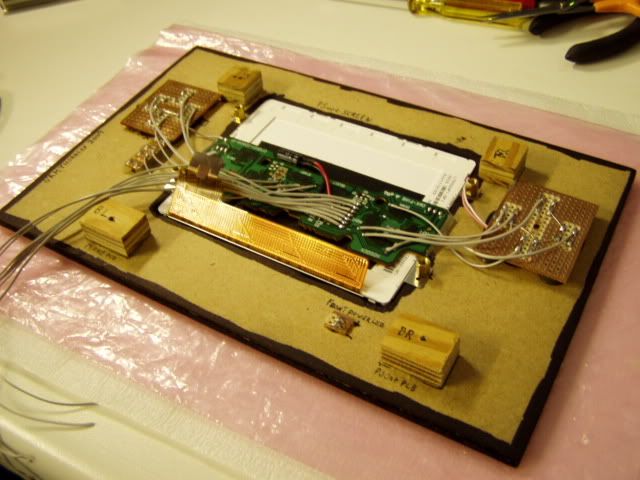
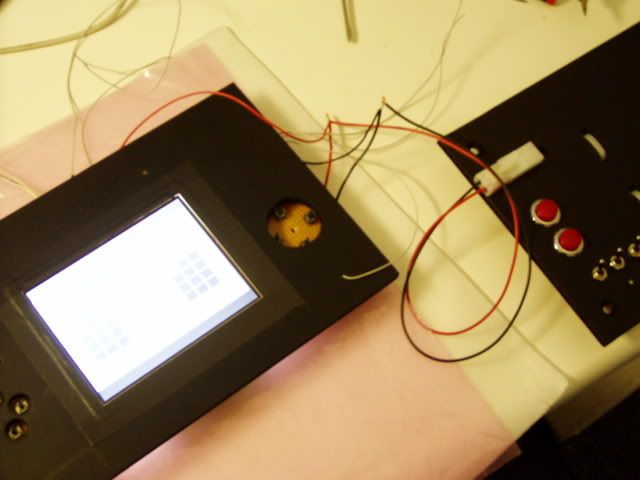
I'm using 6mm thick 250x250mm MDF boards for front and back pannels of the case, cut down to 250x165mm. All sprayed painted black.

Image

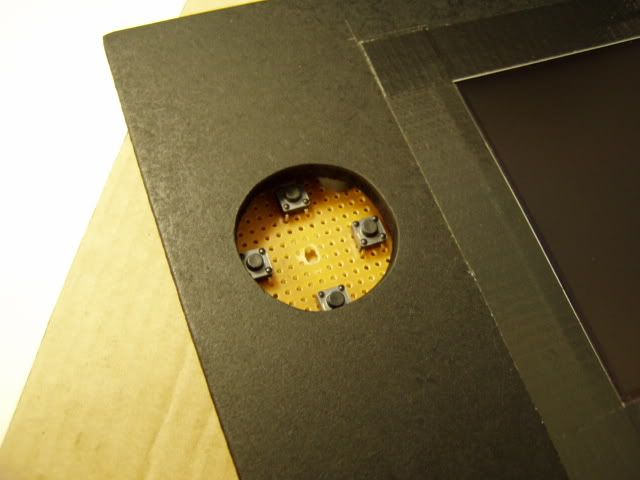
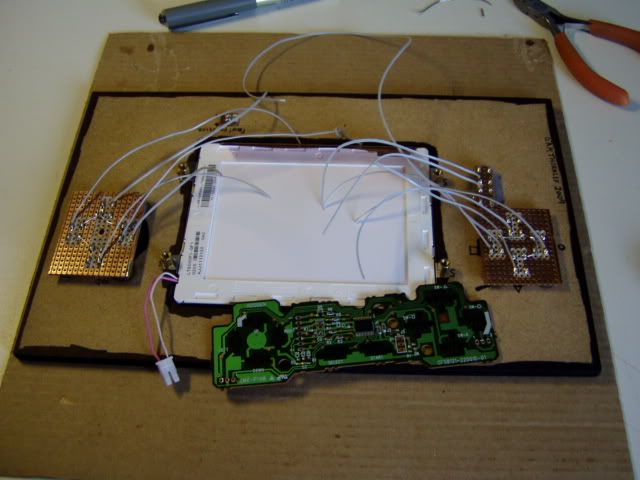
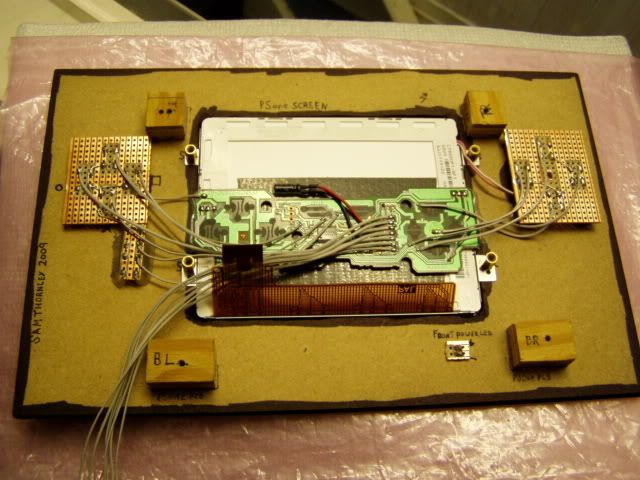
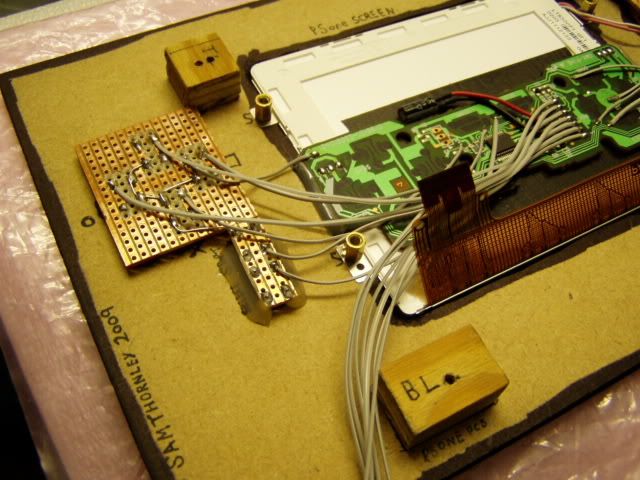
With four wooden blocks in each corner as the main supports. The side panels will be added on towards the end of the project, as at the minute i have no idea how thick the system is going to be. Hopefully not too thick! I use MDF because for me its the easiest stuff to use and the only stuff i'm used to. My skills when it comes to building a case are basic and i usually struggle quite abit. The main power/screen/volume switches will be located on the back pannel. Speakers and headphone jack will be located on the bottom side pannel. (like a PSP) I'm thinking of placing the start and select buttons bellow the screen rather than below the action buttons. Not sure yet though.

System Specs/Parts that i'm using:
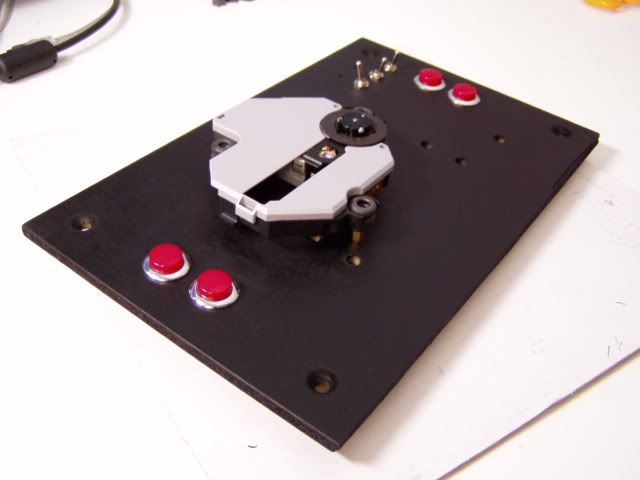
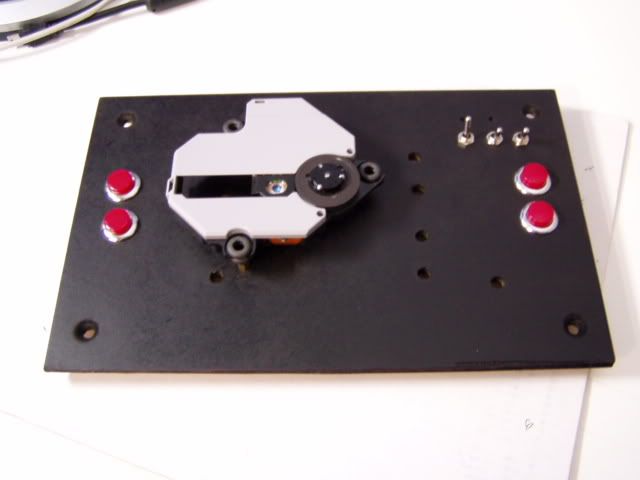
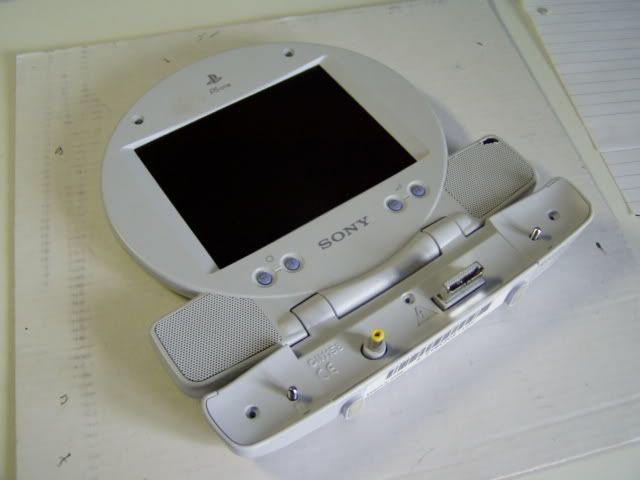
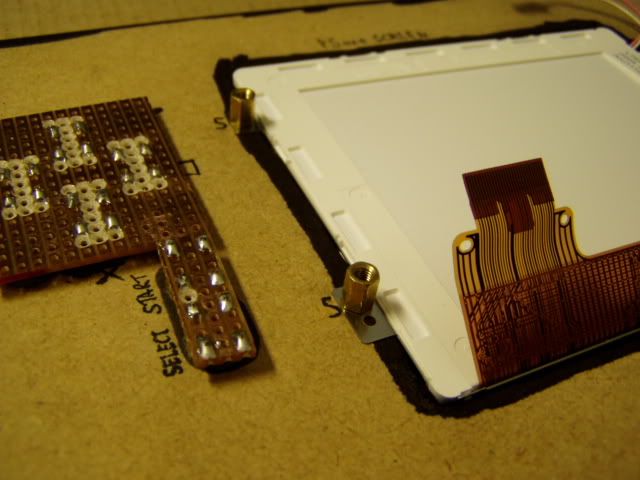
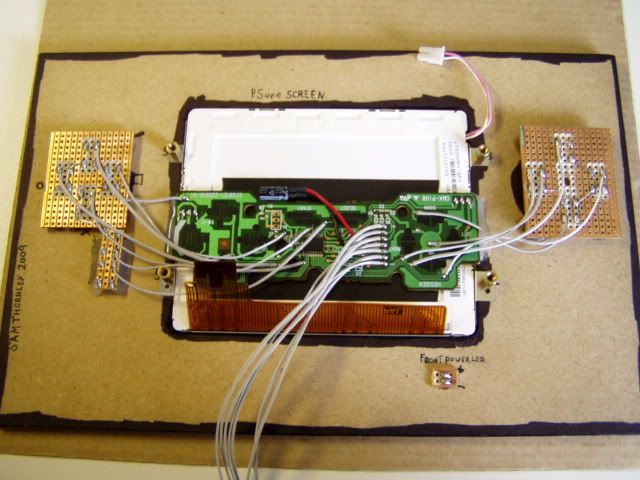
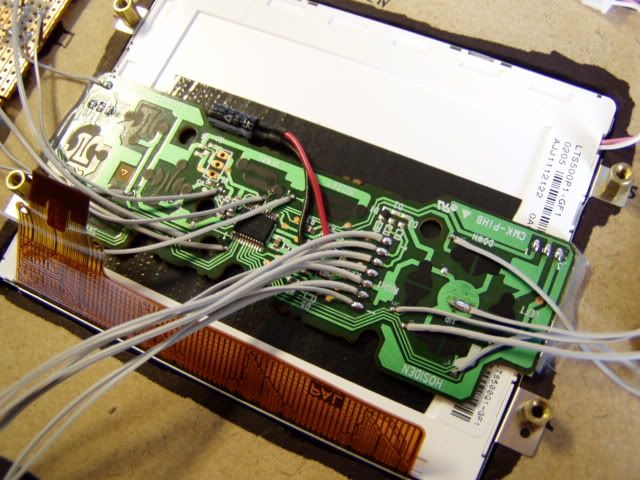
5" PSone Screen
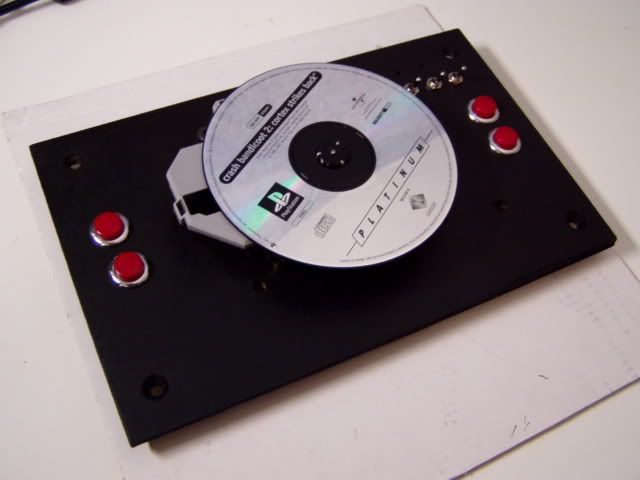
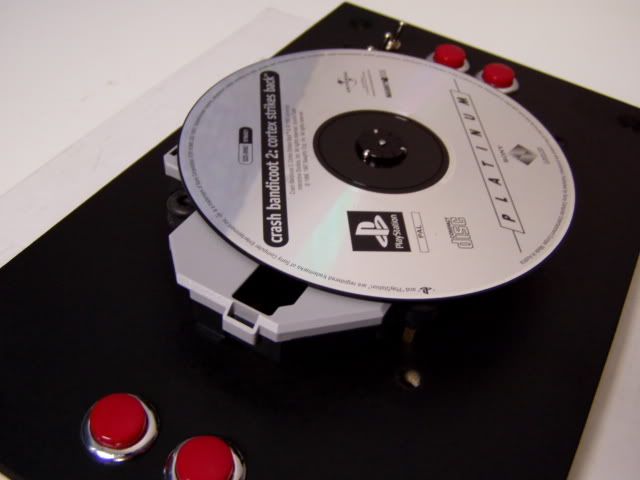
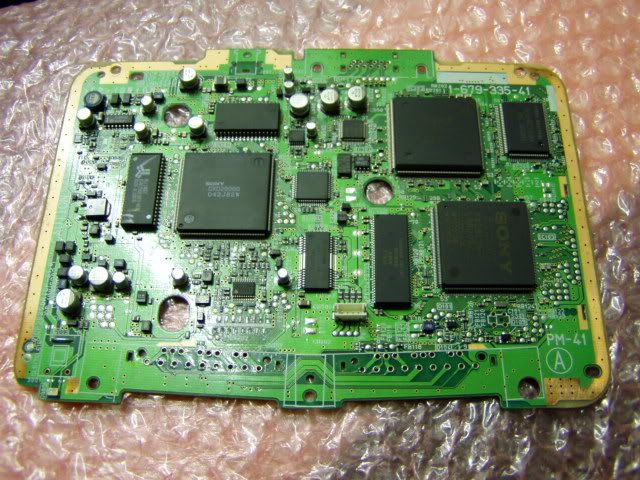
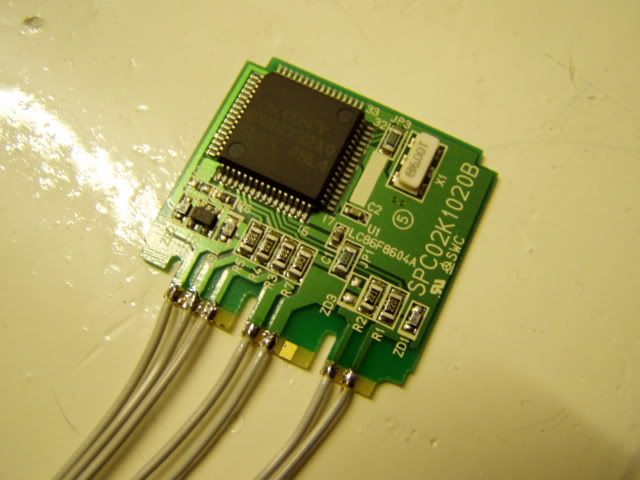
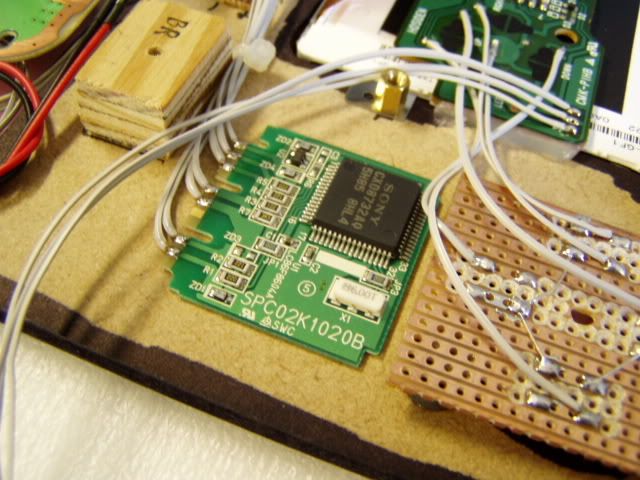
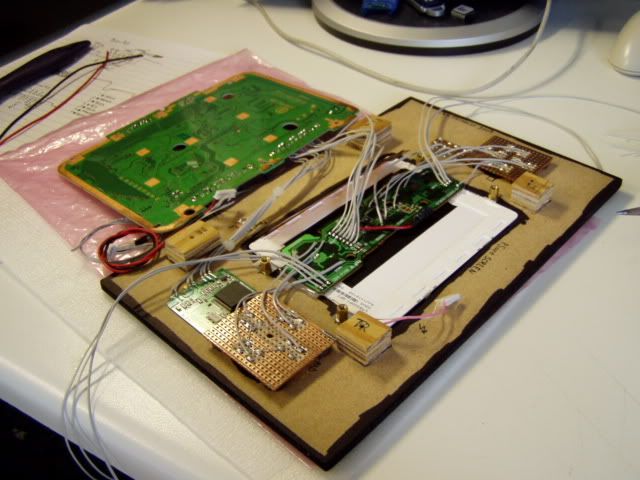
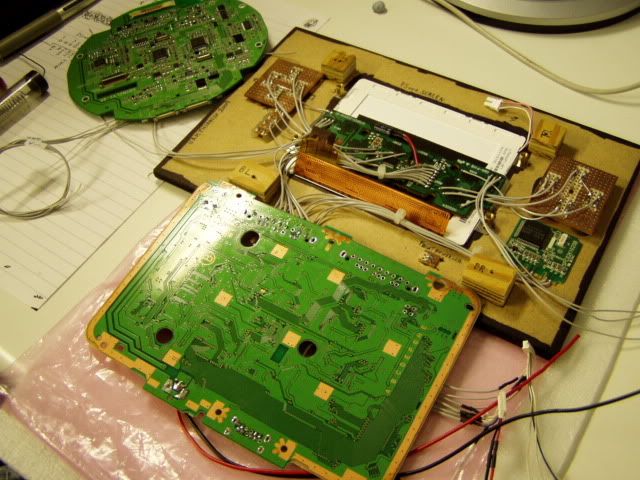
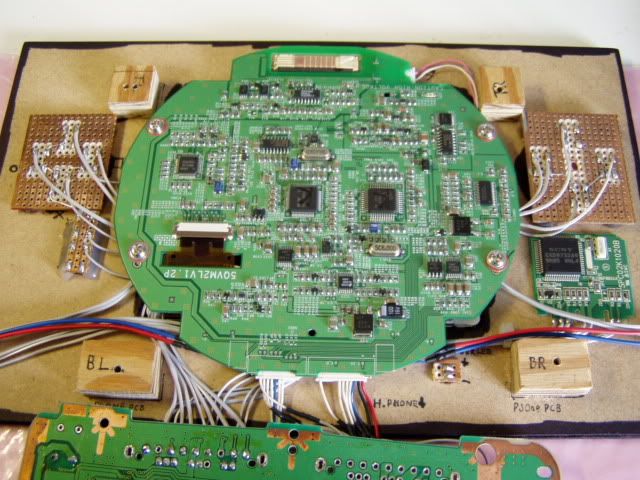
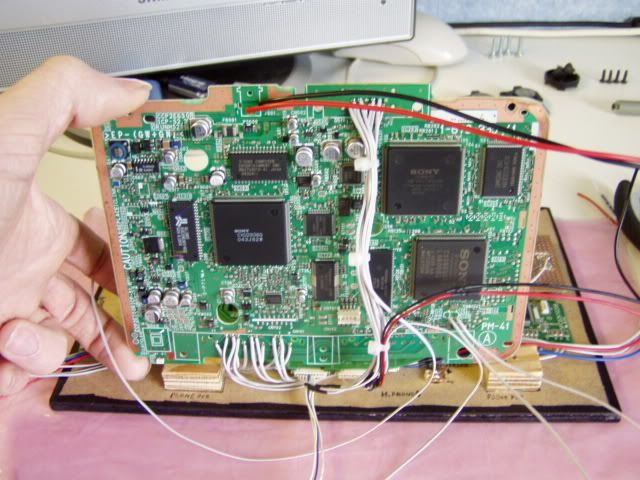
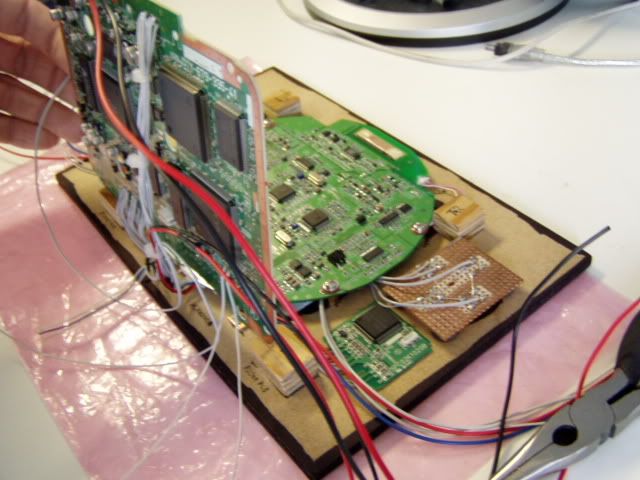
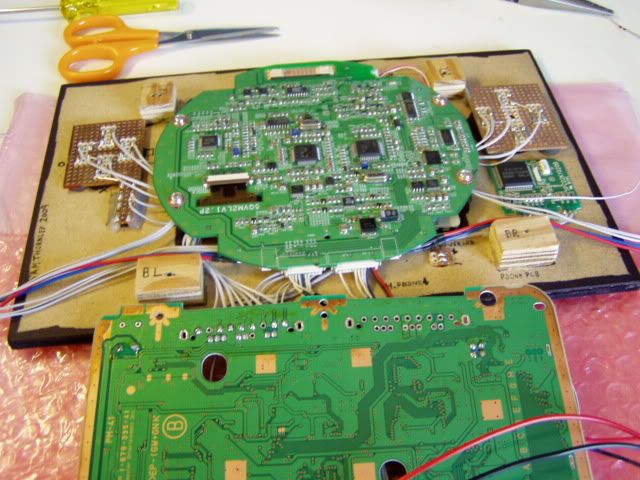
PSone Console PCB/CD Drive
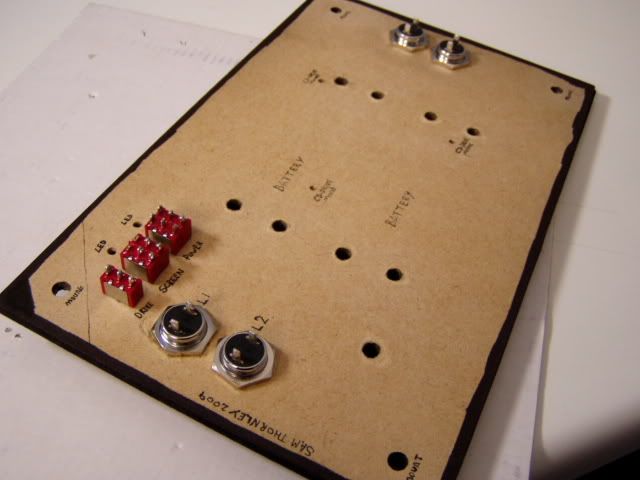
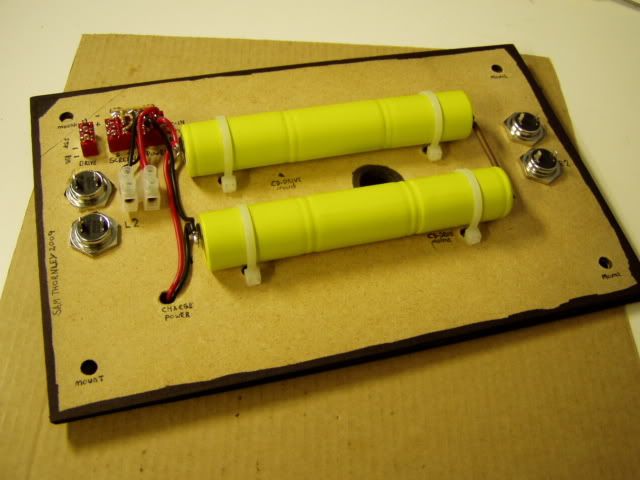
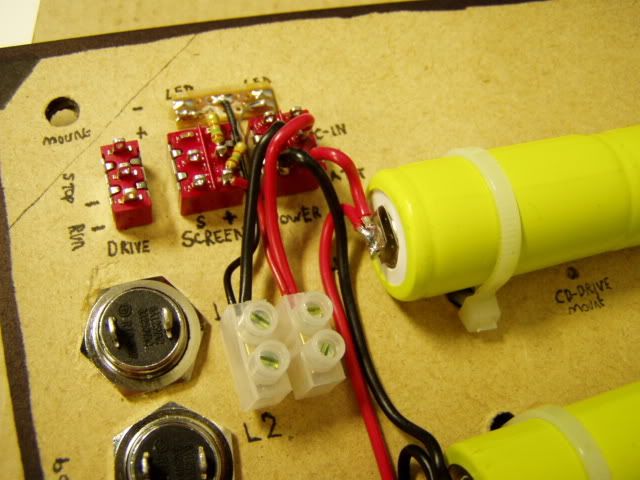
2x 3.6v 4600mAh NIMH Batteries (7.2V Total)
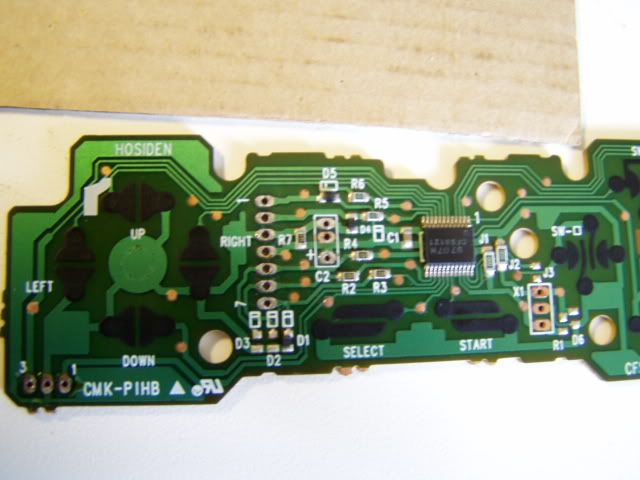
Standard PlayStation non-analog controller. When i first had a playstation back in the 90's this was the only controller i had and used. So for now i'm going with that one.
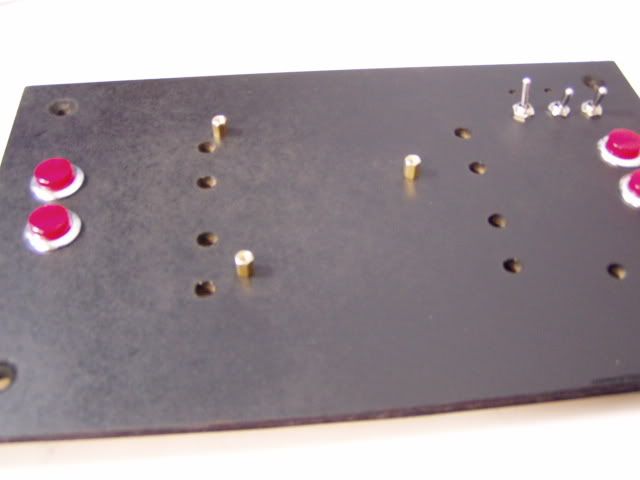
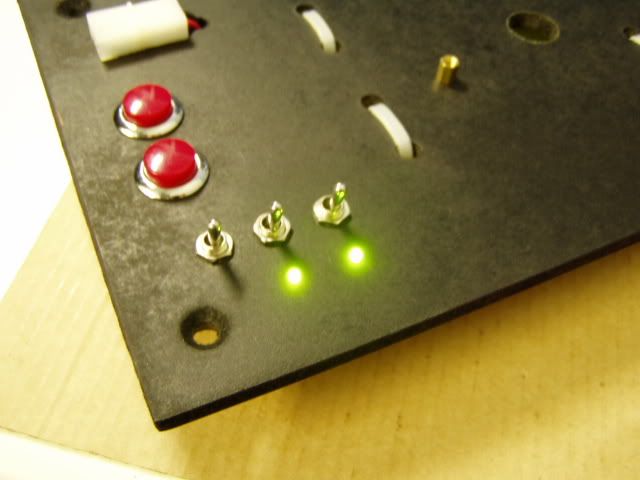
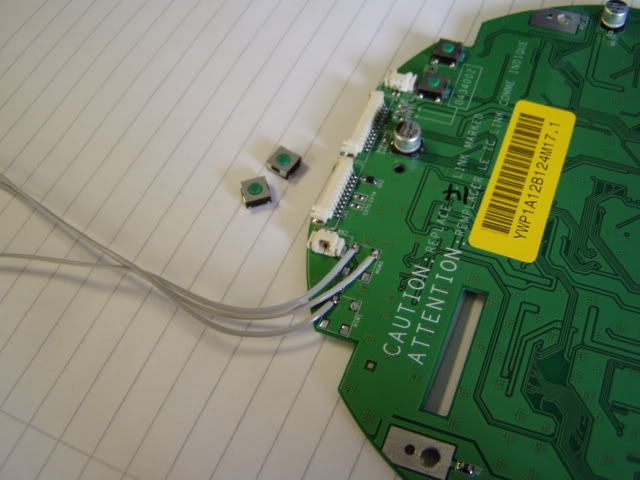
Tact switches for the d-pad and buttons, large red push buttons for L1, L2, R1 and R2. Rocker switches for main power, screen power (screen can be turned off to save battery).
I will also add power/status LEDs to the system.

So far i've got all off the case parts cut out/holes drilled ect and i will be spraying the front part soon. I've also gutted the psone and placed its parts in an anti-static bag ready for when they are needed.

I'm looking forward to getting this finished as the playstion is one of my favorite consoles.

I've got whole weeks of time to use as i only work weekends at the mintute, but i spend a lot of time with the girlfriend out & about and stuff so expect updates every few days or so. :D

-Sam
Image

User avatar
sam_thornley
Posts:137
Joined:Sat Mar 10, 2007 7:32 pm
Location:Derbyshire, UK
Contact:

Re: Sam's Back with a PSone Portable in the works

Post by sam_thornley » Tue Oct 27, 2009 6:06 am

Time for a first update! The main parts of the case are pretty much starting to take shape now.

Got the front and back panels done, cut, sanded, filed up and painted. Two coats of "mat Black" spray paint.

The Front panel

Image

I cut the screen hole with my dremmel's spiral saw bit, abit wobbly but i'm putting a bezel around the screen so my cutting job will be hidden. The PSone screen's lcd module is going to sit flush mounted in to the hole. I will add the select and start buttons below the screen. (Forgot to add them before i sprayed)

The Back panel

Image

Image

Image

Image

Same treatment as the front. I started to install some of the controls. The bottom left sholder button is a little off, though its not really noticeable. I also added the mounts for the CD thingy, they are brass computer motherboard mounts. I can then screw on the CD drive with normal computer case screws. (i just placed it on to show what it will look like with it fitted) I've yet to drill the holes for the CD drive Data/motor cables. (Sorry about this last picture, bit crappy)

Front and Back

Image

Game In

Image

Image

More updates soon...
Image

User avatar
samjc3
Posts:1086
Joined:Sun Feb 15, 2009 8:05 pm
Steam ID:samjc3
Location:burning and pillaging!!

Re: Sam's Back with a PSone Portable in the works

Post by samjc3 » Tue Oct 27, 2009 8:23 pm

Wow! this looks great so far! cant wait to see more! :mrgreen:
AfroLH wrote:
HotDog-Cart wrote: Also, the codename stuff adds a little bit of sexyness, in my eyes.
Yeah well Alcohol adds a little bit of sexyness in my eyes, but I dont drink it all the time. :wink:
SpongeBuell wrote:As proof, I offer this picture of a monkey on my head.

User avatar
sam_thornley
Posts:137
Joined:Sat Mar 10, 2007 7:32 pm
Location:Derbyshire, UK
Contact:

Re: Sam's Back with a PSone Portable in the works

Post by sam_thornley » Mon Nov 02, 2009 3:17 pm

More updates! Got quite a bit of work done over the last few days...

Got a used psone screen off ebay uk.

Image

Opened it up:

Image

Gutted ready for use:

Image

The installed the PSone screen LCD module into the front panel. Stuck a bezel made out of duct tape around the edge of the screen. I've also installed the tact switches for the dpad/select/start/action buttons.

Image

The d-pad. (Theres a plastic circle that i have that is going over the top of the switches.)

Image

Back of the front panel:

Image

On the back panel, i've added the mounts for the CD-Drive, added the charging jack, Installed the batteries and got the main power section wired up.

Image

I'm using a 7.2v 4600mAh battery pack that i split in two so i could place the cells apart. The two cells are held in with cable ties.

Image

I'm using a dual pole rocker switch, so i can switch from battery power or wall adaptor. I will be adding a DC-IN jack later on. The junction block is where the PSone screen and PSone PCB will be attached.

Image

Added the Main power and Screen Power LEDs. Its alive!...Kinda.

Image

Thats it for now. Next i will be wiring up the controls and installing the PSone screen board.
Image

User avatar
andrewdorsey
Posts:183
Joined:Mon Dec 01, 2008 2:49 pm
Location:hmmmmmmm

Re: Sam's Back with a PSone Portable in the works

Post by andrewdorsey » Mon Nov 02, 2009 4:59 pm

Dang! You're getting this done fast! By the way, what is the capacity of those batteries???

User avatar
blaze3927
Portablizer
Posts:1114
Joined:Mon Dec 08, 2008 6:14 am
360 GamerTag:notjames
Location:Australia
Contact:

Re: Sam's Back with a PSone Portable in the works

Post by blaze3927 » Mon Nov 02, 2009 5:19 pm

wow, your methods are so...methodic how much planning went into this?
Australian Kaillera server
[url]hhttp://i56.tinypic.com/ncb0wi.gif[/url]

User avatar
argelfraster
Posts:984
Joined:Sun Sep 07, 2008 3:14 pm
Contact:

Re: Sam's Back with a PSone Portable in the works

Post by argelfraster » Mon Nov 02, 2009 6:05 pm

This looks amazing!
Can't wait for the next update :)

User avatar
neverused
Posts:290
Joined:Fri Feb 06, 2009 6:14 pm

Re: Sam's Back with a PSone Portable in the works

Post by neverused » Mon Nov 02, 2009 9:41 pm

I like the way everything is well thought out and constructed so that you can remove/ replace one specific part without tearing apart the whole thing.

excellent job thus far

User avatar
sam_thornley
Posts:137
Joined:Sat Mar 10, 2007 7:32 pm
Location:Derbyshire, UK
Contact:

Re: Sam's Back with a PSone Portable in the works

Post by sam_thornley » Tue Nov 03, 2009 5:55 am

Thanks for the comments people, all greatly appreciated. :D
blaze3927 wrote:wow, your methods are so...methodic how much planning went into this?
The only planning i did was to do a quick mock-up on mspaint. I had a good idea in my mind on how everything was going to look like and be put together for a good 6 months or so. From there i've just altered it slightly as i've progressed on with the project.
andrewdorsey wrote:Dang! You're getting this done fast! By the way, what is the capacity of those batteries???
The batteries are 4600mAh capacity. Its one of these: http://www.vapextech.co.uk/acatalog/info_92.html" onclick="window.open(this.href);return false;. I've just taken it apart so i could split the cells apart. I used the same battery on my Master Boy Portable.
Image

User avatar
banditpaw1
Portablizer
Posts:617
Joined:Mon Apr 13, 2009 6:46 pm
Location:CONNECTICT
Contact:

Re: Sam's Back with a PSone Portable in the works

Post by banditpaw1 » Tue Nov 03, 2009 11:55 am

Your using those big red buttons that I love so much. I LOVE YOUR PORTABLES!

User avatar
sam_thornley
Posts:137
Joined:Sat Mar 10, 2007 7:32 pm
Location:Derbyshire, UK
Contact:

Re: Sam's Back with a PSone Portable in the works

Post by sam_thornley » Fri Nov 06, 2009 6:32 am

Ok time for another update on the project.

De-solderd most of the ports on the psone PCB. Shorted the power switch so that the board powers up with the portable. I'm going to extend the CD drive data cable, then solder it directly to the board. Also removed the CD cover switch.

Image

Extended the psone screen Volume -/+ buttons, so i can mount them elsewhere.

Image

Gutted a Playstion controller, desolderd the data wires. I was going to cut down the controller PCB, but i realised that there are some small PCB tracks that i would not be able to solder to. So i decided to leave it as it is and solder to the little copper pads that are all over the board.

Image

Started wireing up the buttons. I decided the best place to put the controller PCB was just behind psone screen LCD module.

Image

All wired up:

Image

As you can see there is a 16v 10uF capacitor that was on the PCB that i had to relocate. The board is hot glued in both sides. I've yet to add the wires for the L1, L2, R1 and R2 buttons.

Image

Then i cut some small blocks of wood. To act as feet for the psone board to sit on. Hot glued them on around the screen area.

Image

Image

Image

Next update i will hopefully have the screen wired up and the portable showing the first signs of life. Stay Tuned!
Image

User avatar
argelfraster
Posts:984
Joined:Sun Sep 07, 2008 3:14 pm
Contact:

Re: Sam's Back with a PSone Portable in the works

Post by argelfraster » Fri Nov 06, 2009 9:17 am

Wow you sure are quick at this! :mrgreen:
Looks awesome Image

User avatar
samjc3
Posts:1086
Joined:Sun Feb 15, 2009 8:05 pm
Steam ID:samjc3
Location:burning and pillaging!!

Re: Sam's Back with a PSone Portable in the works

Post by samjc3 » Sat Nov 07, 2009 1:15 pm

Wow! you work amazingly fast, and methodically!! im very jealous! :D :mrgreen:
AfroLH wrote:
HotDog-Cart wrote: Also, the codename stuff adds a little bit of sexyness, in my eyes.
Yeah well Alcohol adds a little bit of sexyness in my eyes, but I dont drink it all the time. :wink:
SpongeBuell wrote:As proof, I offer this picture of a monkey on my head.

User avatar
sam_thornley
Posts:137
Joined:Sat Mar 10, 2007 7:32 pm
Location:Derbyshire, UK
Contact:

Re: Sam's Back with a PSone Portable in the works

Post by sam_thornley » Tue Dec 01, 2009 10:45 am

Apologies for lack of updates recently people, i decided to put the project on hold for a few weeks. As i've been busy with some other stuff (acquired 2 JAMMA arcade cabs that needed cleaning up and sorting out), so not had much time to focus on the project. But now i'm ready to continue on. But just after i posted last update i started to get the Psone board and the PSone screen wired up plus some other stuff. At least i've got something to show after all this time without any updates. :D

I'm having the memory card built into the system, so i took apart a spare memory card and extended the data wires.

Image

Then i stuck the memory card board in to the front of the case with some double sided tape.

Image

Extended the wires on the PSone screens connectors.(+7.2v, ground, RGB+Sync, Left&right audio, headphone wires and +5v)

Image

Got the controls and memory card wired up the the PSone board.

Image

Image

Installed the PSone Screen board on to the front panel.

Image

Then i got the RGB Video/Audio wires soldered up the the PSone board. Added some cable ties to neaten things up abit.

Image

Image

Image

Originally i solderd the +7.2v power wires from the front of the psone board. But they kept getting in the way so i re-solderd them to the back of the PSone board. (I allways use thicker wires for power)

Image

With most of the main wiring complete i decided to power up the system for the first time without the CD-Drive attached. After spending some time double checking all the connections, i hooked up the main power for the screen and PSone board...

Phew...All working fine first time! :D

Image

All of the controls are working fine and the Memory card is accessible. Nice sharp image on the screen. (Using RGB video)

Image

Thats it for now. Next i'm going to hopefully get the CD-Drive wired up and start to get the case side panels together.
Image

User avatar
dragonhead
Posts:952
Joined:Sun Apr 04, 2004 4:28 pm
Location:NH, USA
Contact:

Re: Sam's Back with a PSone Portable in the works

Post by dragonhead » Tue Dec 01, 2009 11:13 am

impressive! very simple, but methodical and well put together. it should be quite solid and easy to repair should something go wrong. nothing is hot glued into place or taped in. its all removable. once you get the case together, you should sand all the corners and edges round. soften up the shape a little. looking good though.

Post Reply