nes/snes portable - finished page 14

Includes but not limited to: SNES, Genesis, Sega CD, PlayStation 1, Nintendo 64, Dreamcast, Game Gear and I guess the Virtual Boy.

Moderator:Moderators

Post Reply
User avatar
lovablechevy
Portablizer Extraordinaire
Posts:1104
Joined:Wed Nov 01, 2006 3:09 pm
Location:busy with a project
Contact:
nes/snes portable - finished page 14

Post by lovablechevy » Tue Mar 11, 2008 1:00 pm

i originally wasn't going to post anything about my project unless i actually got it working. but, i like what i've gotten done so far, so i thought i'd actually start a work log. plus that way i can get some comments from you guys.

please keep in mind that this is my very first attempt at a portable.

so i'm portablizing the RetroDuo and using the zn-40 case. i know that might not seem logical, but i think i've got it figured out as to how it will work. i'll have to have internal batteries, so i'm going to use some li-ion batteries.

i haven't really done much electronically speaking. i'm still gathering all of those materials. however, i have gotten a good start on the case. now, don't laugh. i don't have much experience with a dremel, so some of what i did might seem silly. but it works well for me.

anyway, enough chat and on to a pic or two! this is not my most recent progress. i'm not at home right now where my most recent pics are. this is my progress as of march 7th.

Image
like i said, not good with a dremel. so i thought it'd be much easier for me to just cut out the already perfectly square screen. and it was very easy.

Image
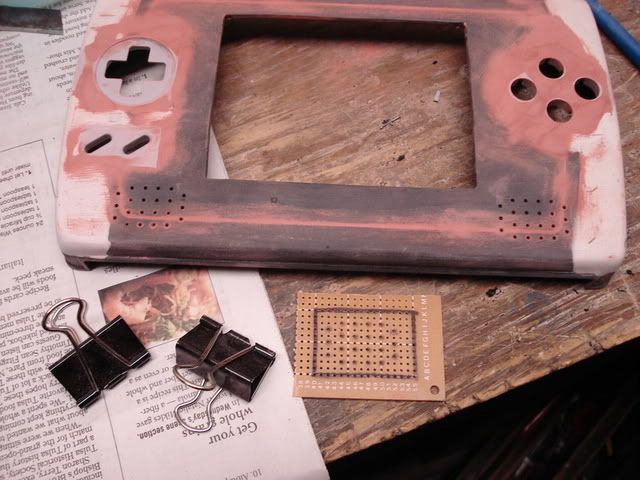
i took this right after i superglued and bondoed the controller holes in. i have since sanded and spot puttied a few times. and in case you didn't know, those two holes under the d-pad are the 8-bit & 16-bit led indicators. i just thought it'd be cool to include them.

Image
i decided to hack apart parts of the retro duo system to use on my portable. this is going to be the nes cart slot cover. this pic was taken right after i simply cut them off of the console. i've since cut them down to the correct size.

that's all i have to show right now. i'll upload some more up-to-date pictures later tonight when i get home.

i made a failed attempt at speaker holes... stupid perfboard slipped. ergh... i was just trying to do it too quickly. so i'll have to fill those holes in and start over.

for those of you wondering about my design, i'll try to explain. i think i've figured this out correctly. the nes portion will slide down the back of the case with the cart sticking out about 1/2" - 3/4" or so (haven't measure exactly). this will make it so i only have to do 1 slot relocation and still have both carts parallel with the case. i believe there will be just enough room for me to have the snes cart actually going inside the casing. i will make another cart slot so that the insides are not exposed.

i want to go ahead and thank Life of Brian and G-force. as you can see, i am basically stealing ideas from both of them.

comments, suggestions, criticisms?
Last edited by lovablechevy on Sat Jul 31, 2010 1:34 pm, edited 8 times in total.

User avatar
Life of Brian
Moderator
Posts:2867
Joined:Wed Aug 03, 2005 5:55 pm
Location:Oklahoma
Contact:

Re: HandyDuo work log

Post by Life of Brian » Tue Mar 11, 2008 2:13 pm

lovablechevy wrote:i want to go ahead and thank Life of Brian and G-force. as you can see, i am basically stealing ideas from both of them.
I prefer the term "borrowing and improving upon" :D I'm really digging how you are going to mount the screen. This way you'll be able to use the original screwposts and buttons for the screen controls. Very nice.

I think your bondo work would benefit from mixing it up to a bit more even texture/color before applying it. I dip my fingers in water (so it won't stick to me) and mash it until it's nice and smooth. However, once you paint your case no one will know :P

The indicator lights will be awesome.

So, the plastic in your last picture is going to be glued together to form a cartridge slot cover? Am I understanding you correctly?

I'm really looking forward to this. I can't recall if anybody has actually completed an SNES/NES combo portable before, so you get extra awesome points for your project.
dragonhead wrote:sweet. ive spent a third of my life on benheck!
Image

User avatar
lovablechevy
Portablizer Extraordinaire
Posts:1104
Joined:Wed Nov 01, 2006 3:09 pm
Location:busy with a project
Contact:

Re: HandyDuo work log

Post by lovablechevy » Tue Mar 11, 2008 2:52 pm

Life of Brian wrote:I'm really digging how you are going to mount the screen. This way you'll be able to use the original screwposts and buttons for the screen controls. Very nice.
thanks! i thought that would be easier than dremeling the screwposts out and gluing them in. plus, it helps in my design since the zenith screen plastic is a bit thinner than the case. every mm counts in this design!
Life of Brian wrote:I think your bondo work would benefit from mixing it up to a bit more even texture/color before applying it. I dip my fingers in water (so it won't stick to me) and mash it until it's nice and smooth. However, once you paint your case no one will know :P
yeah, i've used 3 different types of epoxy sticks so far. the first was kinda old (the yellowish spots). it just didn't want to mix very well. the 2nd type just wasn't cooperating with me to mix well (the greenish stuff). the last type is what i prefer but couldn't find at walmart when i went to get it at first. it's just the marine epoxy putty that G-force talks about. and that is what was used for the controller stuff. it's actually a solid color! :shock: :D
Life of Brian wrote:The indicator lights will be awesome.
that's what i thought! and i think having them right there helps keep the portable symmetrical.
Life of Brian wrote:So, the plastic in your last picture is going to be glued together to form a cartridge slot cover? Am I understanding you correctly?
yes, this is correct. it's hard to explain with that pic alone. i'll upload some better pics tonight. they are going to be glued and bondoed together and the entire thing will then screw onto the back half of the case. the nes cart slot will then screw into the bottom of the cover. i have some major work to do on this part still.
Life of Brian wrote:I'm really looking forward to this. I can't recall if anybody has actually completed an SNES/NES combo portable before, so you get extra awesome points for your project.


me too! yeah, i've looked all around to see if anyone has completed a 2-in-1 nes/snes. there has been talk of people doing one, but nothing to show for it. hopefully i will be able to bring this to fruition. sweet! extra awesome points! :o

User avatar
lovablechevy
Portablizer Extraordinaire
Posts:1104
Joined:Wed Nov 01, 2006 3:09 pm
Location:busy with a project
Contact:

Post by lovablechevy » Tue Mar 11, 2008 11:00 pm

ok, finally got home from work. now i'll upload my most recent progress.

Image
this is after only 1 layer of spot putty. i have done one more layer since this pic, but it doesn't look much different unless you really look at it. i still need to do 2 or 3 more coats.

Image
this is a very fast and rough mock-up of the cart slot cover for nes games. i still need to actually bondo all 3 pieces together. the two side pieces have the original screw posts from the retro duo in them. this will keep it nicely attached to the case. i also didn't have the actual nes slot in there at the time so i didn't know how far the game would actually stick up. the cart will stick out above the case about 1". this cannot be helped seeing that the nes carts are so dang big!

Image
all i've had time to do is simply detach the nes board from the snes board. don't worry, i'm not planning on leaving the plugs on there. this is just to show how the slot itself will be mounted. those screw posts have not been attached yet. i'm thinkin about shortening them a little bit. there does need to be some space for the wires to connect back to the snes board, but it doesn't need to be that much space. we'll see.

anyway, that is for the most part up to date. i haven't had any time to work on it this week. maybe tomorrow! :D
Last edited by lovablechevy on Wed Mar 18, 2009 10:12 am, edited 1 time in total.

User avatar
bacteria
Portablizer Extraordinaire
Posts:3984
Joined:Fri Apr 20, 2007 12:14 am
Location:Hampshire, UK
Contact:

Post by bacteria » Tue Mar 11, 2008 11:56 pm

Excellent so far.

This is evidence that uploading WIP guides is beneficial to people, as it encourages others to "have a go".

Looking nice so far, don't rush the work, make it the best you can.

Welcome to the forum!
Image

User avatar
Life of Brian
Moderator
Posts:2867
Joined:Wed Aug 03, 2005 5:55 pm
Location:Oklahoma
Contact:

Post by Life of Brian » Wed Mar 12, 2008 12:52 am

Jeez, at this rate you're going to be finished with your portable before I am :o

It's looking great and I like the NES cart slot.

I just thought of an acronym for a dual portable. Once I get around to making one I'm going to put "NESNES" somewhere on it. maybe
dragonhead wrote:sweet. ive spent a third of my life on benheck!
Image

User avatar
bacteria
Portablizer Extraordinaire
Posts:3984
Joined:Fri Apr 20, 2007 12:14 am
Location:Hampshire, UK
Contact:

Post by bacteria » Wed Mar 12, 2008 5:06 am

Or : SNes

We look forward to welcoming you loveablechevy, into the Portalizers group!

Keep your detailed progress report with pics coming. Try to think of something unique and add it to your project, rather than just a replication.
Image

User avatar
lovablechevy
Portablizer Extraordinaire
Posts:1104
Joined:Wed Nov 01, 2006 3:09 pm
Location:busy with a project
Contact:

Post by lovablechevy » Wed Mar 12, 2008 7:09 am

thanks for the comments guys!

i look forward to joining the portalizers also!
bacteria wrote:Try to think of something unique and add it to your project, rather than just a replication.
is perhaps completing the first nes/snes portable not unique enough...? :shock:

User avatar
lovablechevy
Portablizer Extraordinaire
Posts:1104
Joined:Wed Nov 01, 2006 3:09 pm
Location:busy with a project
Contact:

Post by lovablechevy » Sun Mar 16, 2008 9:38 pm

update time! :D

Image
i think i just have one more layer of spot putty to do to call it good. the left speaker holes i drilled on one shot. i think they look pretty good! it was impossible for me to get the right speaker holes perfect. i unfortunately had to do this side four times... by the 4th time, the drill only wanted to slip into previous holes. however, they are a lot straighter than the other 3 attempts. so much for perfection... *sigh...*

Image
i'm still not done with the l and r trigger buttons. i didn't notice until after i had super glued both in that the l button is spaced further up than the r button. plus, this button gave me a lot of difficulties gluing in. after the glue was dry, i started putting the epoxy on. apparently, there wasn't enough area that the glue was on. the button casing kept moving and slipping. that's why the epoxy is cracked and has a hole at the top. i'm going to have to re-epoxy this side and sand it down again. also, i've run into another problem. in my haste, i cut out too large of a section for the nes board... i'm going to have to put some back in on the left and right sides so that the screw posts for the cart slot cover have something to screw into... ergh...

Image
i need to do a lot of sanding still on the cart slot cover, but here is a more realistic mock-up. i incorrectly measured things in an earlier post. the nes games are only going to stick up above the case just over 1/2"! :o and just a side note, i realize that the bondo isn't mixed the best. i have two different types on the cover. that's why there is such a drastic difference in appearance.

since i'm not used to doing things like this, it's becoming a rather long and slow process. but, that's ok, cuz i think it's fun! i spent probably 6 hours today working on the case, hoping to get it basically done. and i wasn't even able to get to the cart slot cover... not to mention i'm not even done with the l and r buttons. but, i at least got some work done! over all, i'm rather pleased with today's work.

let me know what ya'll think!

User avatar
Life of Brian
Moderator
Posts:2867
Joined:Wed Aug 03, 2005 5:55 pm
Location:Oklahoma
Contact:

Post by Life of Brian » Sun Mar 16, 2008 9:54 pm

It's fantastic! The NES cart sticks up about the same as the SNES cart does on mine.

It's incredibly hard to get the l and r buttons to line up - I spent a long long time sanding, cutting, measuring, checking, testing, and sanding some more to get them to line up on mine. It was quite tedious.

You didn't drill those speaker holes freehand, did you? If so, props to you! I did it the easy way: I used a template.
Image

Spending hours and hours working on a project that could (at best) be classified as "oddball" is what we're all about here!
dragonhead wrote:sweet. ive spent a third of my life on benheck!
Image

User avatar
lovablechevy
Portablizer Extraordinaire
Posts:1104
Joined:Wed Nov 01, 2006 3:09 pm
Location:busy with a project
Contact:

Post by lovablechevy » Tue Mar 18, 2008 8:42 am

Life of Brian wrote:It's fantastic! The NES cart sticks up about the same as the SNES cart does on mine.

You didn't drill those speaker holes freehand, did you? If so, props to you! I did it the easy way: I used a template.

Spending hours and hours working on a project that could (at best) be classified as "oddball" is what we're all about here!
thanks for thinkin it's fantastic. it's nice to know that someone other than my parents are interested in my progress.

now that the nes cart only sticks up that far, i'm having problems matching the snes cart to the same height... but i will succeed!

goodness, no, i didn't do the speaker holes freehand. that would have been disastrous! i used perfboard. my problem with the right speakers is that i wanted there to be more holes originally. in fact, about twice as many. but that just didn't work.

yes, "oddball" we are. of course, my best friend likes to phrase it simply as, "you're a nerd, sharon!"

hopefully my batteries will get here in the not too distant future. that's what's holding me up on the electronics side of this project...

User avatar
lovablechevy
Portablizer Extraordinaire
Posts:1104
Joined:Wed Nov 01, 2006 3:09 pm
Location:busy with a project
Contact:

Post by lovablechevy » Sun Mar 23, 2008 8:46 pm

i finally had some time to work on this today. i wasn't able to get that much done, but here's an update!

Image
so i put the primer on. the picture looks a lot better than it is in real life. i now understand how everyone says that the paint really makes flaws noticeable! i have quite a bit of sanding and spot putty-ing to do still. it's nice to see the front in a solid color now!

Image
i got a little excited and decided to do a mock-up of the front with controls.

Image
the back half still needs tons of work. things just aren't working out for me the way i want them to. i got around to drilling the holes for the cart slot cover to be screwed to. i then tested out screwing it on, and, as you can see in the picture, the upper left post ripped away from the rest of the cover. ergh...

anyway, that's the progress for the most part.

i hope you all had a wonderful easter!
they call me the Queen of Bondo, though maybe i should be called the Queen of Epoxy Putty

Image

current project - code name: blue mushroom!

User avatar
Life of Brian
Moderator
Posts:2867
Joined:Wed Aug 03, 2005 5:55 pm
Location:Oklahoma
Contact:

Post by Life of Brian » Mon Mar 24, 2008 12:02 am

Heck yeah! It's looking great!
dragonhead wrote:sweet. ive spent a third of my life on benheck!
Image

User avatar
shmagoogin77
Portablizer
Posts:1469
Joined:Sun Apr 17, 2005 6:10 pm
Location:My desk
Contact:

Post by shmagoogin77 » Wed Mar 26, 2008 6:58 pm

this thing is really amazing for a first portable :D
your case work is incredible
i would like to tackle something like this

User avatar
Tibia
Posts:1319
Joined:Thu Feb 28, 2008 2:02 pm
PSN Username:Tibia1013
Steam ID:Mulder101361
Location:Istanbul, not Constantinople
Contact:

Post by Tibia » Wed Mar 26, 2008 9:38 pm

Is that grey going to be your final color? I think it looks great with the blue buttons! You are doing some awesome work!

Post Reply