I designed my own power board for this project, but I made it so that it could be used for other projects as well:

The power board makes it so that the wall adapter and batteries are switched in and out automatically. It's configured so that the wall and batteries are never connected at the same time, so there's no unwanted charging or anything like that on the batteries. It has a PIC microcontroller on board for power switching and power line monitoring. I'm also able to change the duty cycle of the fan using one of the two external push buttons. I eventually hope to add a temperature sensor so that the PIC can automatically adjust the speed of the fan depending on the temperature of the N64 processors.
Unfortunately I made a silly mistake when thinking about the circuit design for this board, so I had to do some modifications. Rather than using power MOSFETs for switching the batteries, I had to use relays instead. Ultimately it's a better solution, but it takes up much more space.
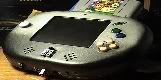
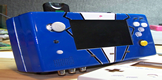
Various pictures of my portable:

Ocarina of time seems to be the standard for picture taking!


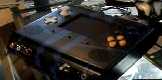
Showing the batteries I use and the battery compartments in the back:

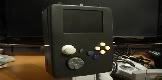
It can fit two 4000mAh batteries for a total of 8000mAh...should be able to run it for 4 hours or so (this might be conservative, but the batteries are kind of old so I expect their capacity to have dwindled a bit) It has a built in memory card, uses the expansion pack, and I was able to keep all the buttons that are on the N64 controller including the L-button since I like the kirby 64 game! It's a bit thicker than I would have liked, but that's because I was greedy about the battery size since I wanted it to be able to run for along time and more powerful batteries equals more space. But even with this thickness it's surprisingly comfortable to hold.
I've configured the PIC to run in a very low power mode, so it should take much less than 5mA while running, thus having a minimal impact on the batteries. I plan to add a power indicator LED soon, which will be very easy using the A/D of the PIC and possibly a PWM output depending on how I want it to work. The two buttons above the c-buttons are the power button and the extra button. To turn it on, simply hold the upper button for about 1 second and it will turn on. The second button I'm not sure what to do with really. For now I have it set so that pressing the button will toggle through different fan speeds. Anyone have any ideas for that second free button?